I’ve written about a solution for the issue with Solr cores getting locked when using an Azure App Service before but we still had intermittent issues even with this solution provided by Sitecore support.
TLDR - follow these steps to add the script to re-start Solr if there are issues.
Why does this happen?
Talking to others it seems the App Service storage is shared, therefore If only one Service is running all is fine. But disk locks can occur when Azure tries to run more Solr instances, e.g. when: scaling, overlapped recycle, internal azure load balancing, fail over etc.
Ok how do I fix it?
On a previous project I started looking at an solution (based on an answer on SSE from BikerP [Pete Newal] a while back) to check the service status periodically and restart Solr automatically when it errors like this, but never completed it due to other priorities.
I’ve revisited this on an recent project though and have it working so wanted to share the solution for others to benefit from.
What does the solution involve?
- Creating an automation account, Runbook and Managed Identity for the Job
- A PowerShell script which:
– Checks the status endpoint for any errors returned (this endpoint checks all Cores)
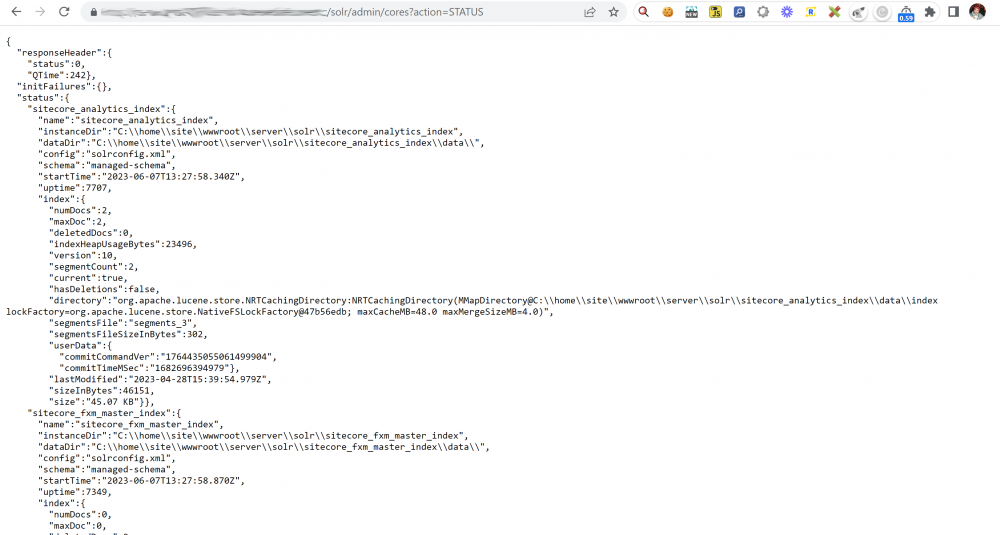 – Logs out any errors and uses the Managed Identity to restart the app service if there is an error
- Enabling logging sending the logs into the log analytics workspace
- Setting up a schedule to run the script to check Solr every x minutes
- Setting up an alert monitor which emails if ‘Solr Down’ is found in the automation account logs
Step 1 – Create the Azure Automation Account
We first need to setup an Automation account to hold our Runbook.
1. Create a new automation account in the correct Resource group:
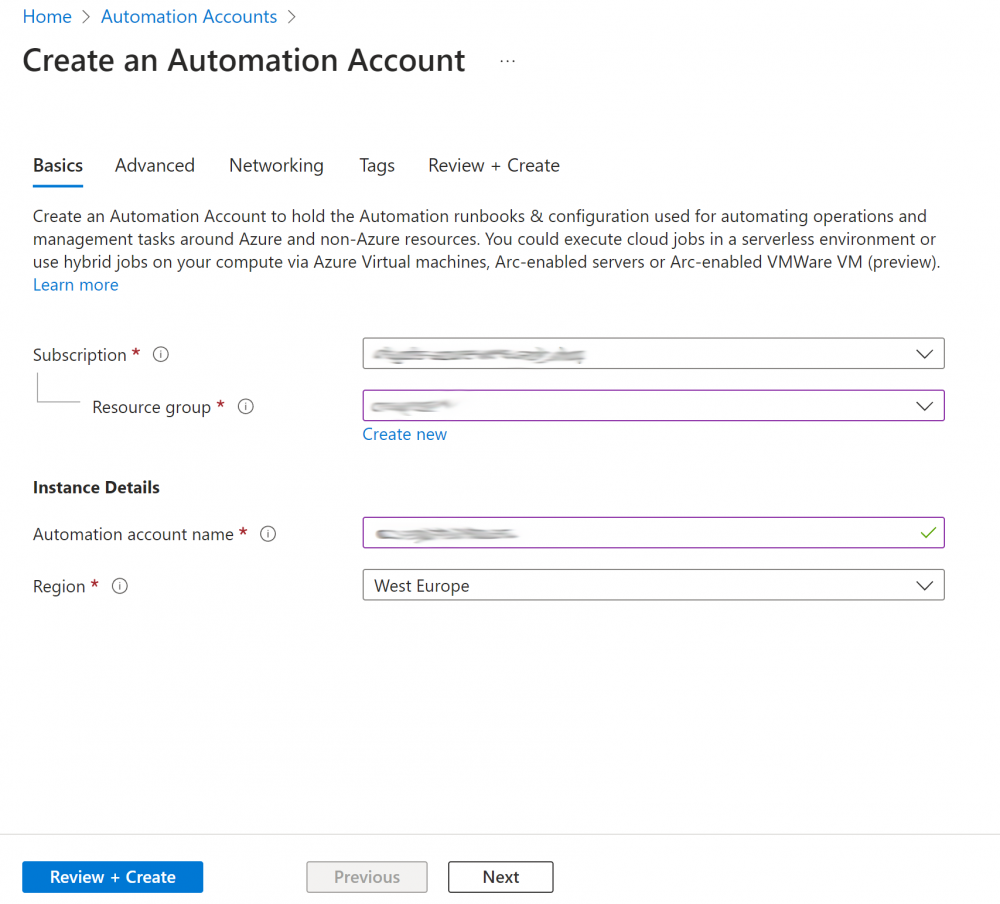
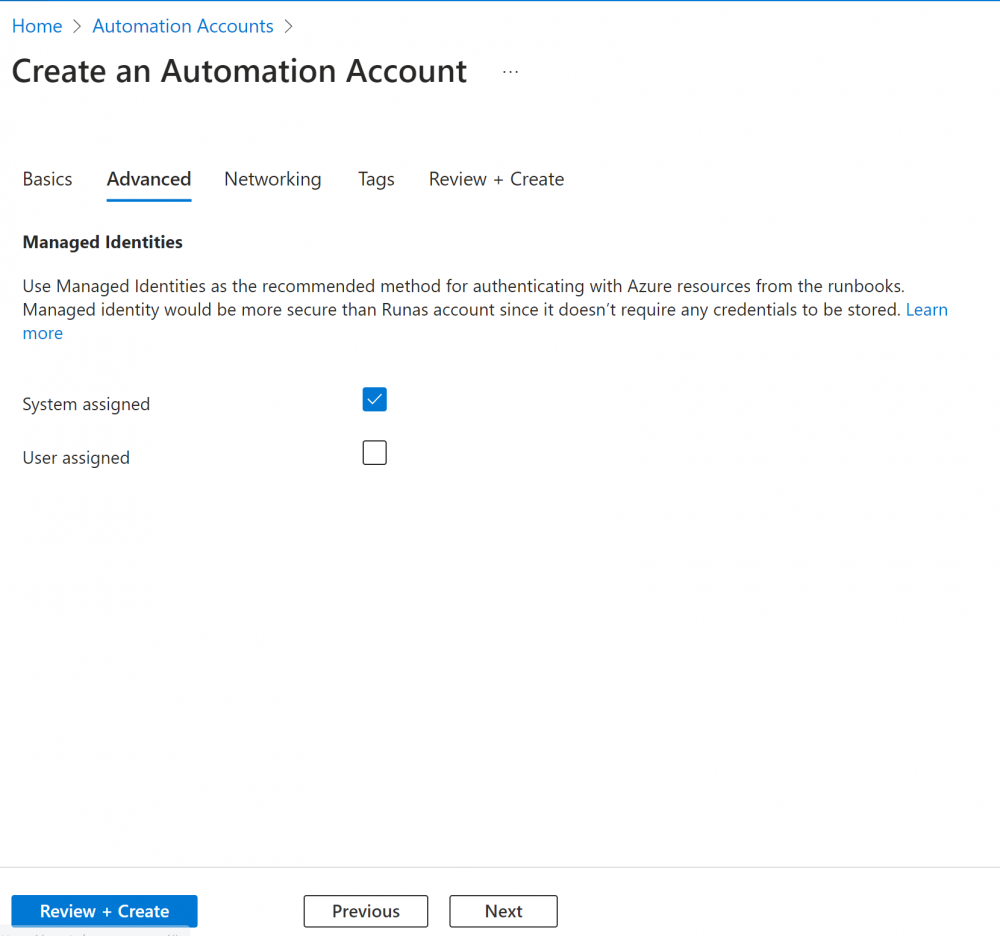
2. Ensure ‘System Assigned’ Managed Identifies is ticked under the ‘Advanced’ tab:
Step 2 – Create the Run Book & Add the Script
We are going to create an Agent based Hybrid Runbook Worker to run the Script.
Note: These need to be migrated to Extension Based Hybrid workers by August 2024. However Microsoft provide a simple approach to do this. I haven’t used these yet as I don’t have VMs available to run the workers.
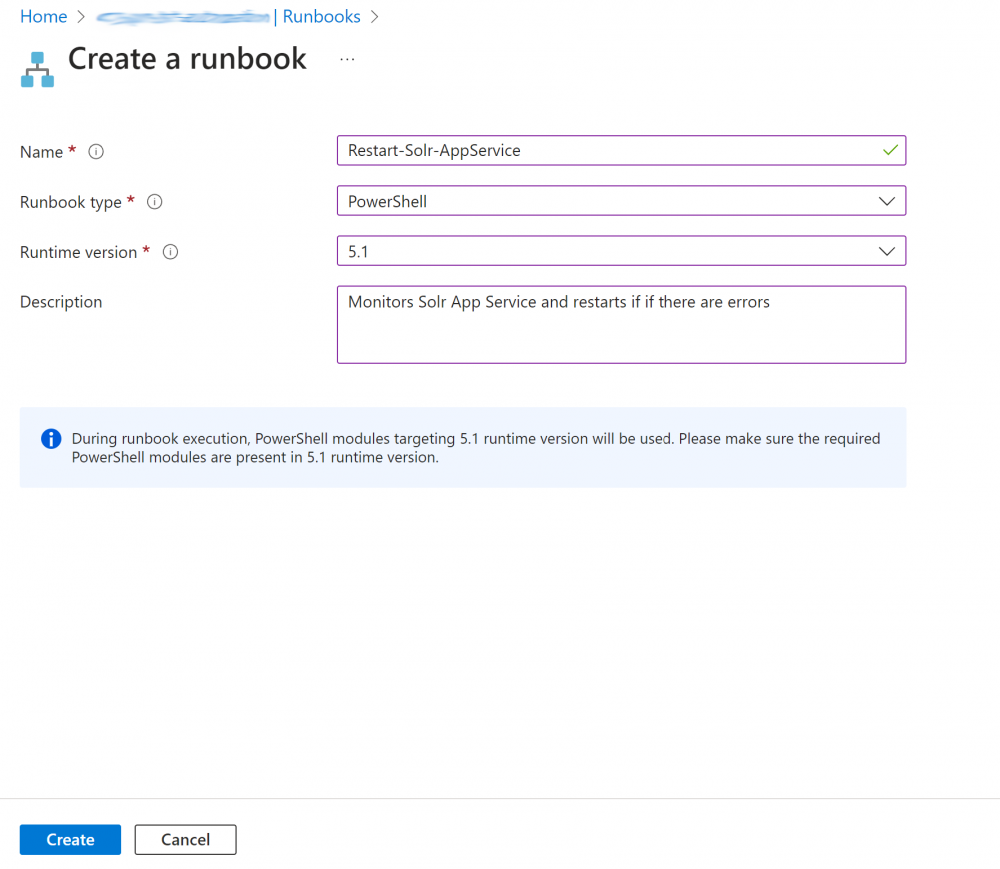
1. Create the Runbook using a name similar to below and choosing the runbook type of ‘PowerShell’ and runtime version 5.1:
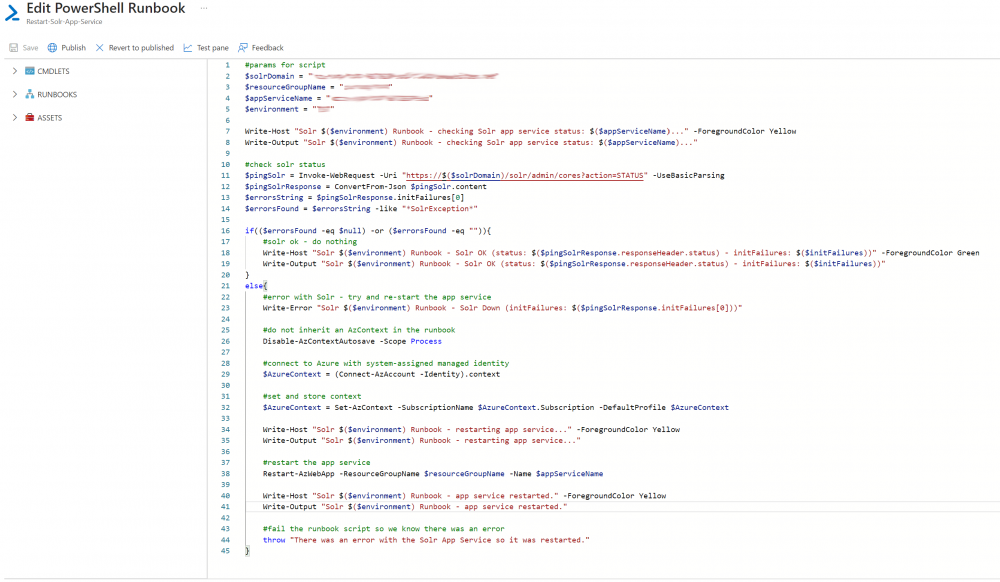
2. Add the PowerShell Script below to the Runbook pane and update the 4 parameter’s at the top of the script for: $solrDomain, $resourceGroupName, $appServiceName, $environment:
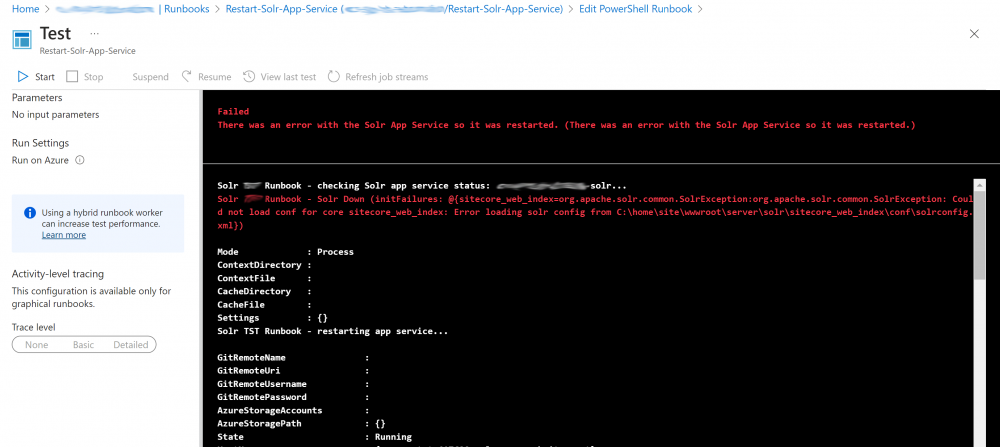
3. Save the Runbook an then click the ‘Test pane’ tab and run the script to test it.
Note: You can break Solr on purpose by adding invalid xml (e.g <test> before the closing tag) to the solrconfig.xml file will see an error like so:
Step 3 – Create the Managed Identify Role
The new method of Automation accounts being able to access resources (such as VMs) is to use Managed Identifies. Last time I looked at this I used RunAsAccount but this is no longer recommended.
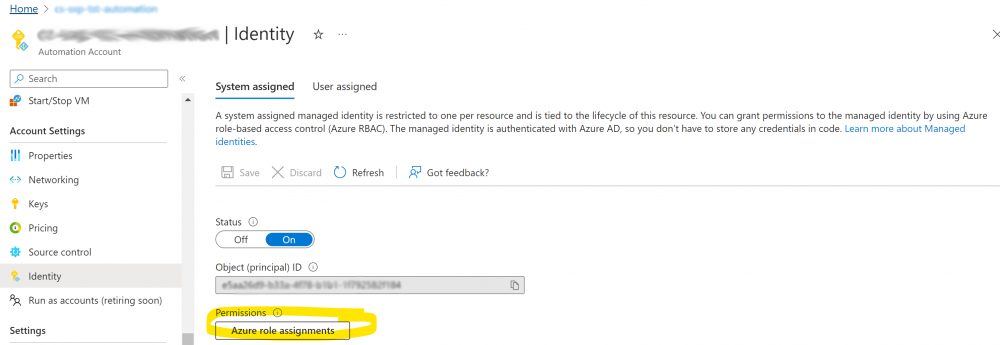
1. Under the automation account click on ‘Identity’ in ‘Account Settings’ and click the ‘Azure role assignments’ button:
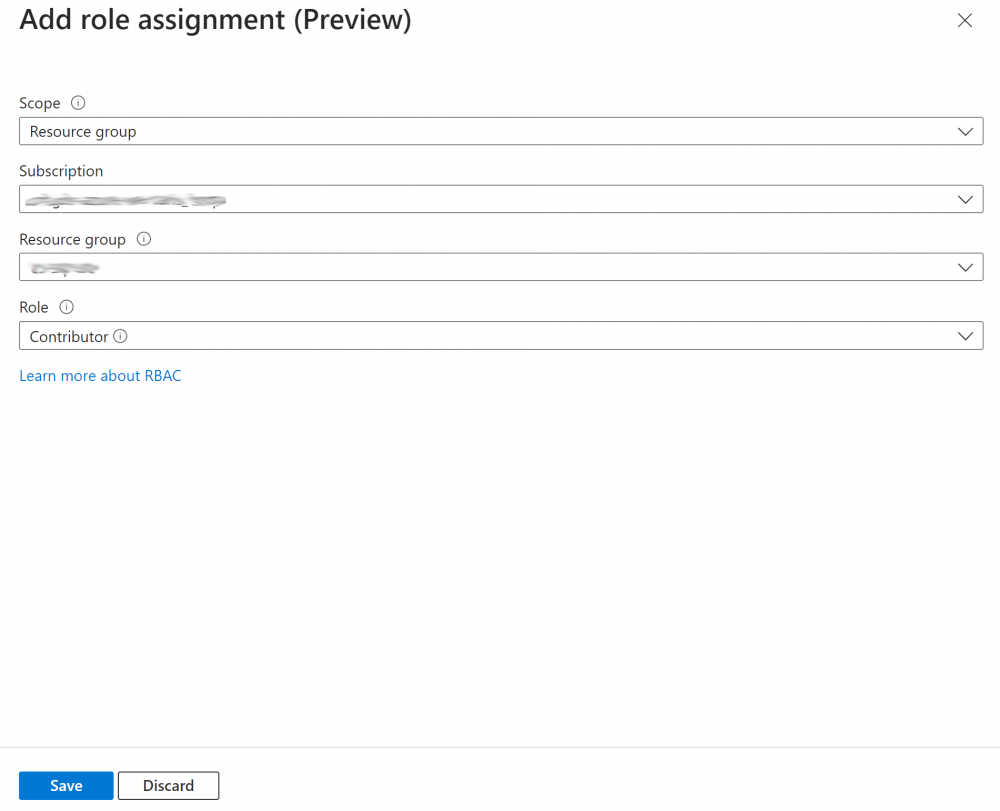
2. Click the ‘add role assignment’ button:

3. Choose ‘Resource group’ as the scope, and choose the correct subscription and select the correct Resource group and the ‘Contributor’ role and save
(Note: I couldn’t find a better role that has perms to re-start App Services – please let me know if there is one):
Step 4 – Enable logging
In order to be able to view the logs from the Runbook in the Log Analytics workspace we need to enable logging.
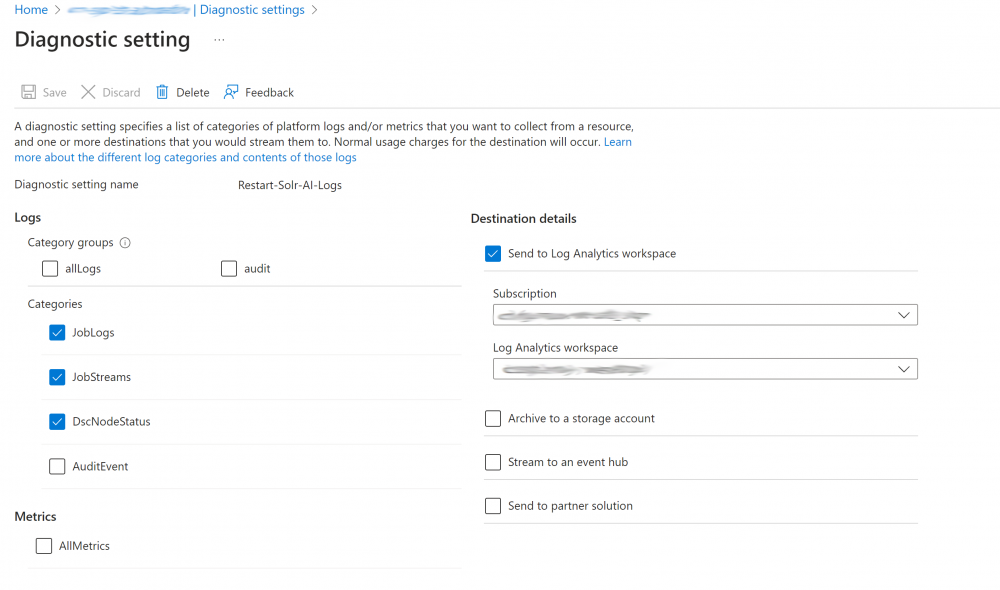
1. Under the automation account click ‘Diagnostic settings’ and click the ‘+ Add diagnostic setting’ link:

2. Enter a name for the Diagnostic setting and tick ‘JobLogs’, ‘JobStreams’ and ‘DscNodeStatus’. Also tick to ‘Send to Log Analytics workspace’ and select the correct subscription and workspace and save:
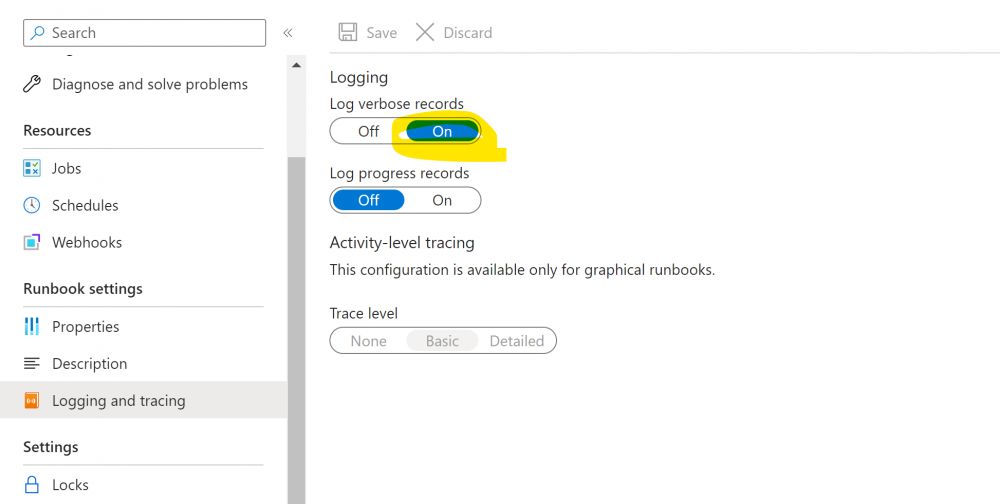
3. Under the Runbook click ‘Logging and tracing’ and enable verbose records (this shows more detail in the logs).
Step 5 – Set up the Scheduler
Here we are going to check Solr every 15 minutes but depending on the environment you may wish to do this more of less frequently.
Note: It’s possible to use a Webhook to schedule your RunBook so you can look at that option instead if you prefer.
1. Under the runbook click link schedule and add schedule:

2. Add a schedule starting in at least 15 minutes time (ideally on the hour so it’s simple to understand). Add a name and description and start time. Recur this every 1 hour (minutes are not supported). Set the expiry to No and click ‘Create’:
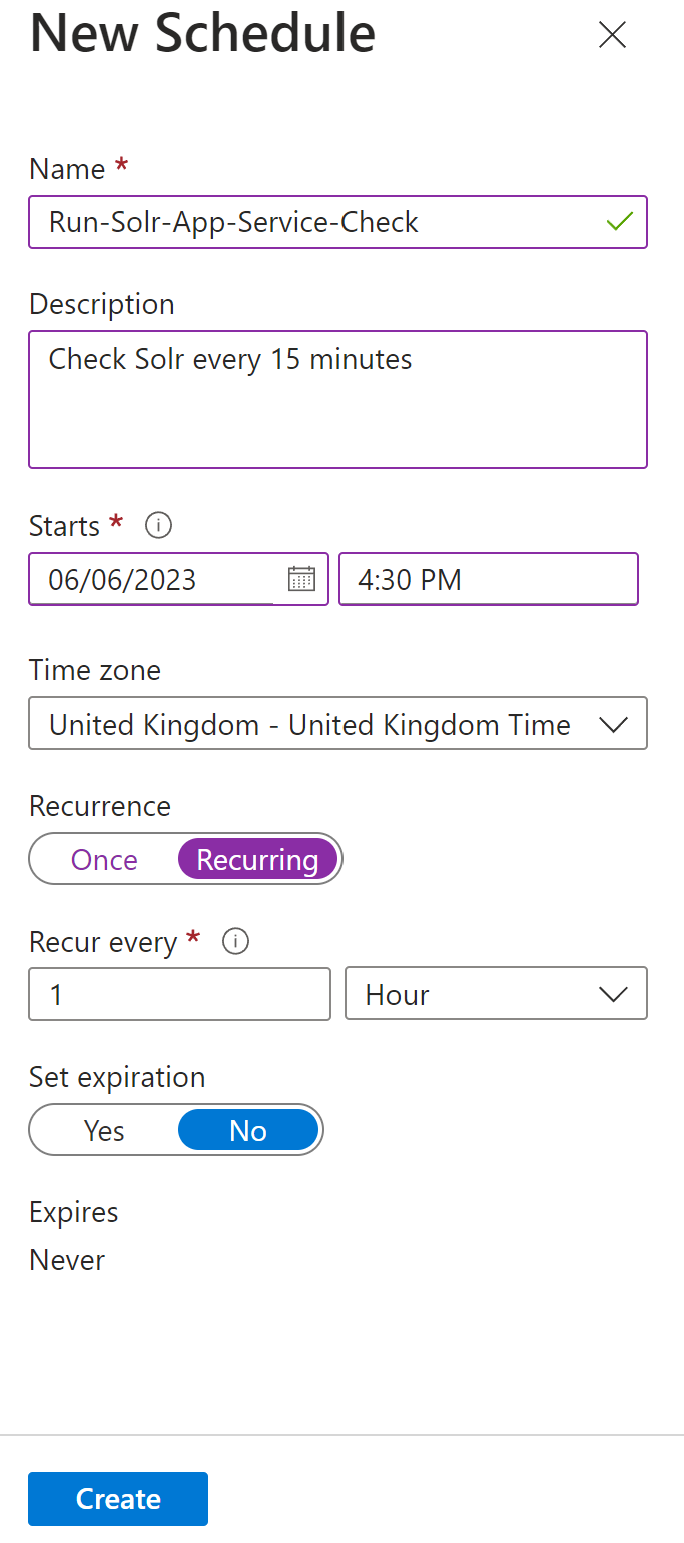
3. Do this 3 more times with each Schedule starting 15 minutes after the last one so you have 4 in total starting on the hour and finishing at quarter to the hour. This will result in the Job running every 15 minutes all day and night:

4. Link each of these Schedules to the Runbook by clicking the ‘Link a schedule to your runbook’ link and selecting each in turn:

Step 6 – Set up the Alert Monitor
In order to notify of any issues automatically we will setup an Alert which will check once a day and send an email. In other environments you would want to have these alerts fire much more frequently.
1. Under the automation account click ‘Alerts’ and click the ‘+ Add diagnostic setting’:
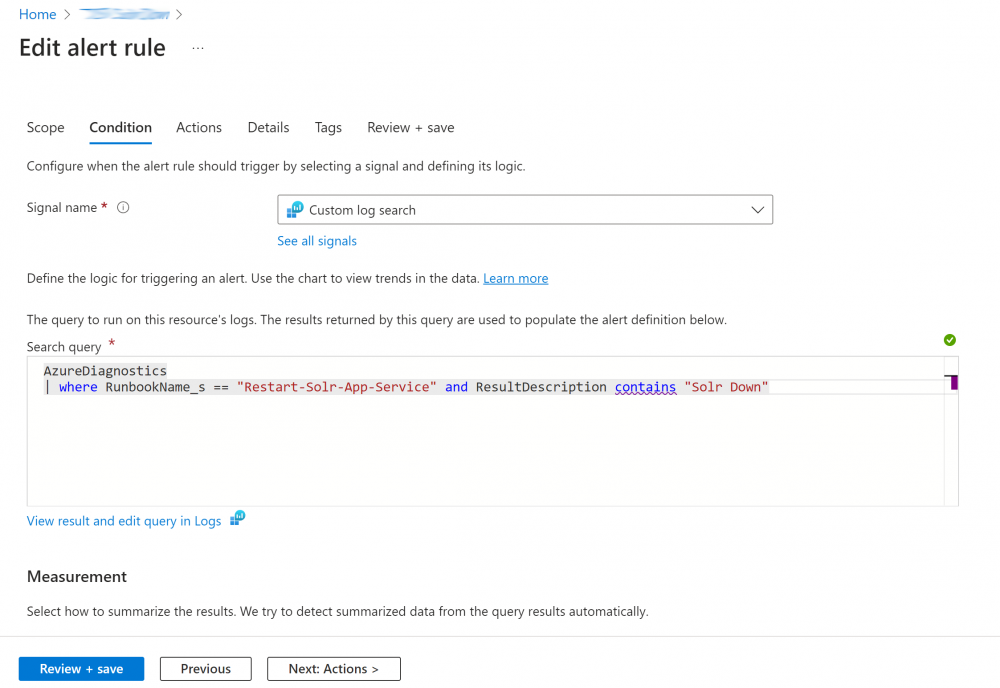
2. Add the search query below, change the RunbookName_s value to match your Runbook name and click next:
AzureDiagnostics
| where RunbookName_s == "Restart-Solr-App-Service" and ResultDescription contains "Solr Down" and TimeGenerated >= now(-24h)
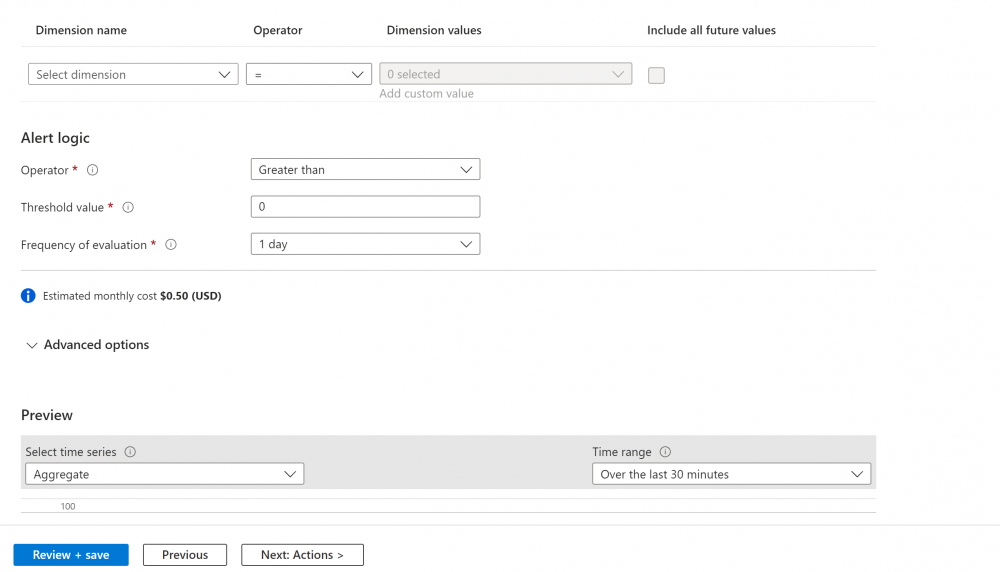
3. Under the conditions tab set the alert logic threshold to 0 and frequency 1 and click next:
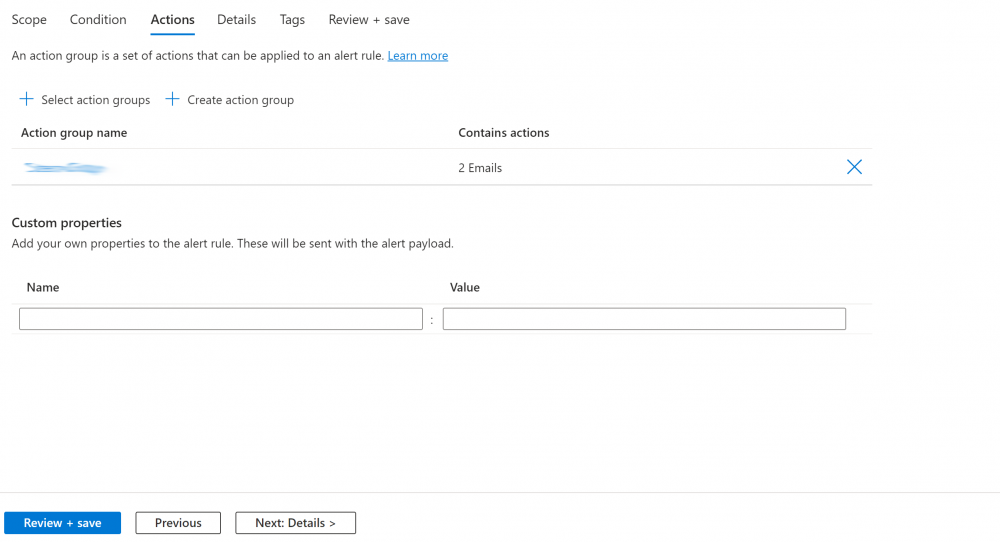
4. Under the actions tab choose/create an group to send emails to when the alert fires and click next:
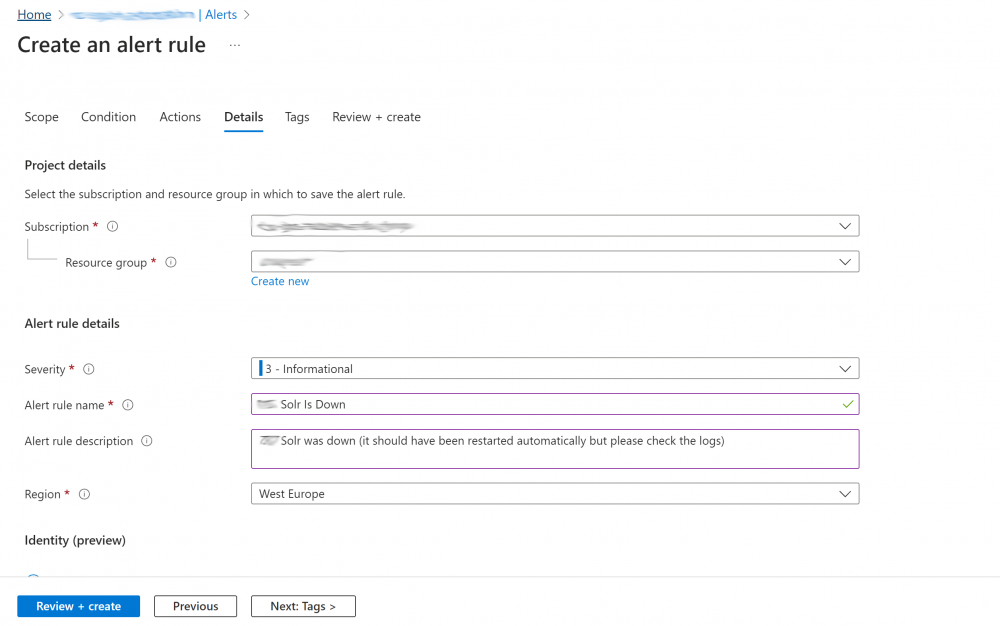
5. Under the details tab set the correct subscription and resource group, set the Severity and enter a Rule name and description, click ‘Review + create’:
Step 7 – Test everything works as Expected
Under the Runbook click on the Jobs link and check the Job is running every 15 minutes as expected. If it isn’t check you’ve linked the 4 schedules and also got the Start times setup correctly.
If the check fails you will see a x and ‘Failed’ as the status:

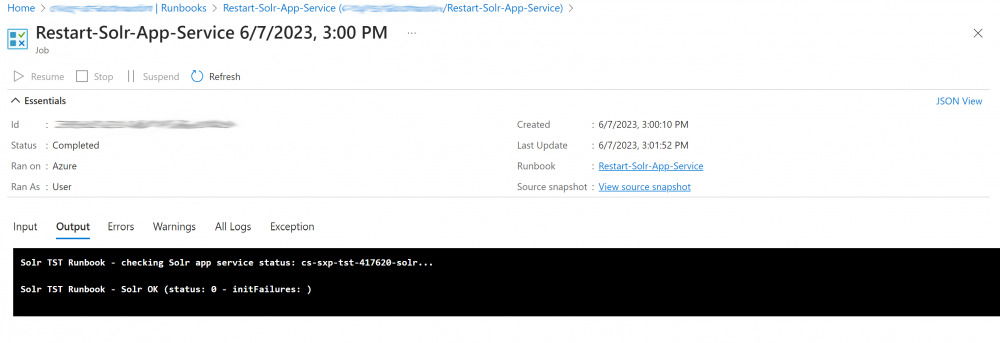
If you click on the Job you should be able to see the logs and see if the job is running correctly:
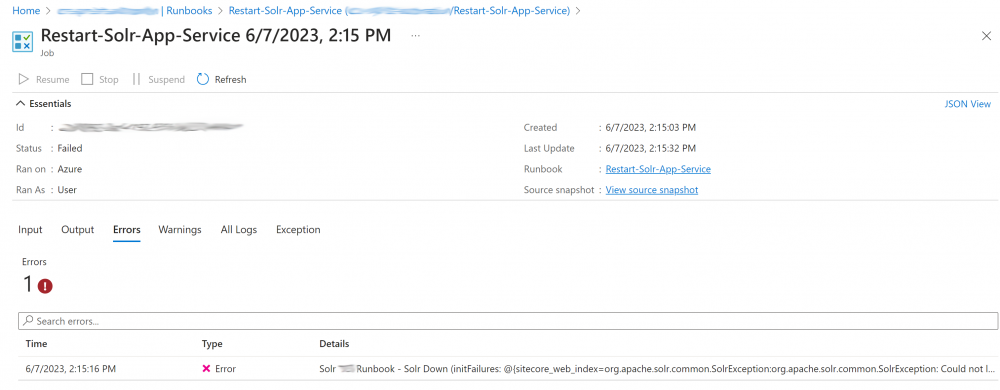
If there are errors you will see these logged out also:
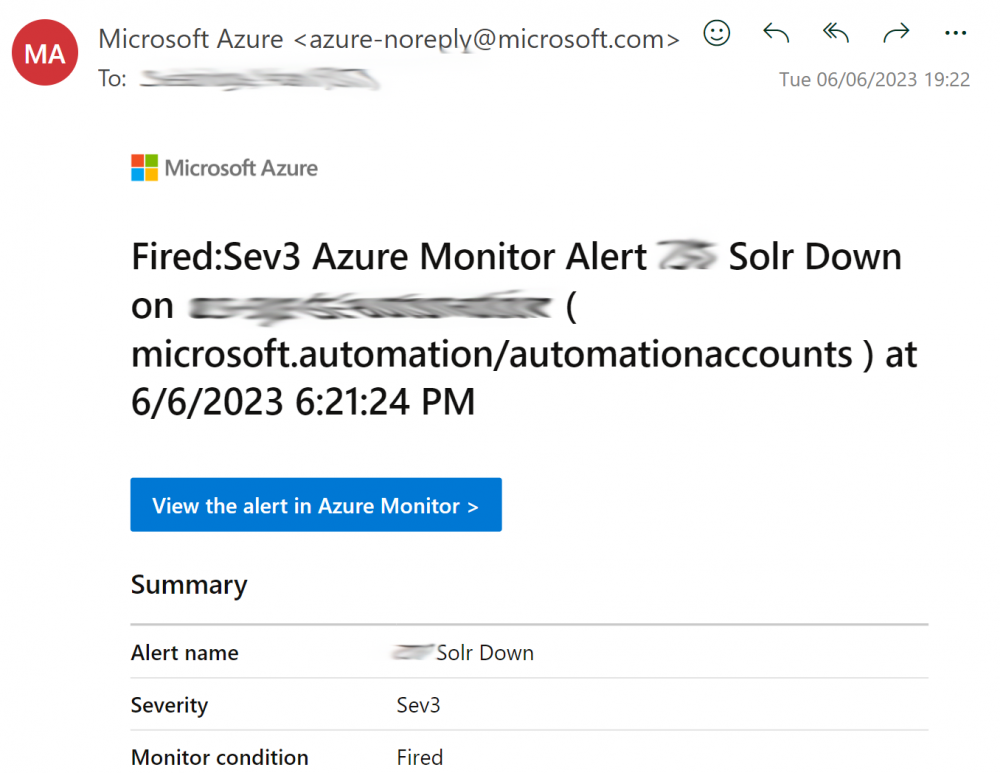
You should also get an email if there are errors and this is setup correctly in your alert:
Useful Links
There were some useful links that helped with all of the above which I’ve listed below:
https://adamtheautomator.com/azure-vm-schedule/
https://www.sharepointdiary.com/2020/11/sharepoint-online-schedule-powershell-script-using-azure-automation.html
https://stackoverflow.com/questions/69410570/how-to-automatically-run-a-powershell-script-in-azure
https://blog.tyang.org/2018/03/18/creating-azure-monitor-alerts-using-azure-log-analytics-query-language-based-on-azure-automation-runbook-job-output/
https://learn.microsoft.com/en-us/azure/active-directory/managed-identities-azure-resources/overview
https://azureis.fun/posts/Update-Azure-Automation-Account-To-Use-Managed-Identity/
https://stackoverflow.com/questions/48414477/azurerunasconnection-has-not-exist-after-create-automation-account-with-run-as-a
We are not using this solution in production yet, but so far it seems to be working well from our testing. Hopefully it’s useful for others who have this issue with core locking on Azure App Services.
