Enabling Code Coverage for Sitecore with Coverlet & Github Actions

Last week I was tasked with enabling Code Coverage in our Sitecore Visual Studio solution and getting it into CodeCov (via our build pipeline). I ended up going down quite the Rabbit hole of different options and hitting a lot of brick walls along the way.

I finally figured it out and got it working though so thought I’d share my findings and what I did in the end to get this working.

TLDR - add this to your CI workflow in Github actions and adjust the settings as required.

What is Code Coverage?

In simple terms it gives you an idea of how many of your lines of code are covered by tests and therefore how confident you can be in making changes and releasing without breaking things. I’m not going to get into if this is a good idea, how accurate it is as a indication of the quality of your tests or if it’s a waste of time here – as I was just asked to get it setup and working. I don’t think were aiming for 100% code-coverage but we want to know the level of coverage we have and where we need to improve it. By the way the header image above is a lie (I hacked it together) – 100% sure looks nice though :-).

What Code Coverage options are there?

There are quite a few, but some of them are paid for. Given the cost cutting across the board at the moment I felt free ones were best to investigate first. The ones I looked at were as follows:

Selected Tools

Read more below on reasoning but in the end I went with the following:

After trying AltCover for a while and struggling to get the filtering working on various dlls I decided to try Coverlet. Coverlet seems to be the defecto standard and is included by default in ASP.NET 6.0+ projects and .NET Core projects in Visual Studio now.

As our Sitecore 10.3 project is traditional MVC, we are tied to .NET 4.8 framework. Also our projects are fairly legacy and have been upgraded a few times. Therefore it’s not possible to install Coverlet as an NuGet package within the test projects and use MSBuild as Id like to have. It seems this is only possible for newer SDK style projects or .NET core ones and not .NET Framework classic projects. So I had to instead go for using the Coverlet console – which in the end worked pretty well.

How do I use it?

So first you need to install it the coverlet console globally like so:

dotnet tool install --global coverlet.console

Then for each of your test projects you need to execute a command like so:

coverlet "C:\Projects\sc103-flux\src\Foundation\Accounts\Tests\bin\FluxDigital.Foundation.Accounts.Tests.dll" --target "C:\Program Files (x86)\Microsoft Visual Studio19\Community\Common7\IDE\Extensions\TestPlatform\vstest.console" --targetargs "C:\Projects\sc103-flux\src\Foundation\Accounts\Tests\bin\FluxDigital.Foundation.Accounts.Tests.dll /Parallel /Logger:TRX" --output "C:\Projects\sc103-flux\coverlet\coverlet-report1.cobertura" --format cobertura --include "[FluxDigital.*]*" --verbosity detailed

What this does is pass your test project dll to Coverlet and tell it to run Xunit to execute the tests. We also send some Params to XUnit to ensure it runs the the tests in parallel and logs out to the console. Lastly we pass some Params to the coverlet to tell it to filter on certain dlls as – otherwise it seems to try and monitor/test 3rd party dlls as well as our code. If you get any errrors in the console it might be because you are not filtering everything out you need to.

So to break it down in more detail:

  • coverlet – runs the coverlet console
  • “..\FluxDigital.Foundation.Accounts.Tests.dll” – this is the test project dll to run codecoverage on
  • –target  ..\vstest.console” – the path to the VSTest console, ensure this path is correct for your version of Visual Studio
  • /Parallel – runs the tests in VSTest in Parallel
  • /Logger:TRX – log out details to the console from VSTest
  • –targetargs “..\FluxDigital.Foundation.Accounts.Tests.dll” – the path to the dll your are testing again. This time for VSTest
  • –output “..\coverlet-cobertura1.cobertura” – the report file saved at the end of the test run.
  • –format cobertura – format for the above report file (this format allows us to merge the files from different test runs)
  • –include “[FluxDigital.]” – this paramater lets you filter out assemblies (dlls) and/or method to include by name. In my case I only want to include the CodeCoverage of dlls that start with “FluxDigital.” so this filters to just include these. I think you can actually add multiple include params if you wish (see below). 
  • –exclude “[]Model” –exclude “[FluxDigital.Foundation.Models]” –exclude “[]Controller*” – I’m not actually using these filters in my command above but if you want to you add multiple exclude parameters, e.g to exclude any Models or Controllers from Coverlet for example. 
  • –verbosity detailed – This tells Coverlet to output a lot of detail when running the code coverage, it’s really useful for debugging any issues.

I found some info here on include/exclude filtering and it was really helpful. Essentially patterns in brackets [my.dll.name] are assemblies and patterns outside of brackets “*my.class.name” are classes/methods.


Once it runs you will get a code coverage report which you will note is In the cultura format. The reason for this is that we want to merge all of our tests into one code coverage file and other formats don’t work for this. More on this later. 

You need to run a similar command (change the test dll and report name) for each test library and save the code coverage file out with a different name but in the same folder. In my case this was 9 test projects and therefore 9 code coverage files generated. Like so:

Running this 9 times in our build pipeline isn’t going to cut it, so you will see I solved this later using PowerShell to find all test dlls and run these commands automatically – but I wanted to explain how this works more simply first.

Report Generator

To merge them I used ReportGenerator. We will also use this tool later to upload the report to CodeCov. First we need to install it like so:

dotnet tool install -g dotnet-reportgenerator-globaltool

Then with the following command we can merge the files (ensure the path is correct to find your individual cobertura report files):

reportgenerator "-reports:C:\Projects\sc103-flux\coverlet\*.cobertura" "-targetdir:C:\Projects\sc103-flux\coverlet\report" -reporttypes:Cobertura

This gives us an Cobertura xml file with all code coverage data blended into one and generates an html report from it.
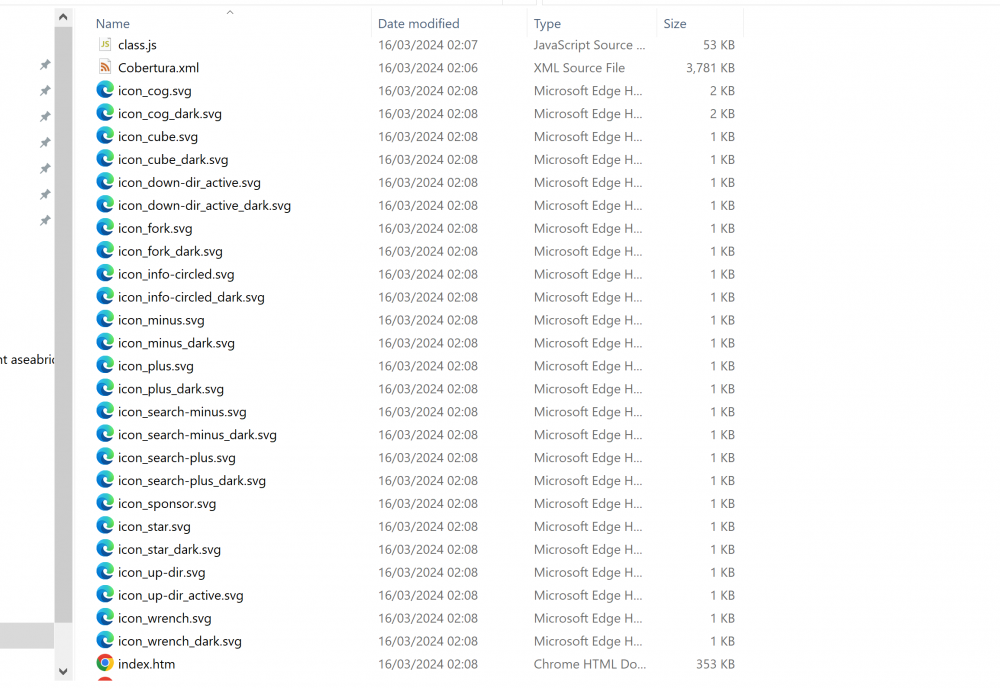
If you open up the index.html file in your browser you will see a summary of your Code Coverage at the top and then a breakdown by Assembly below that. Hmm 22%, not great at all. We have some work to do here to improve this, but that’s a job for another day.
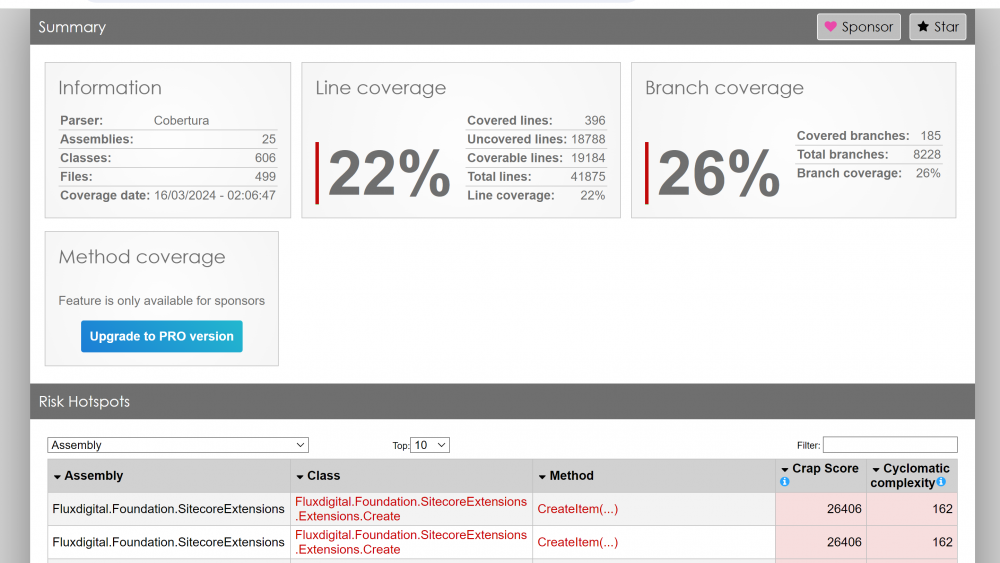
This report is pretty neat though and is already enough for you to see where the gaps are in your coverage so you can decide where you need to add more tests.

Putting everything into Github Actions

The next step is to run this in the build pipeline (in our case Github Actions) and use Report Generator to send the file to CodeCov.

Running Coverlet via PowerShell for all Test Projects

A mentioned earlier in order to make this simpler to run in the build pipeline and maintainable I decided to write an PowerShell script which finds all test dlls that match a specific pattern (it ensures an unique list) and then executes the coverlet command (from above) for each dll in turn with VSTest Console.

This is what I came up with:

$basePath = "."
$reportPath = "coverlet"
$incNamePattern = "*Fluxdigital*test*.dll"
$incVSTestNamePattern = "[Fluxdigital.*]*"

#get all test dlls in the solution - filter here to reduce duplicates
$testdlls = (Get-ChildItem $basePath -include $($incNamePattern) -recurse | ? {$_.FullName -match 'Release' -and $_.FullName -notmatch 'obj' -and $_.FullName -notmatch 'LocalPublish'}).FullName 
        
#write-host "$($testdlls.Count) test dlls found..."
[System.Collections.ArrayList]$uniquedlls = @()

#ensure we only get each test dll once by adding them to an arraylist
foreach ($testdll in $testdlls){
    $fileName = [System.IO.Path]::GetFileName($testdll)
    #write-host "checking for $($fileName)"
    if($uniquedlls -match $fileName){
#write-host "allready in array"
    }
    else{
$uniquedlls.Add($testdll) | out-null 
    }
}

#run coverlet for each test dll in the list
write-host "$($uniquedlls.Count) unique test dlls found..."
foreach ($uniquedll in $uniquedlls){
$fileName = [System.IO.Path]::GetFileName($uniquedll)
$cmd = @"
coverlet $($uniquedll) --target "vstest.console.exe" --targetargs "$($uniquedll)" --output "$($reportPath)\coverlet-$($fileName.Replace('.dll','')).cobertura" --format cobertura --include "$($incVSTestNamePattern)" --verbosity detailed
"@
write-host "running tests for: $($fileName) - report path: $($reportPath)\coverlet-$($fileName.Replace('.dll','')).cobertura"
$($cmd) | cmd
}

This is used in the Github Action below so you will need to update the $incNamePattern and $incVSTestNamePattern to match your test dlls when using it in your Github workflow. You could obviously just use it locally to generate a report too.

The Final Github Actions YAML

In order to use Coverlet, VS Test, Report Generator in Github Actions I needed to add some steps in the build pipeline to install the tools. I also wanted to show the code coverage in the Github action summary so eventually found an market place action that would do that (and work with Windows runners) and then finally an action to send the report to Code Cov. Note you will need to update this action with your repo details and Code Cov token (in secrets).

Please review all the settings below too before trying this in your CI pipeline:

Just like running Coverlet locally from the command line you get a summary as it runs in Github too so it’s easy to debug any issues:

The report summary looks like so, pretty cool I think. You can configure this to work for PRs too if you wish.
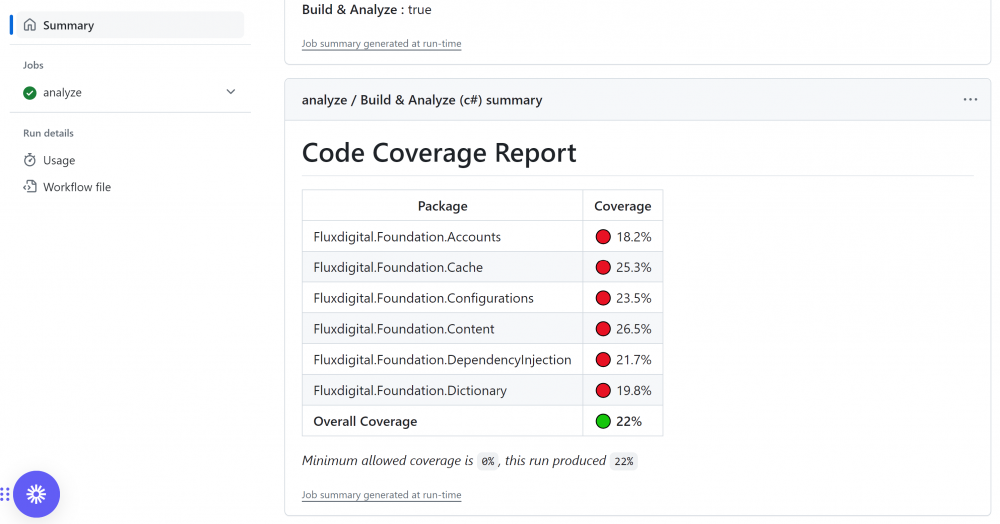
Once you have this all working you may need to reduce the log levels so it’s not as noisy in the console.

Incidentally AltCover seems very clever and if you can get it to work correctly for you might be better than Coverlet, so give it a try also if you have time.

Hopefully this is useful for others who need to get Code Coverage setup for legacy Sitecore MVC projects (or other older .NET Framework projects). I’m sure a very similar approach would work in Azure Devops or other CI/CD platforms too. I’m off to write some more Unit tests.

As always there were a lot of useful links out there that helped me with this in addition to the ones I’ve included above:

https://blog.ndepend.com/guide-code-coverage-tools/
https://medium.com/@justingoldberg_2282/setting-up-code-coverage-with-net-xunit-and-teamcity-for-a-solution-with-multiple-test-projects-5d0986db788b

https://stackoverflow.com/questions/67058242/using-coverlet-with-net-framework-generates-an-error-the-expression-system-v

https://stackoverflow.com/questions/60707310/is-it-possible-to-get-code-coverage-of-net-framework-project-using-coverlet-in

https://stackoverflow.com/questions/60838586/how-to-output-code-coverage-results-file-of-solution-tests-to-solution-directory

https://stackoverflow.com/questions/62512661/how-to-generate-line-coverage-report-with-vstest-console-exe

My Sitecore SUGCON 2023 Takeaways – Day 2

> DAY ONE - If you haven't read about Day One you can read it here.

SUGCON DAY 2

IMG_0478

The 2nd Day of SUGCON started bright an early so after a quick breakfast and cup of tea at the hotel I headed down to the first session I’d planned to see.

Rob’s session is one of the key sessions I really didn’t want to miss this year. A few clients I’ve spoken to recently (and other Sitecore Dev’s I’ve chatted to at SUGCON so far) are facing this challenge:

‘How do we move to XM Cloud from XP and what do we need to consider?’

– so I was keen to learn from Rob’s experiences.

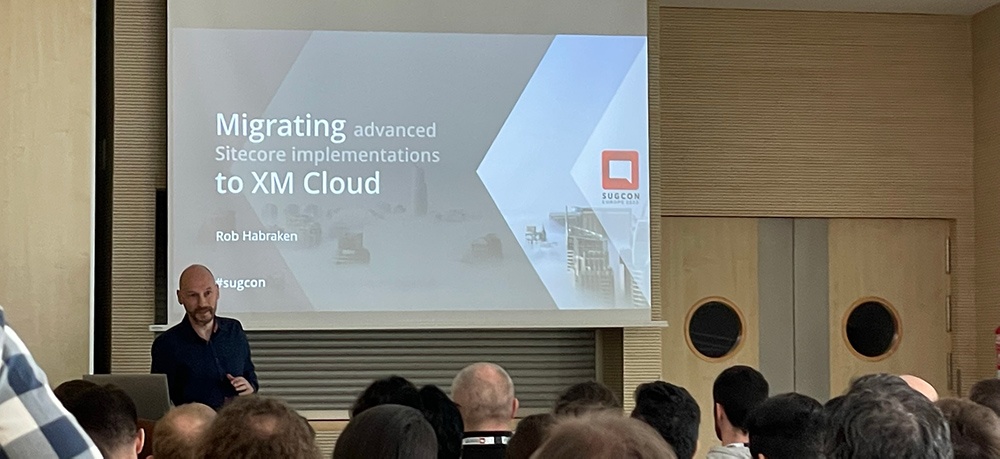
Migrating advanced Sitecore implementations to XM Cloud – Rob Habraken
rob-xm-cloud-banner

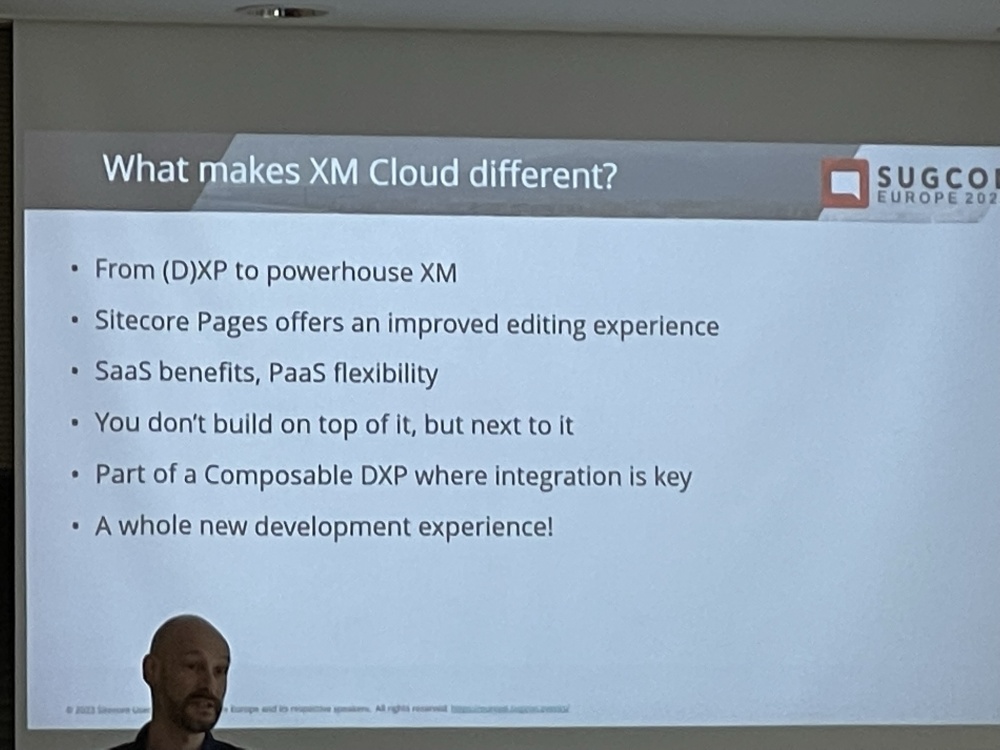
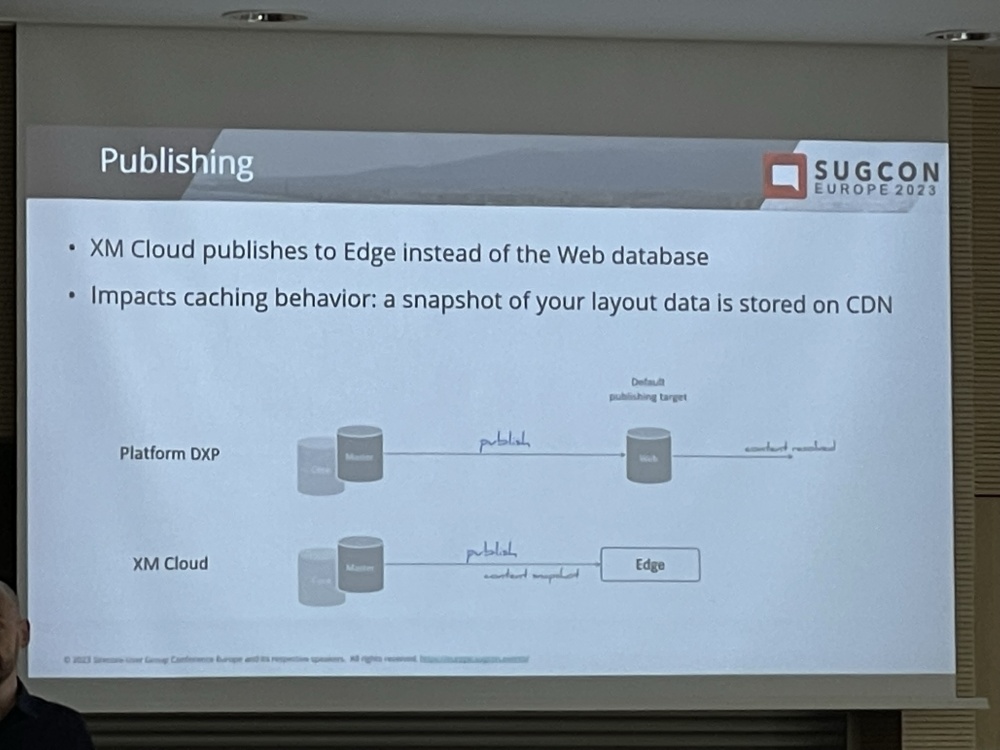
Rob started with telling us the differences with XM Cloud and explaining how publishing works differently (given you publish to the Edge):
IMG_0638
IMG_0640

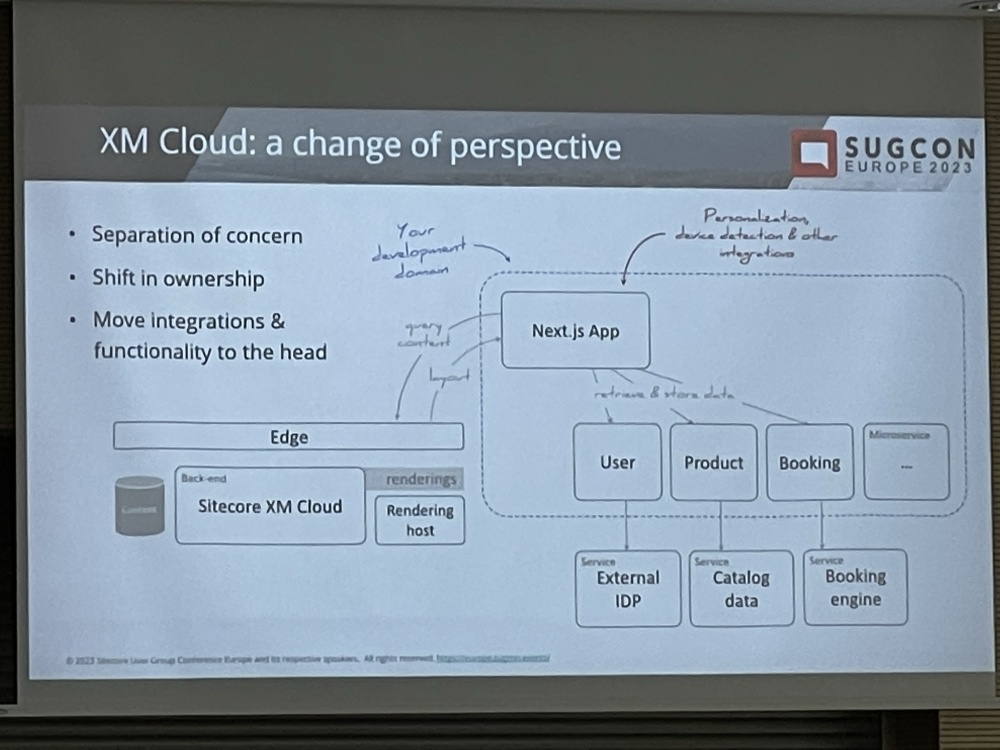
Rob then shared a typical XP implementation diagram and showed how XP Differs as integrations and functionality is moved into the head application:

IMG_0642

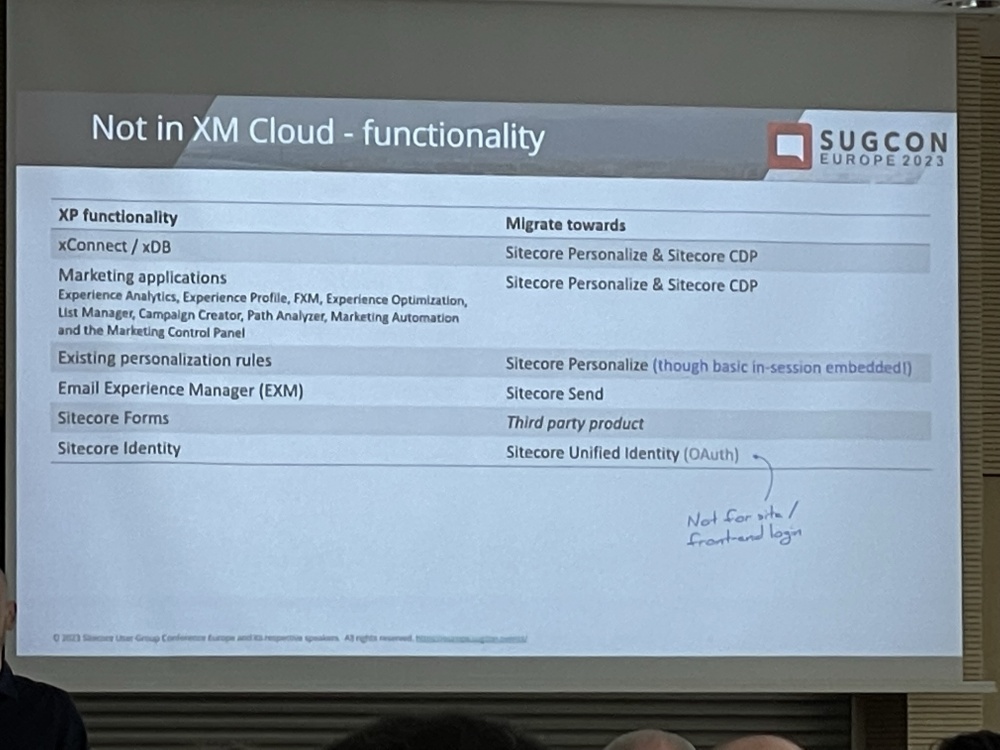
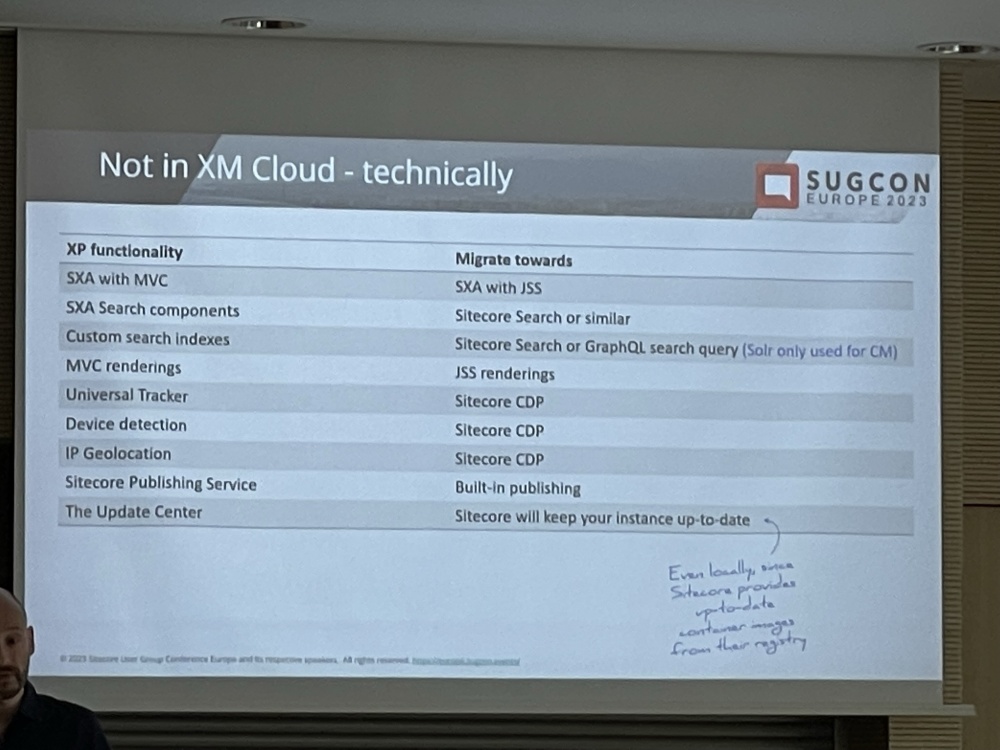
He then discussed what is included and not included in XM Cloud in detail. Martin shared some similar slides the day before, but I think these were a little clearer so I didn’t include them in the previous post:

IMG_0644
IMG_0645

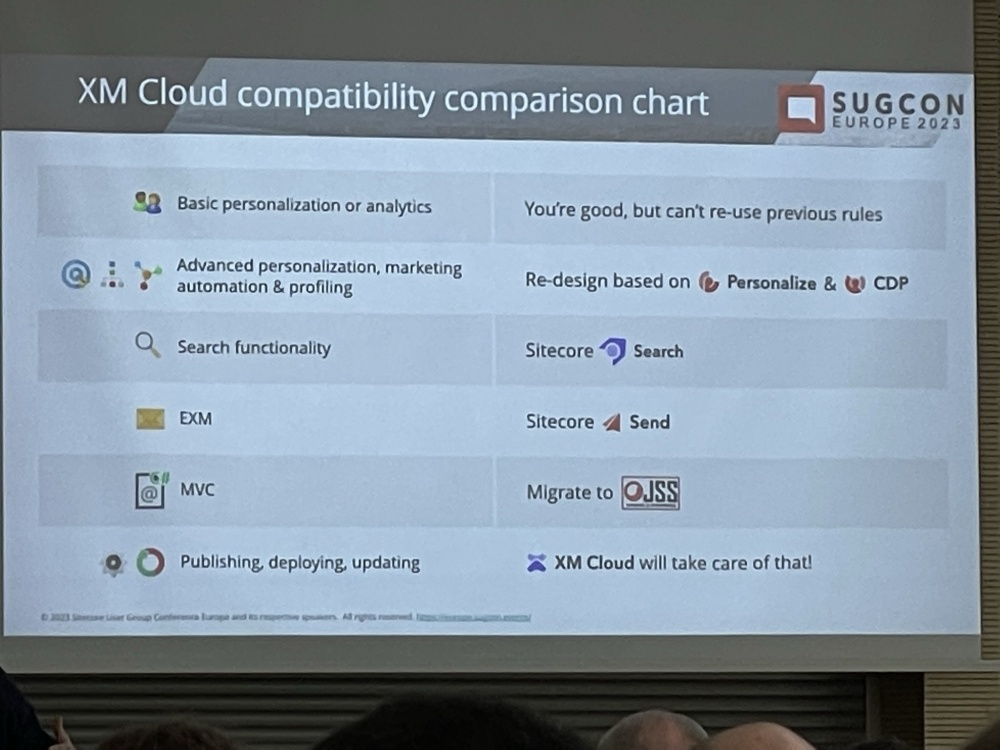
This was also a pretty cool comparison of XP vs XM Cloud equivalent features:

IMG_0646

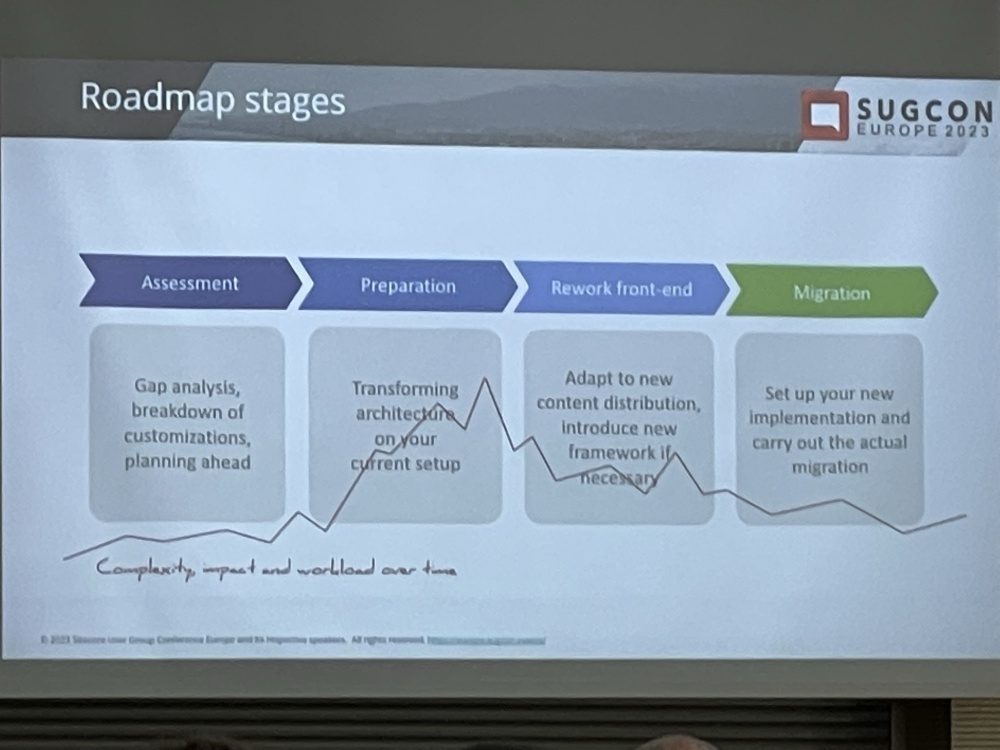
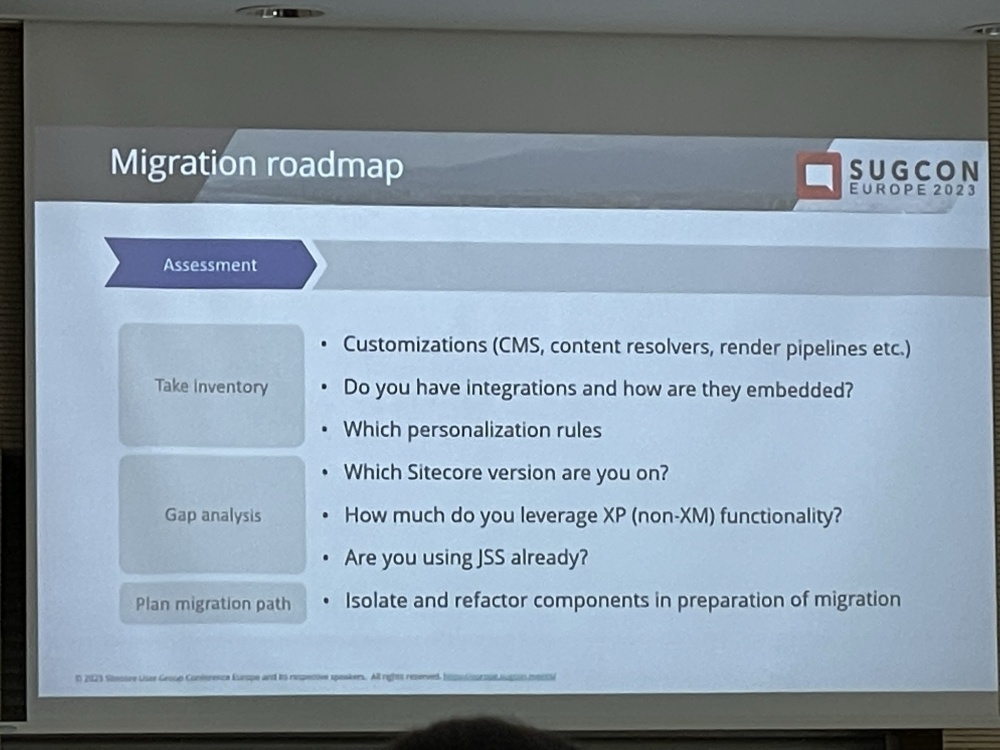
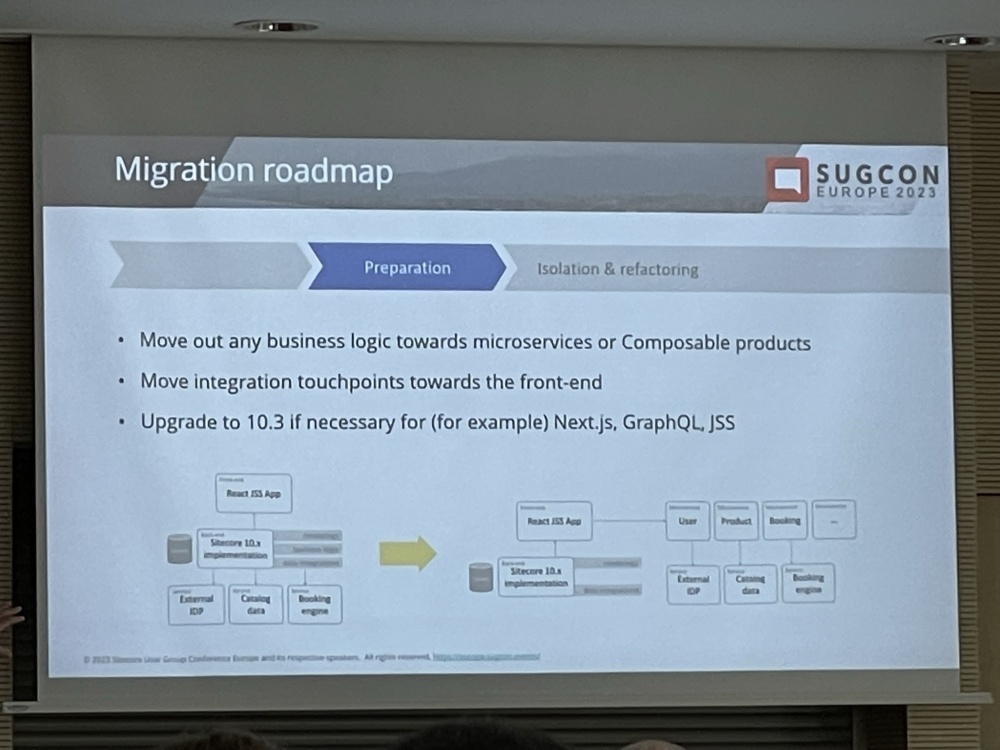
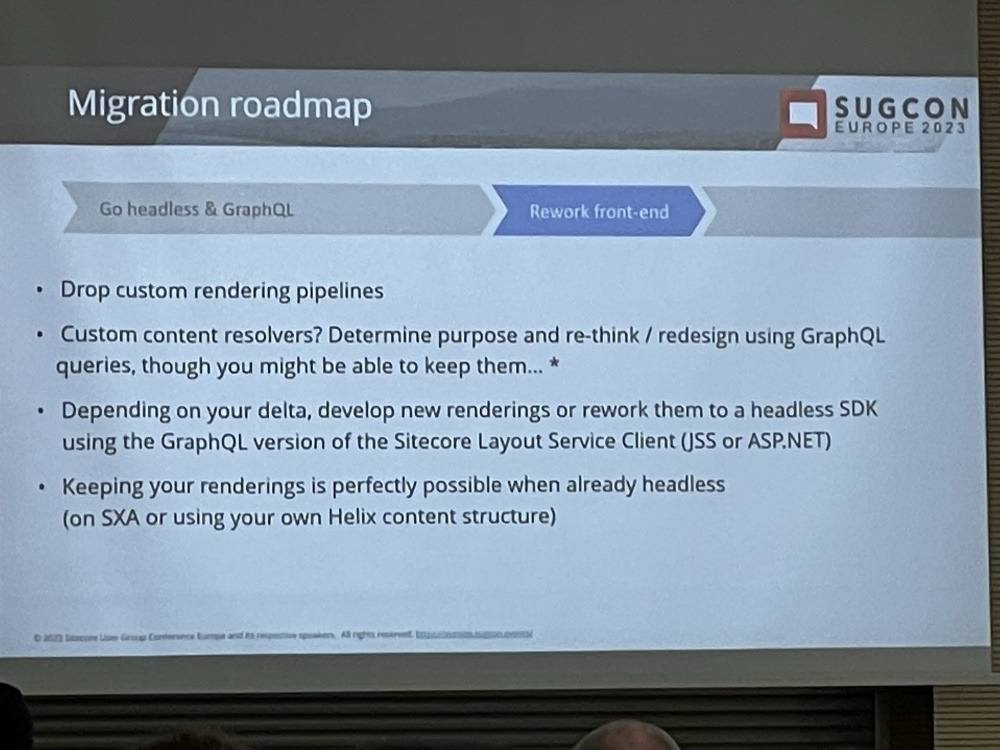
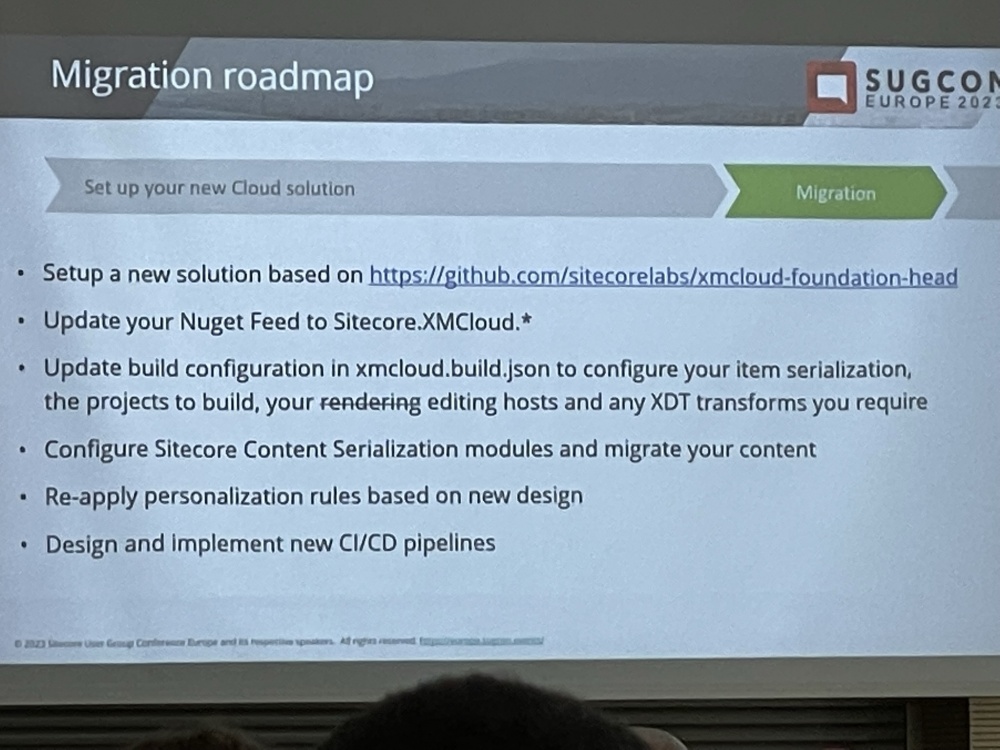
Rob then discussed the Migration approach to XM Cloud. There was a lot of really useful info here about things to consider and how to get your project prepared for the migration and how to tackle it:

IMG_0648
IMG_0649
IMG_0650
IMG_0652

IMG_0653

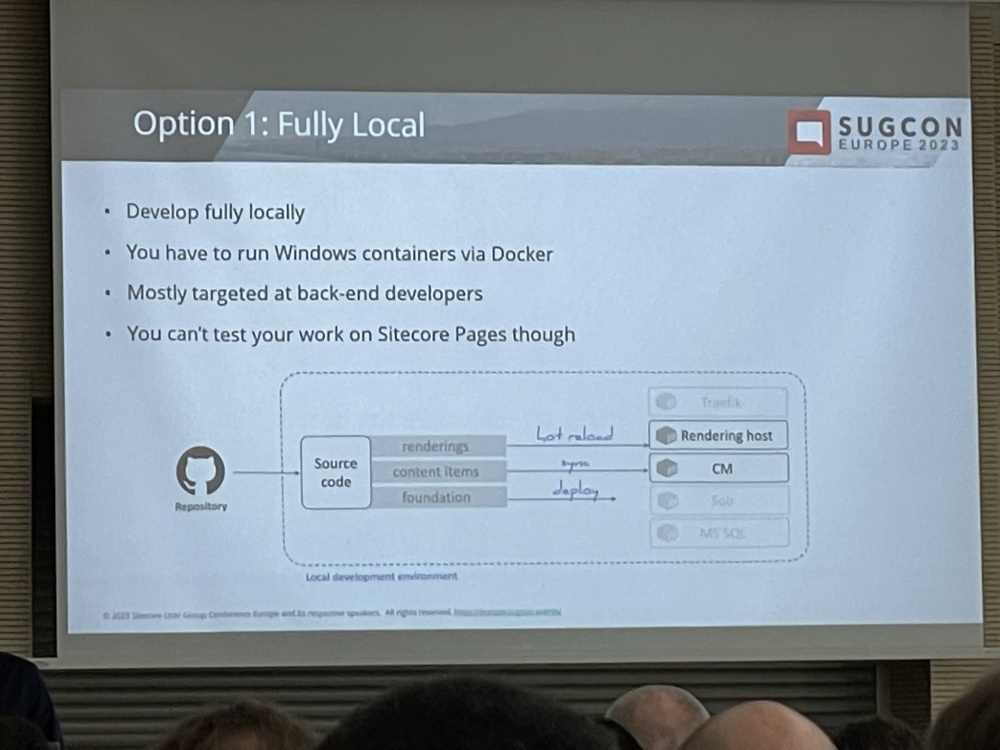
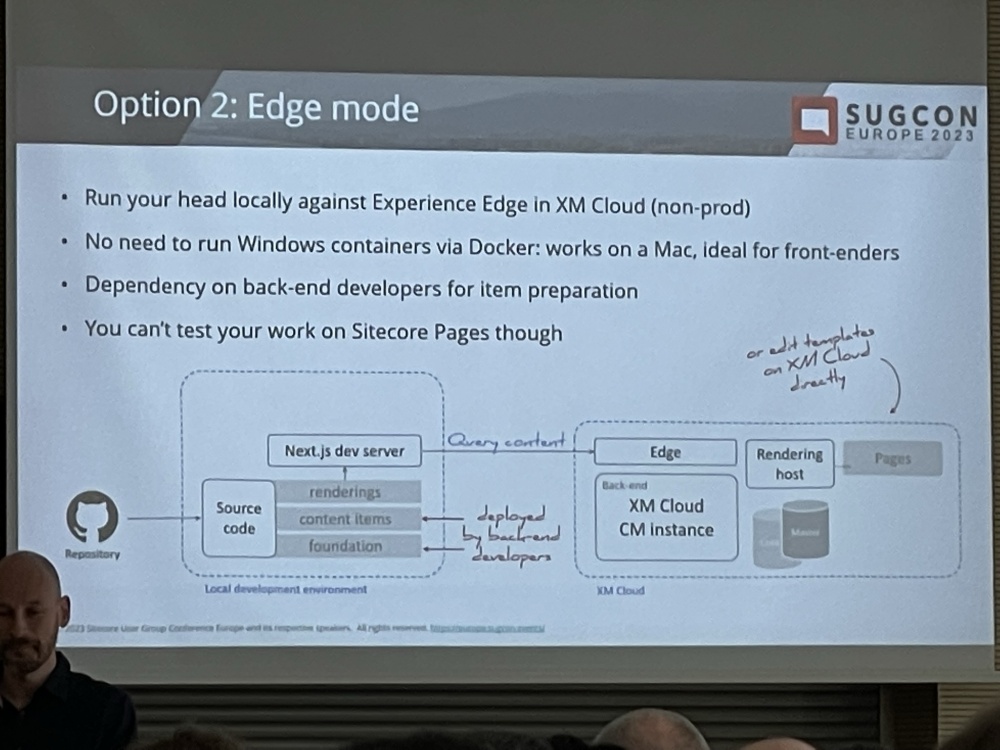
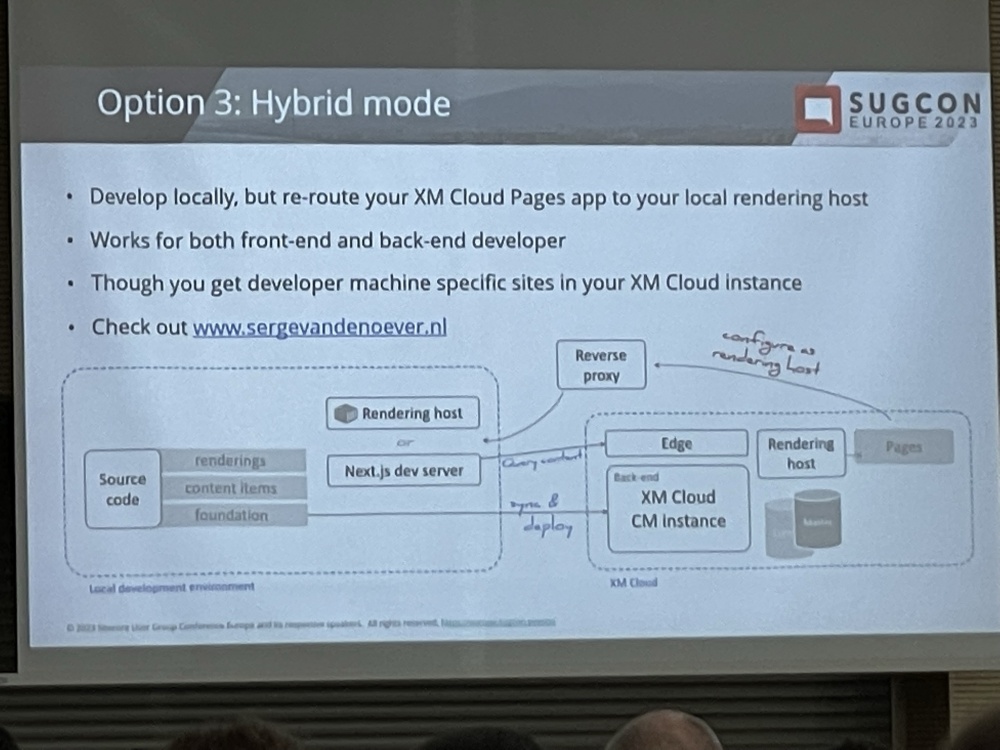
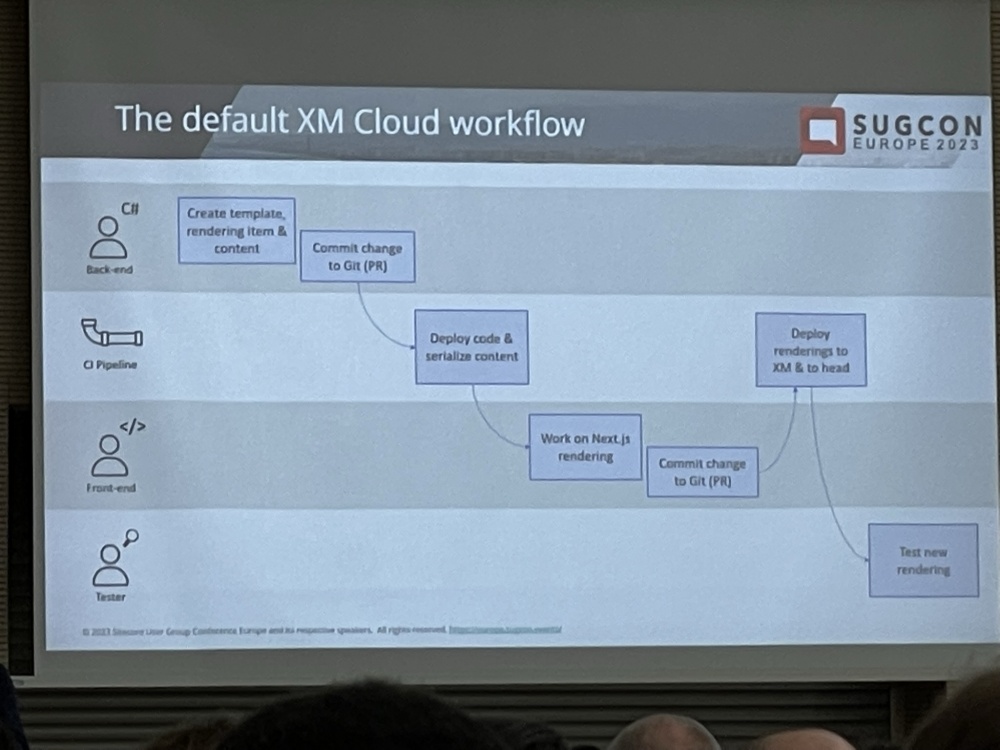
Next up was the the different development approaches and workflow. I’ve talked about these before but I didn’t know much about option 3 at all. I guess most Sitecore developers (especially in a small team) will use option 1, but option 3 is a really good approach for being able to use local content for your development without having to push it to XM Cloud:
IMG_0654
IMG_0655
IMG_0656
IMG_0657

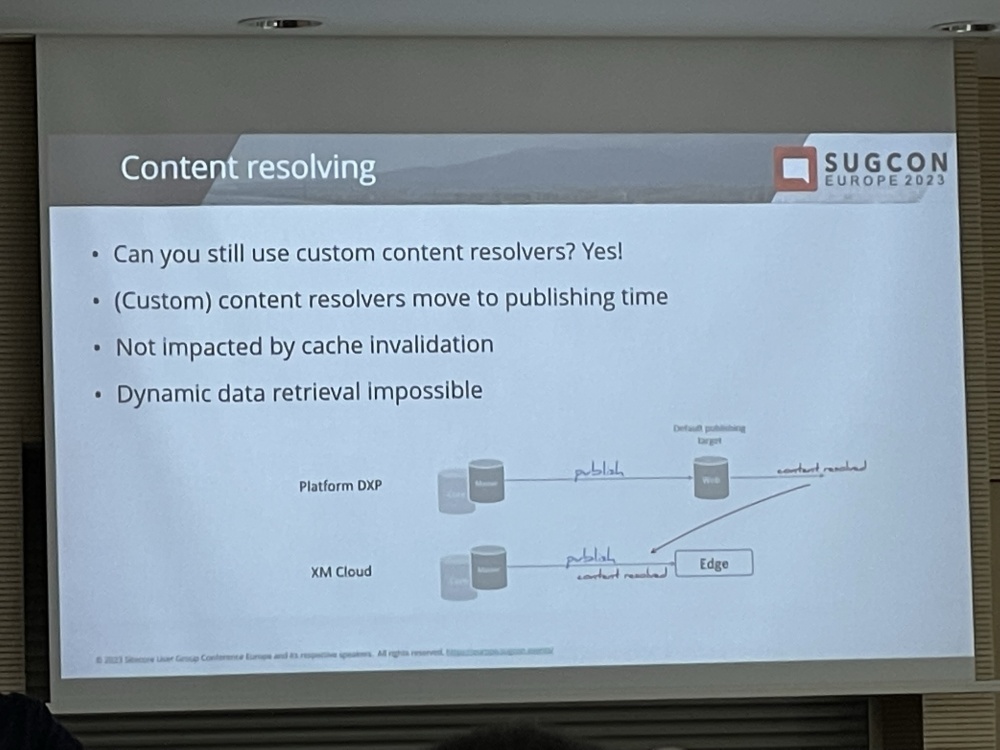
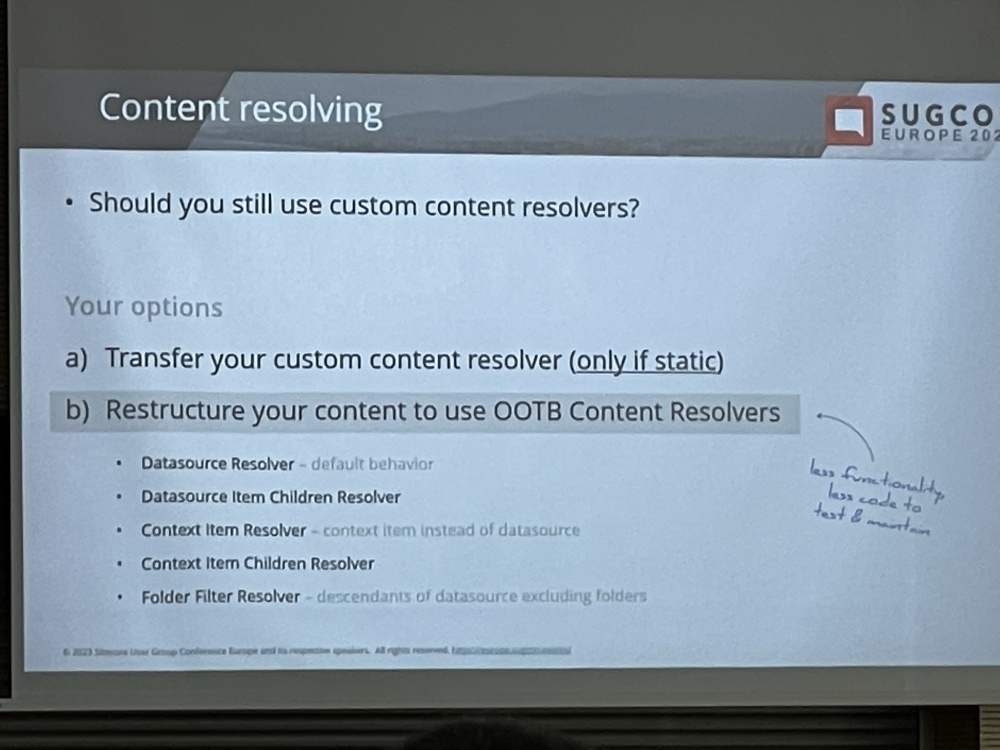
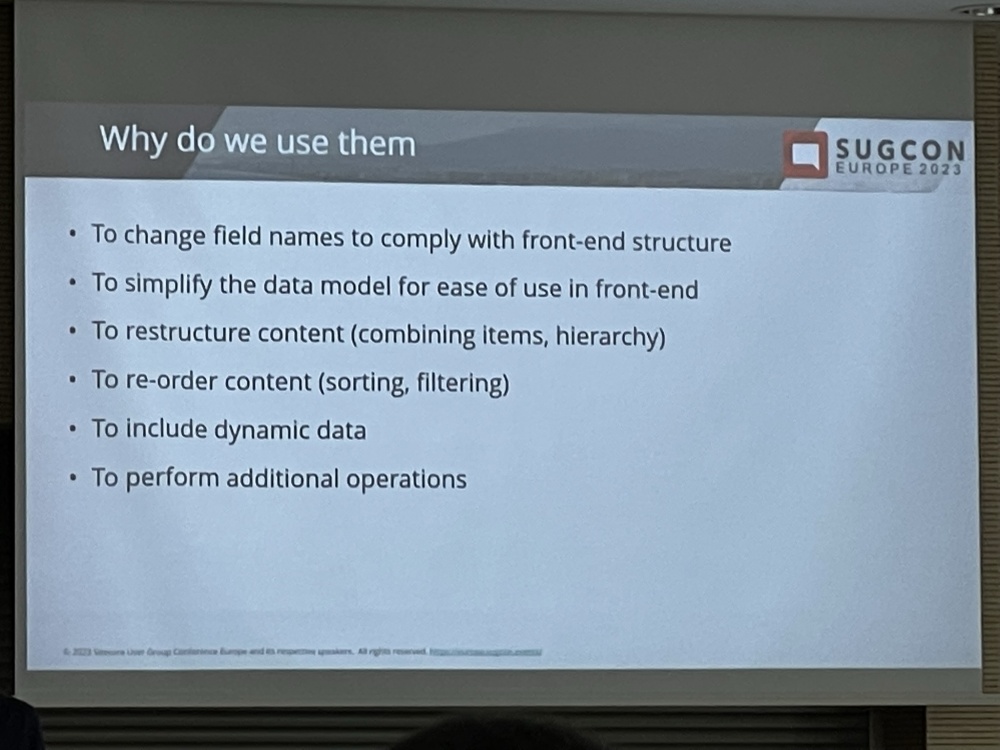
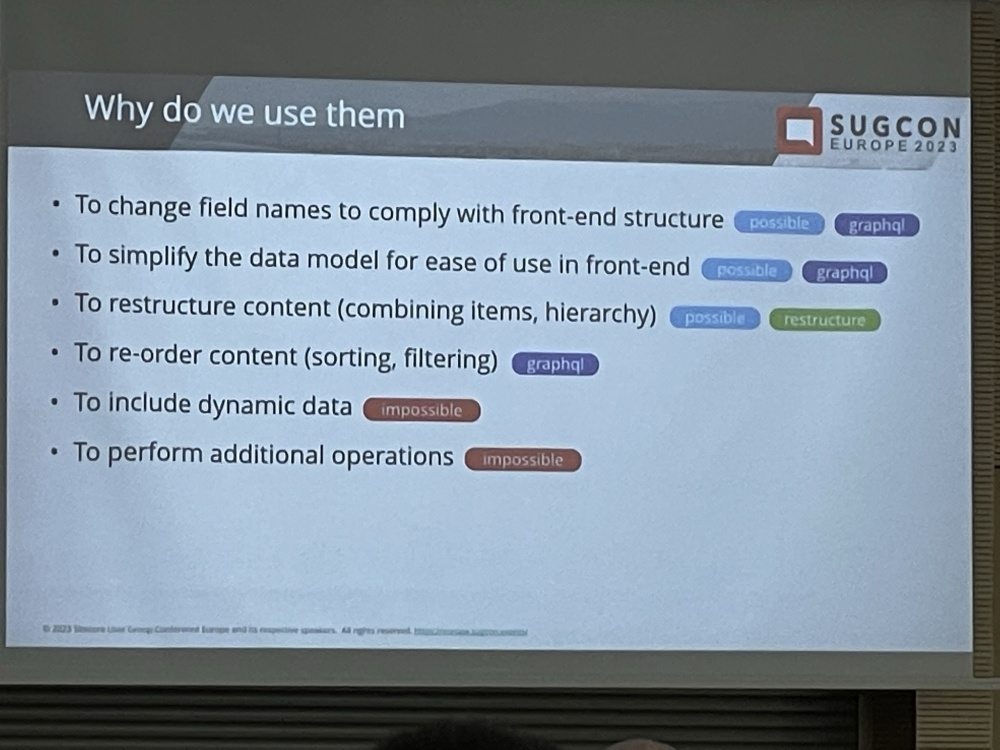
Rob then went on to explain in detail about how Content Resolvers don’t work if they are dynamic and only static ones do. It’s possible to use some out of the box ones or implement your own GraphQL Content Resolver:

IMG_0659
IMG_0662
IMG_0663
IMG_0664

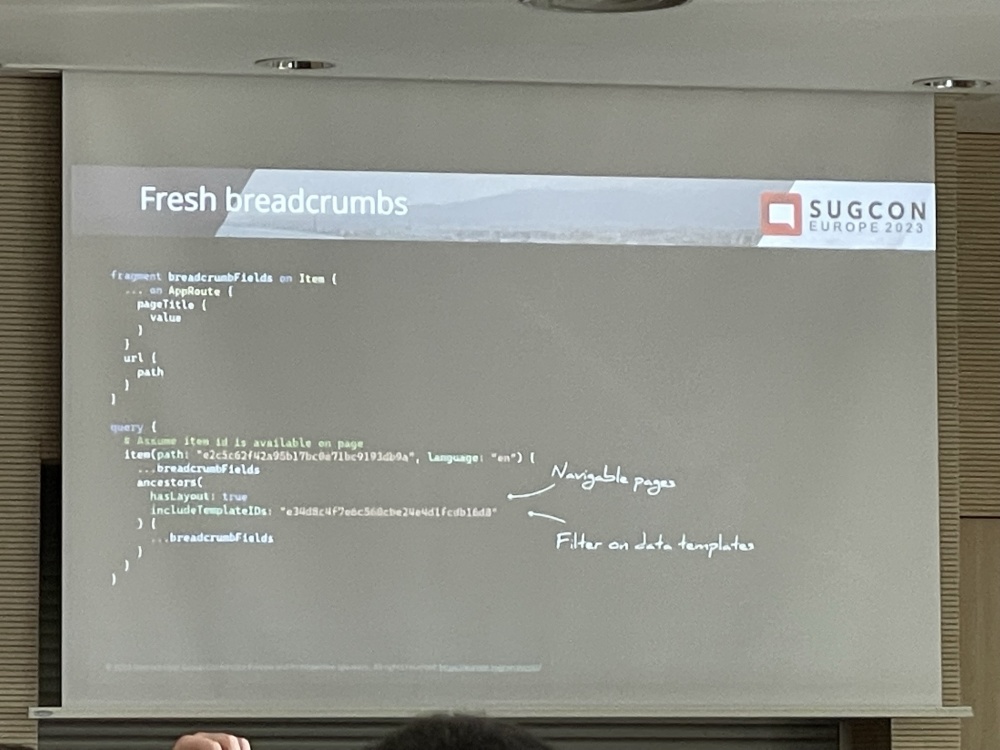
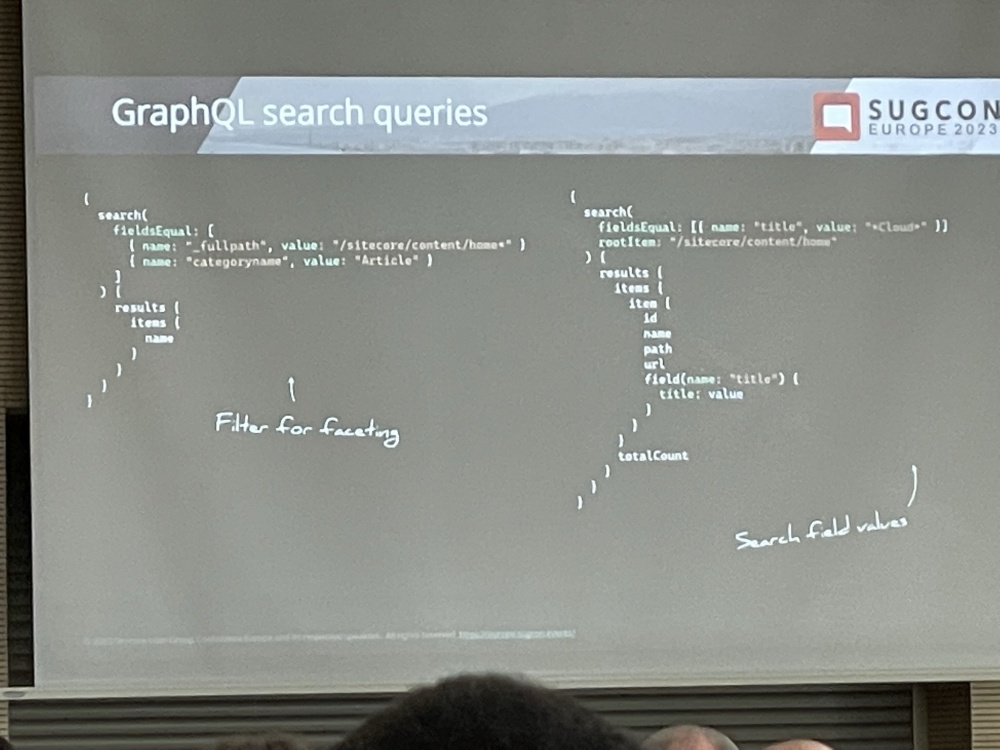
This is an example of Bread crumbs in XM Cloud and a GraphQL search query:

IMG_0666

IMG_0667

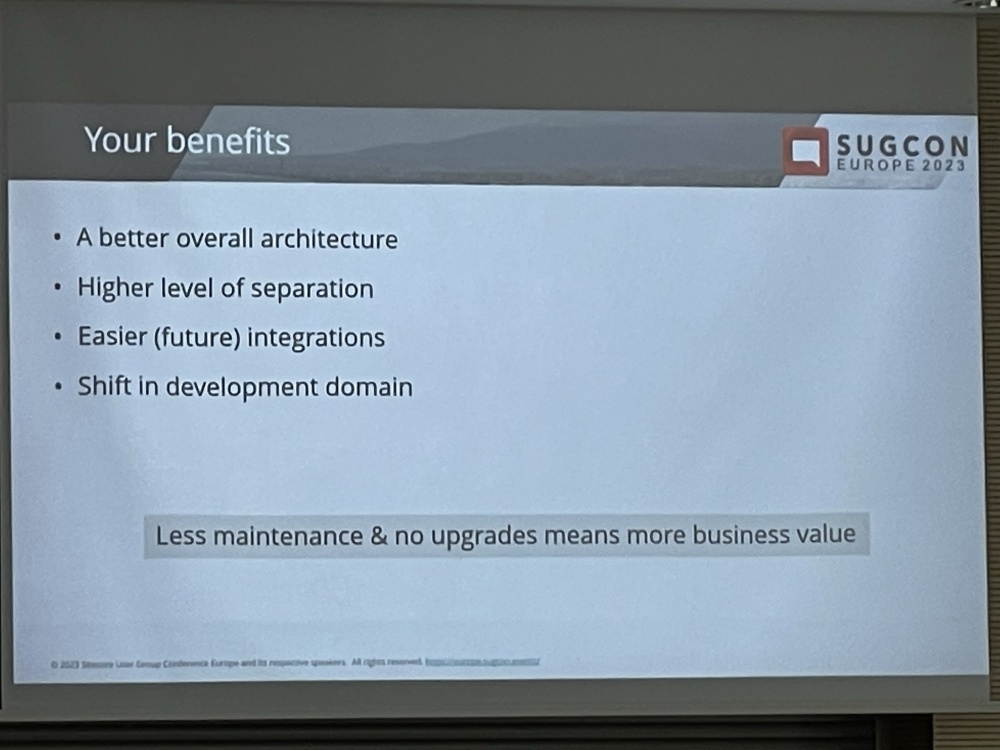
Rob finished his talk with a summary of the benefits of XM Cloud. The shift in Development domain and thinking is the tricky part for a lot of Sitecore Developers I feel:
IMG_0668


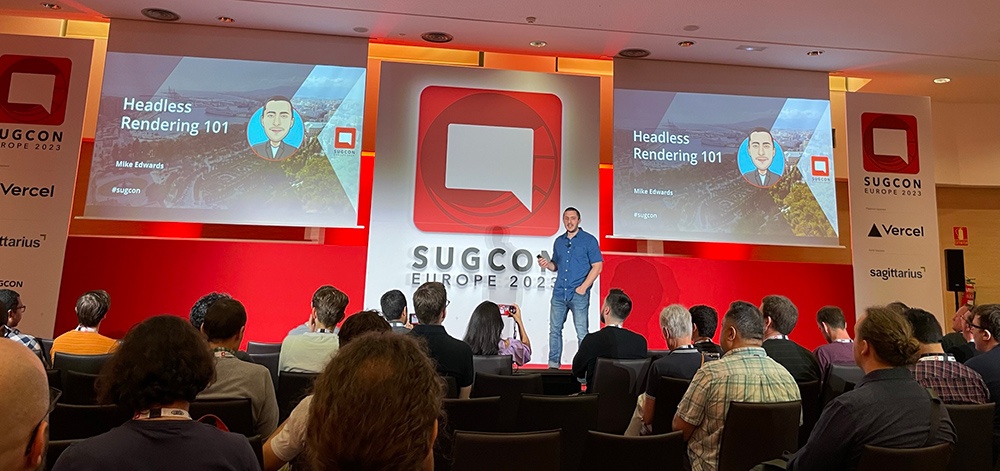
Rendering your data in headless – 101 different ways
– Mike Edwards

mike-headless-banner

I’ve known Mike for a number of years now and he’s always an good speaker so I was looking forward to Mike sharing his learnings from his headless journey.

IMG_0673
IMG_0674

Mike started by lamenting how things used to be easy in the World of MVC and server-side development and then with all the JQuery and JS frameworks things became pretty bloated.

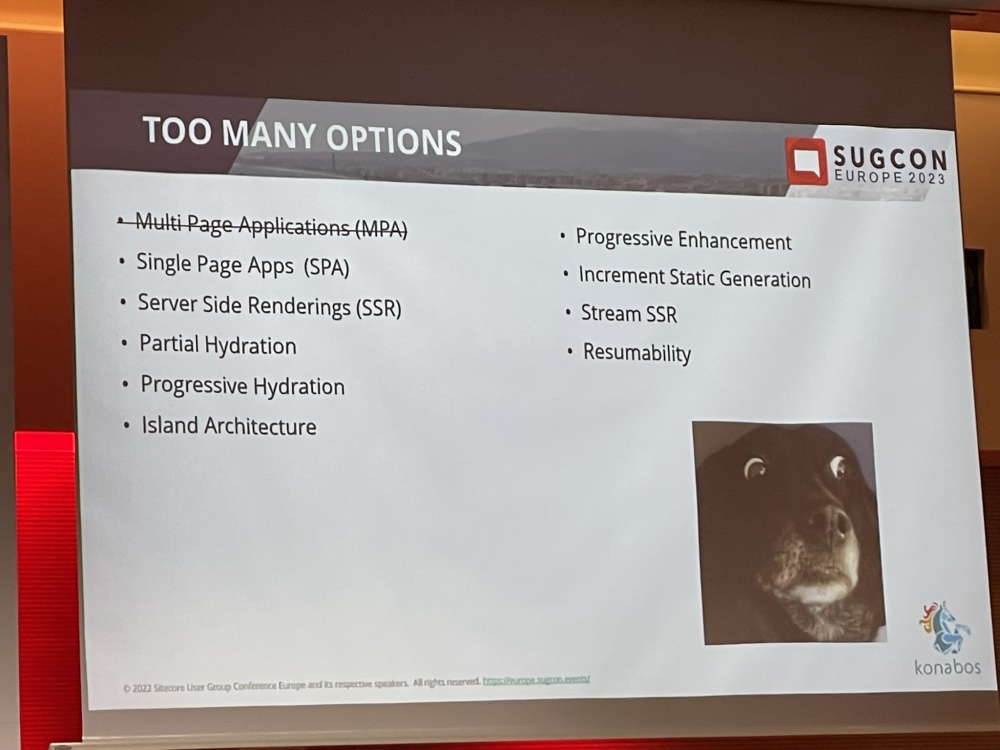
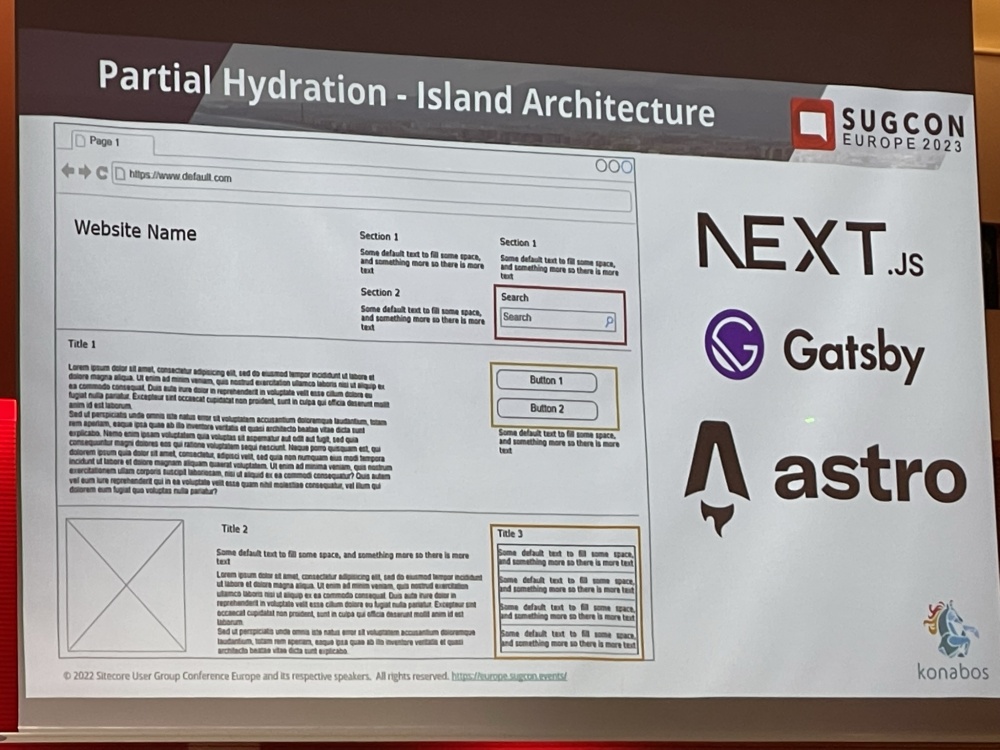
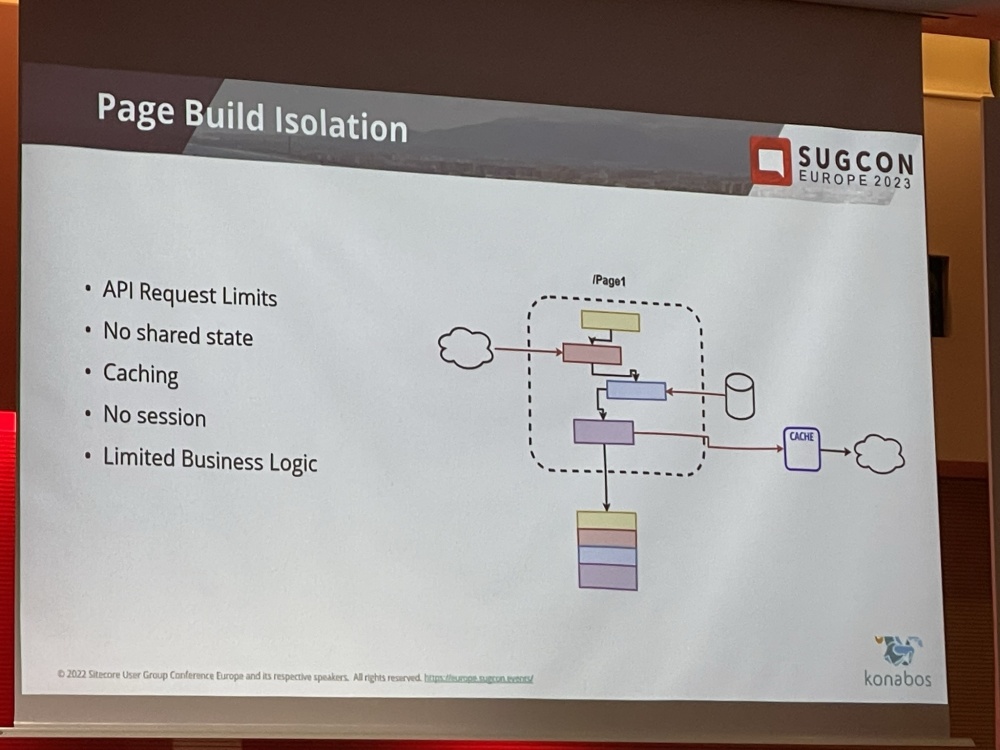
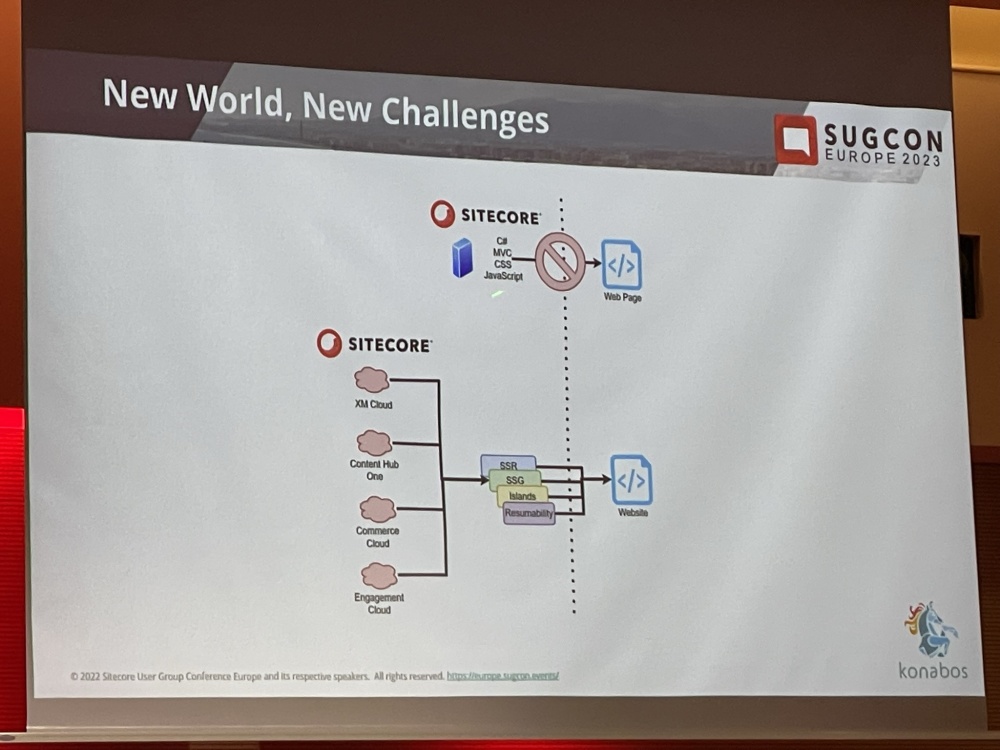
Things have moved on a lot now in FE development though and there are now many different options for building Headless websites in Sitecore, some of these I’m aware of or have experimented with – Others I’ve not heard of, such as ‘Island Architecture’.

IMG_0674
IMG_0676
IMG_0677
IMG_0678

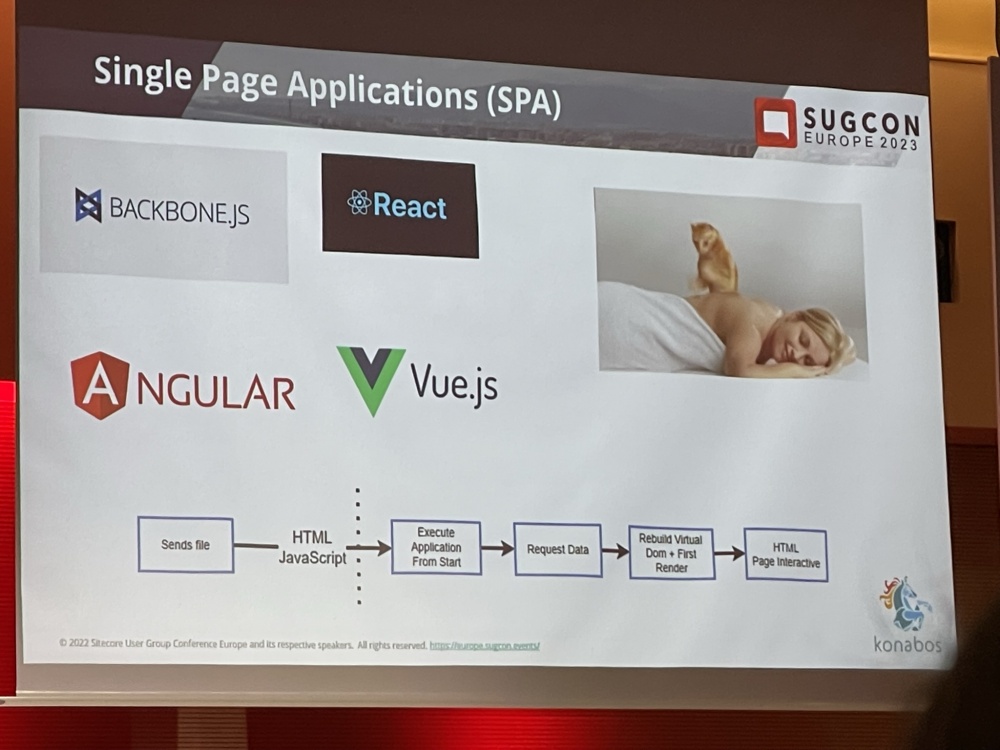
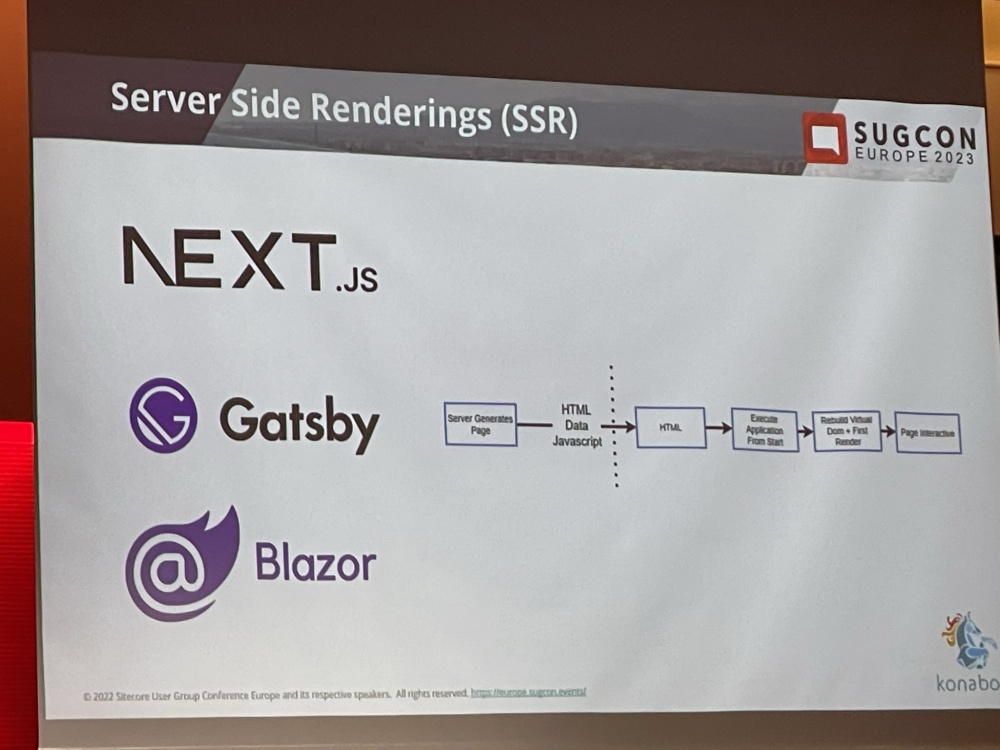
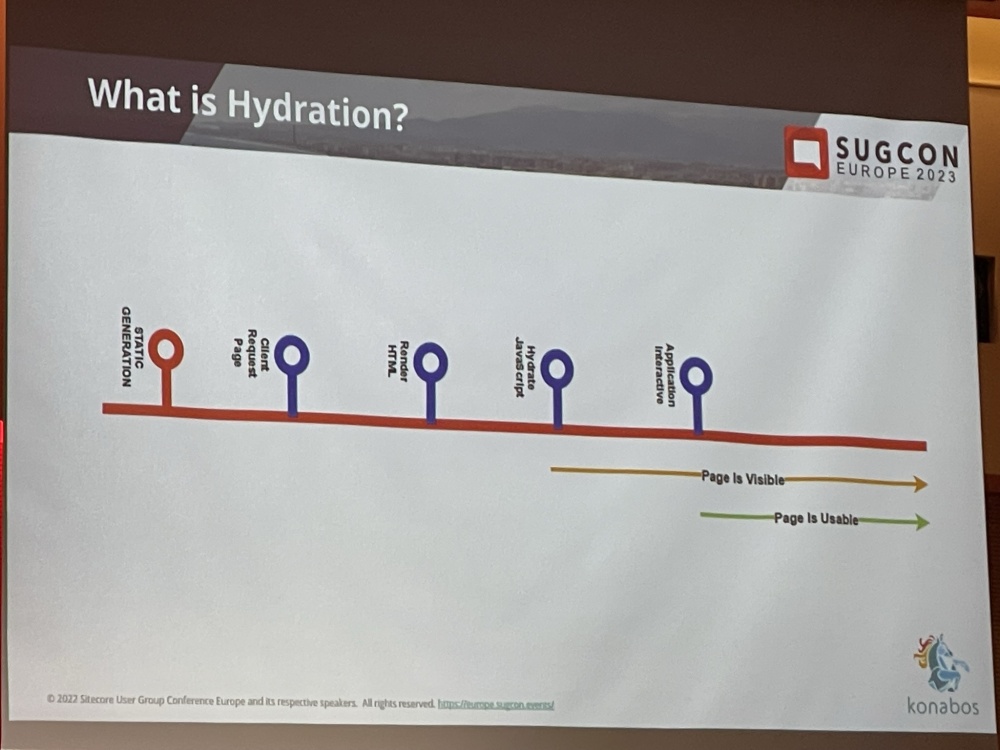
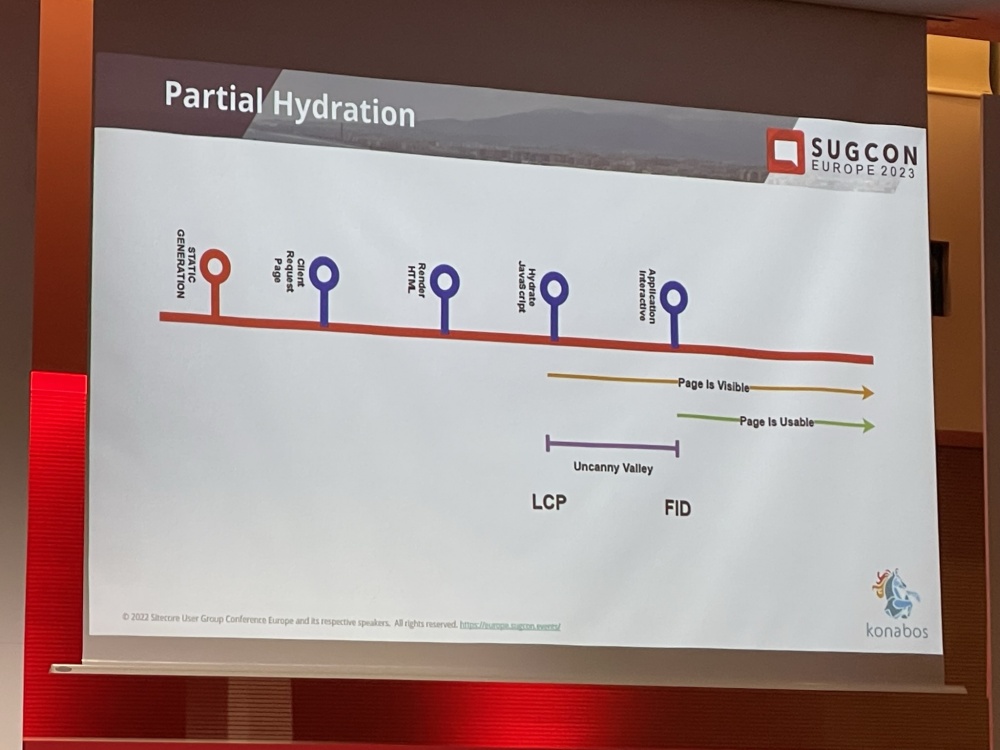
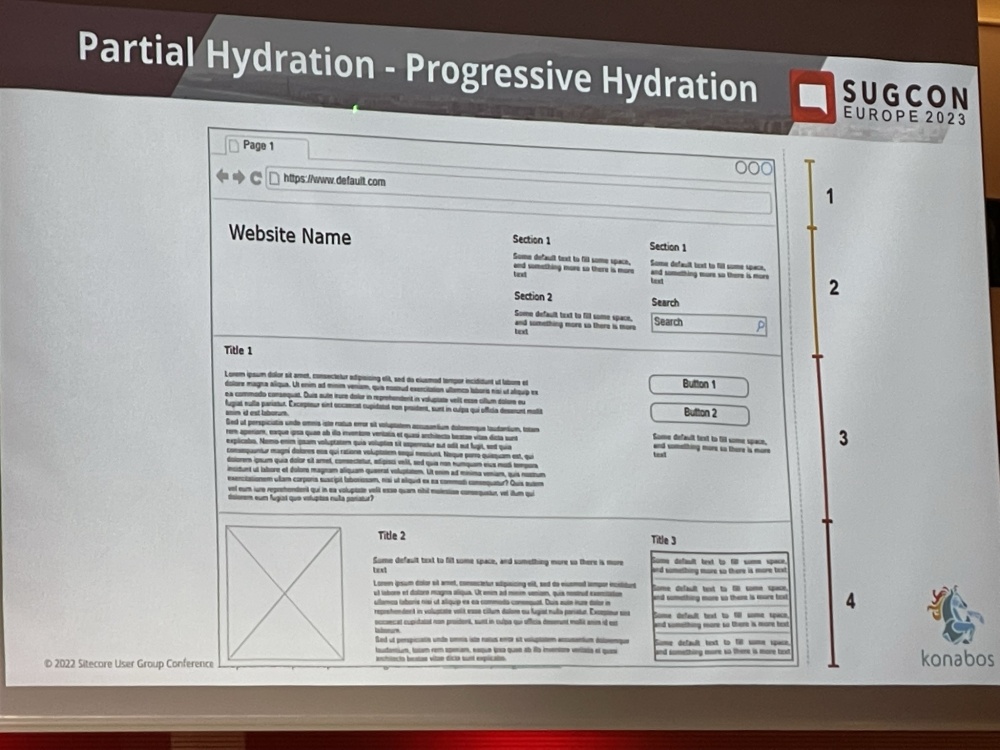
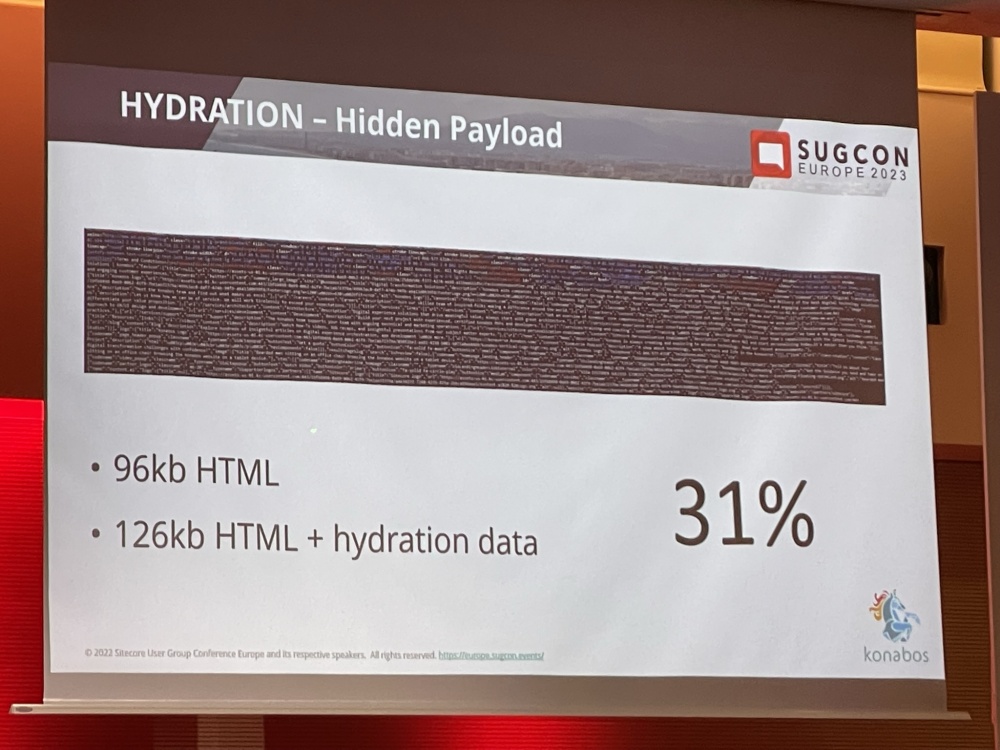
SPAs bring their own set of problems in terms of page load times and indexability so Mike went into Hydration and Partial Hydration techniques and approaches that try to solve these issues:

IMG_0679
IMG_0680

Then Mike explained more about Partial Hydration examples and Island Architecture. Island Architecture lets you create your web app with pure HTML and CSS for all the static content but then add in regions/placeholders of dynamic content to support interactive ‘islands’ of content. Given the rest of the page is static it downloads really quickly and is available to use faster.

IMG_0681
IMG_0683

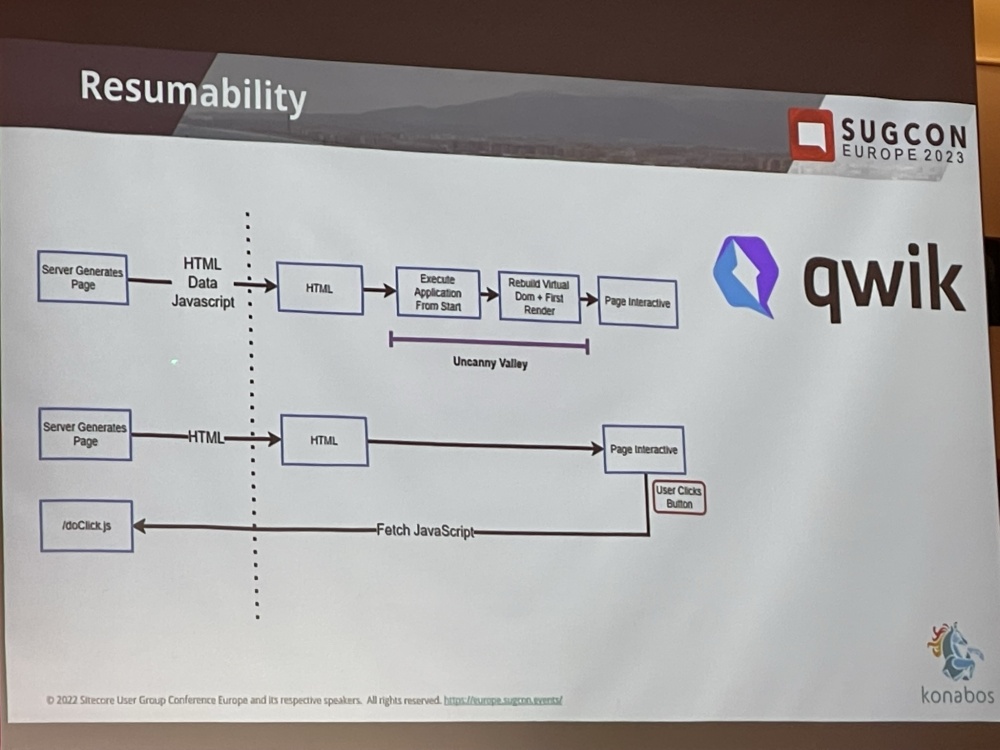
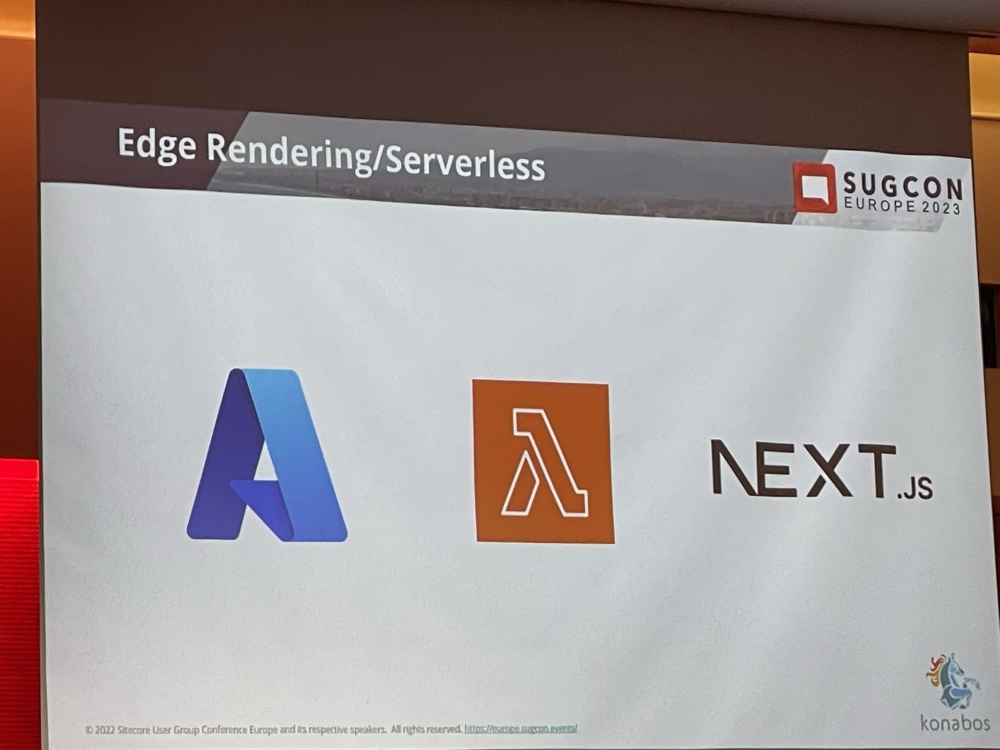
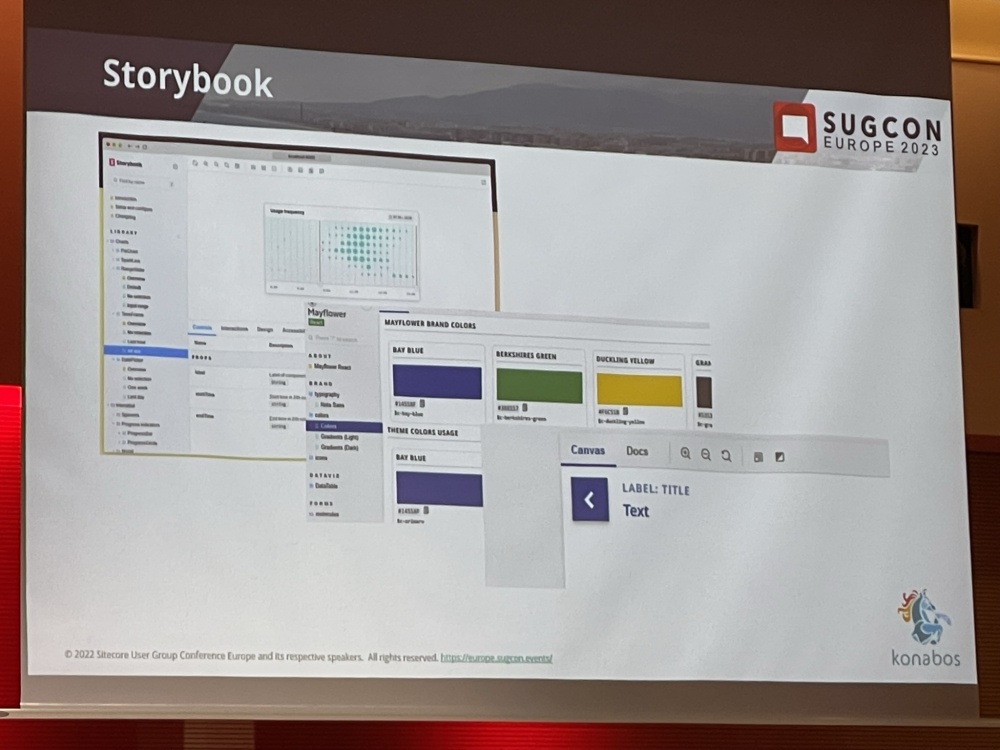
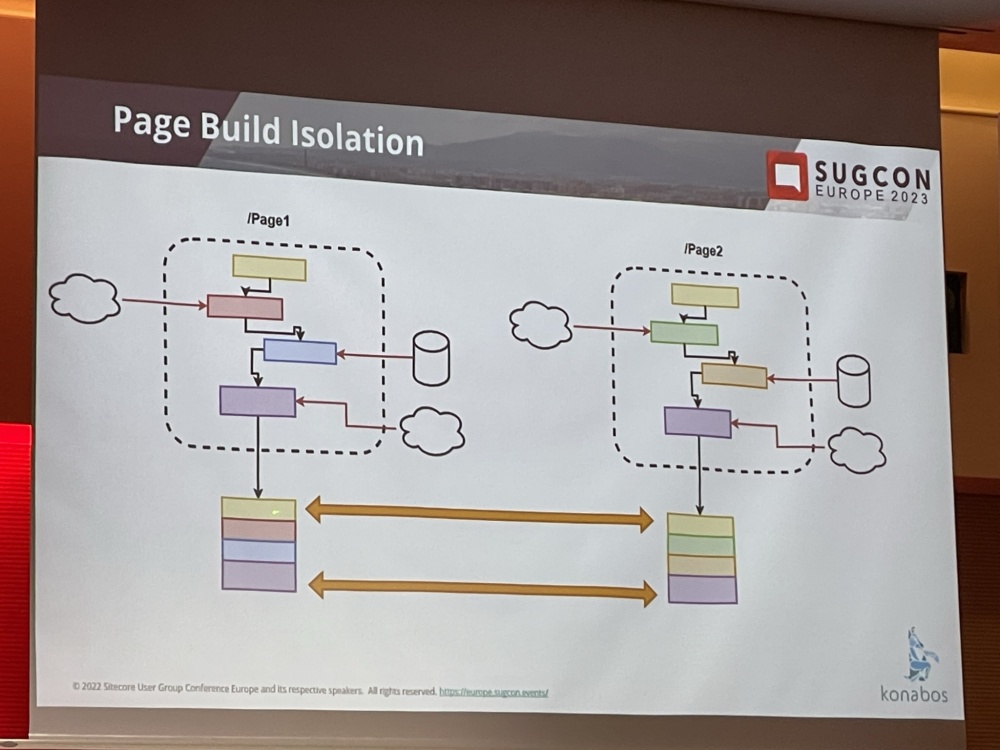
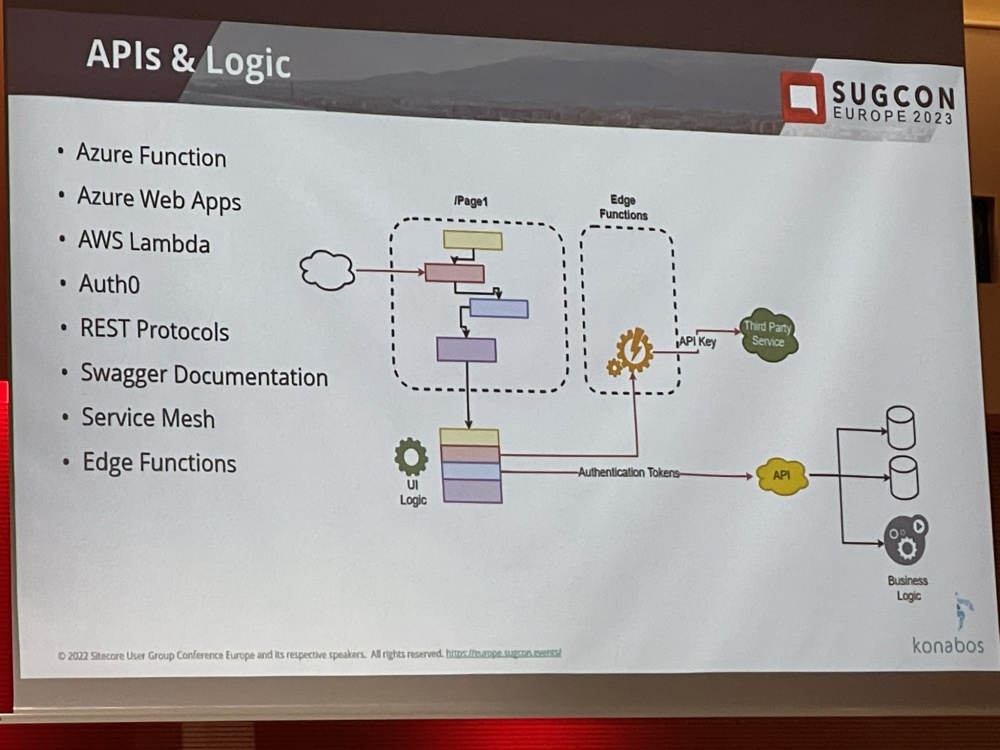
Mike then covered Resumability, Edge/Serverless and tools such as Storybook and Hydration Payload.

IMG_0684
IMG_0685
IMG_0686
IMG_0687

There are some Challenges and limitations which need to be re-address:

IMG_0689
IMG_0690
IMG_0692
IMG_0693

Finally Mike ended with saying that this is the future and we need to embrace the new world.
IMG_0694

It was a really interesting talk and gave me a lot to think about and research further. The following talks were 15 minute lightning talks until lunch.

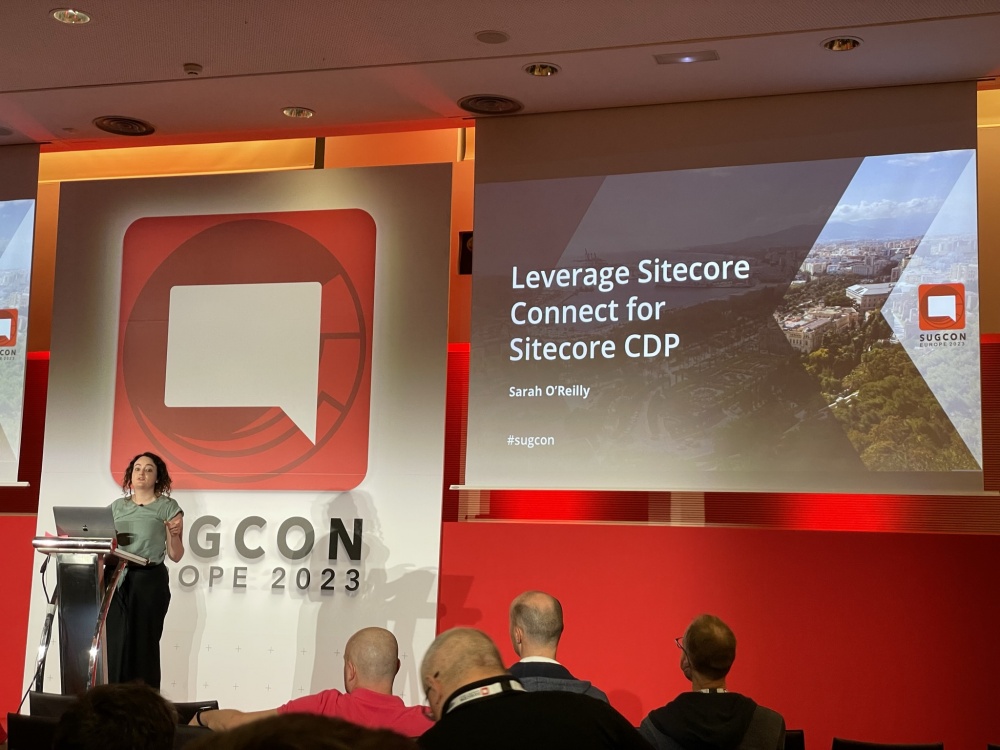
Leverage Sitecore Connect for Sitecore CDP – Sarah O’Reilly

IMG_0695

I’d heard a fair bit about Connect but I’ve not really seen much about how it actually works. So I was looking forward to this session

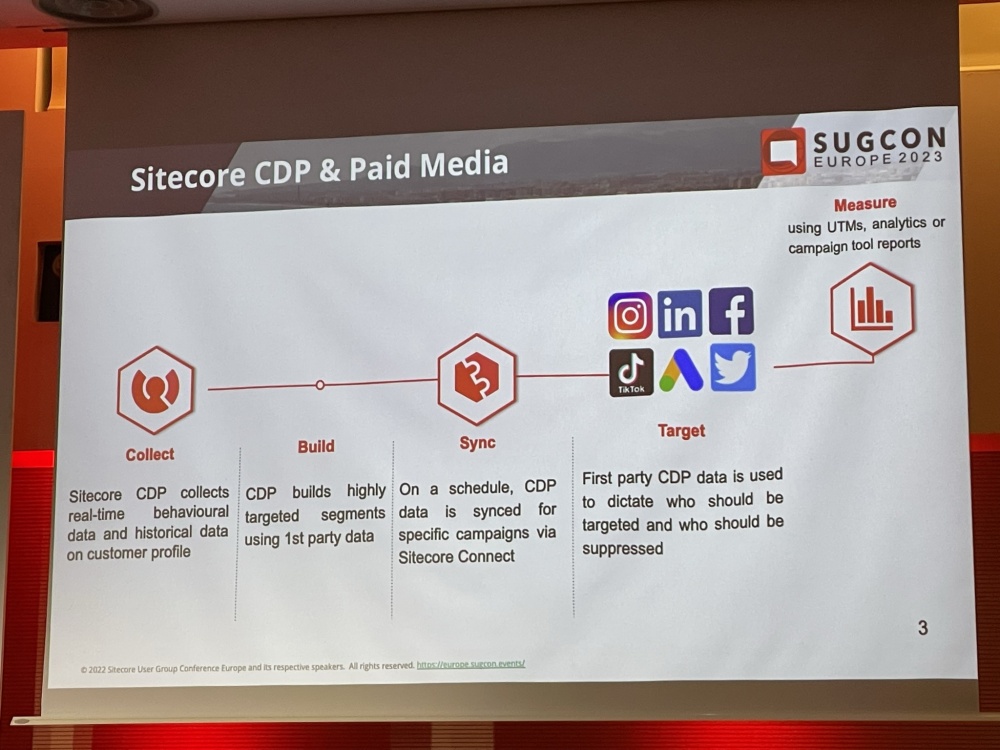
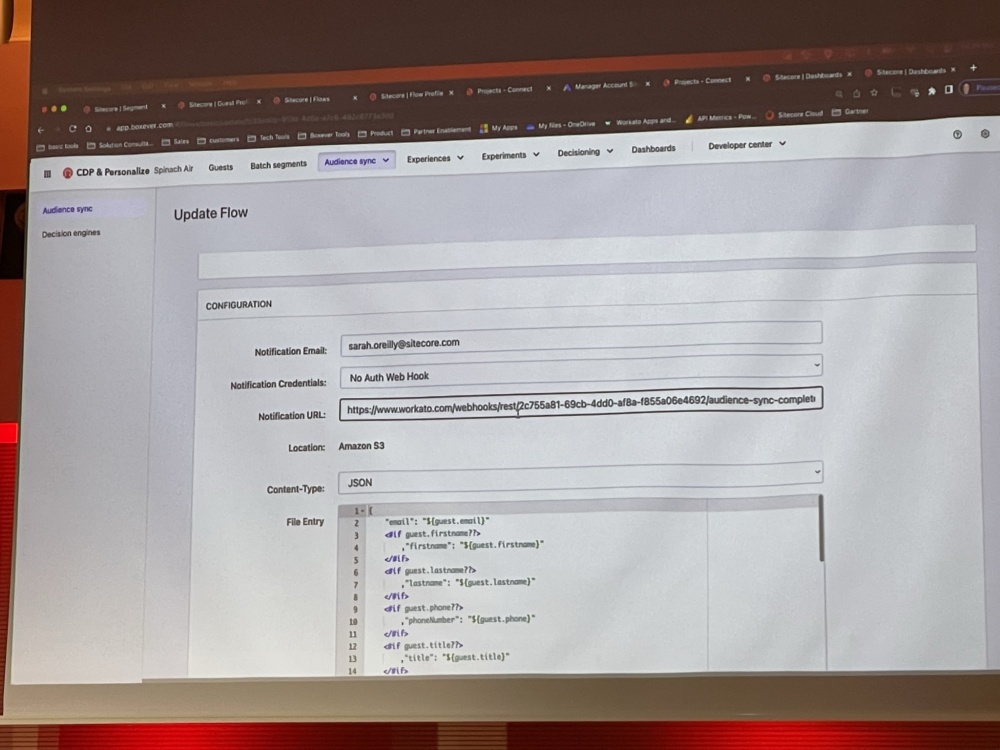
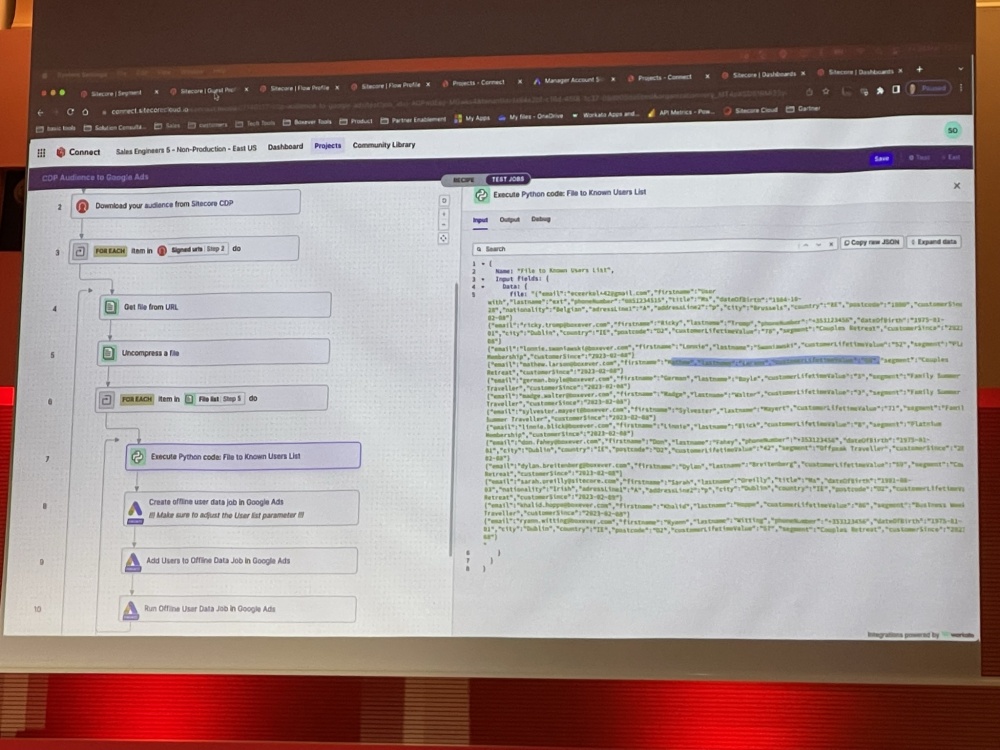
Sarah took us through an example of using Connect to import user segment data from CDP into Google Ads.

IMG_0696 IMG_0703

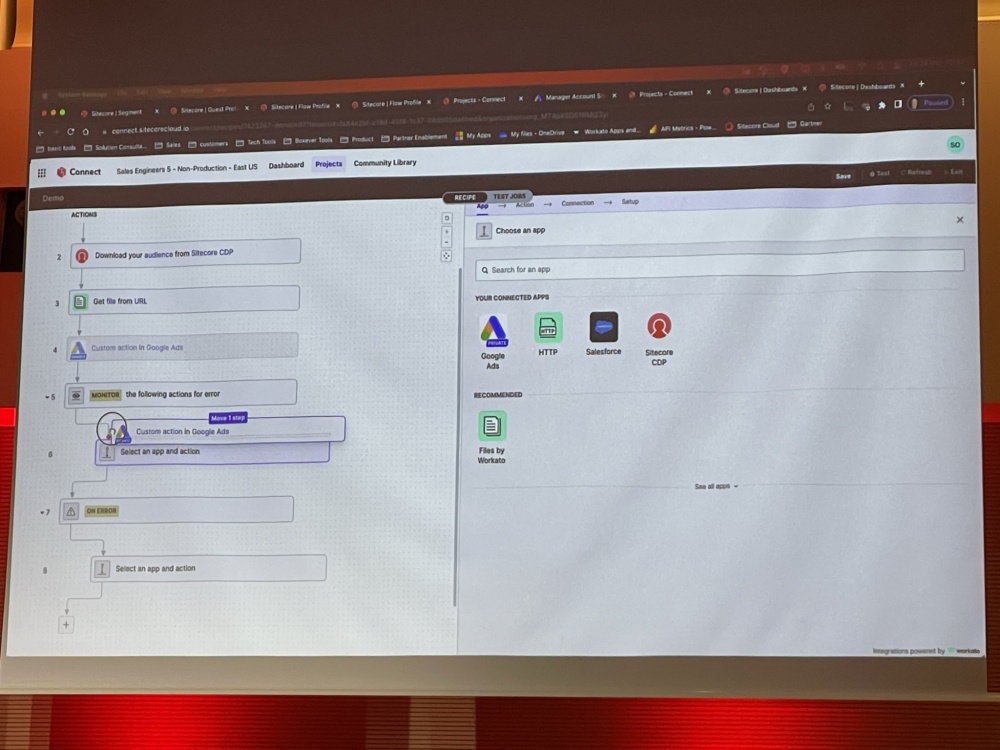
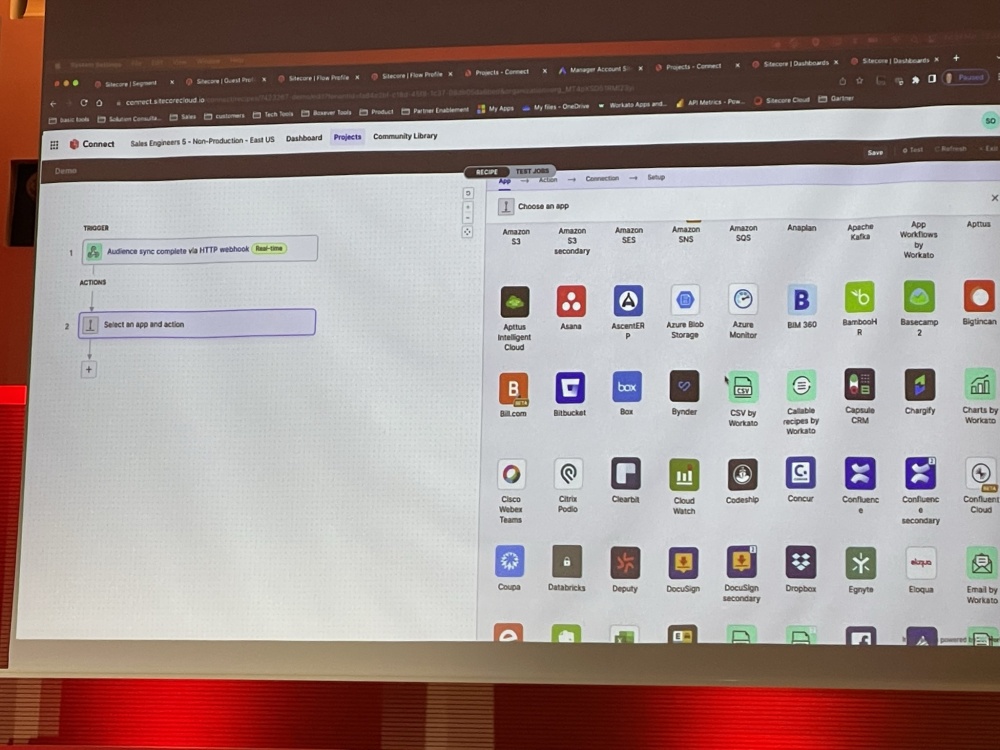
Once the export was setup to build from CDP the steps were then configured in Connect to sync to Google Ads:
IMG_0712
IMG_0714

There are tons of Apps supported and different recipes defined and it was impressive to see the options for building logic such as if statements / for loops data mapping and manipulation all within Connect.

IMG_0709

This was an insightful session and really interesting to see how it works. I can see how it could be used to help with migrating to XM Cloud from XP or another CMS platform.

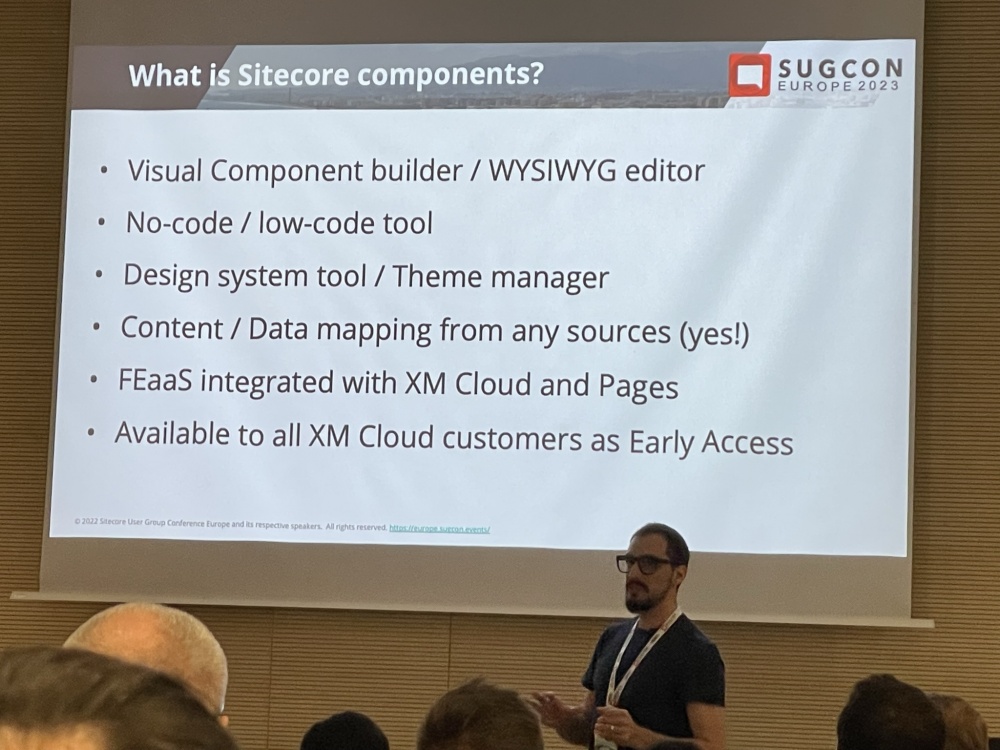
Sitecore components explained for your marketers – Ugo Quaisse

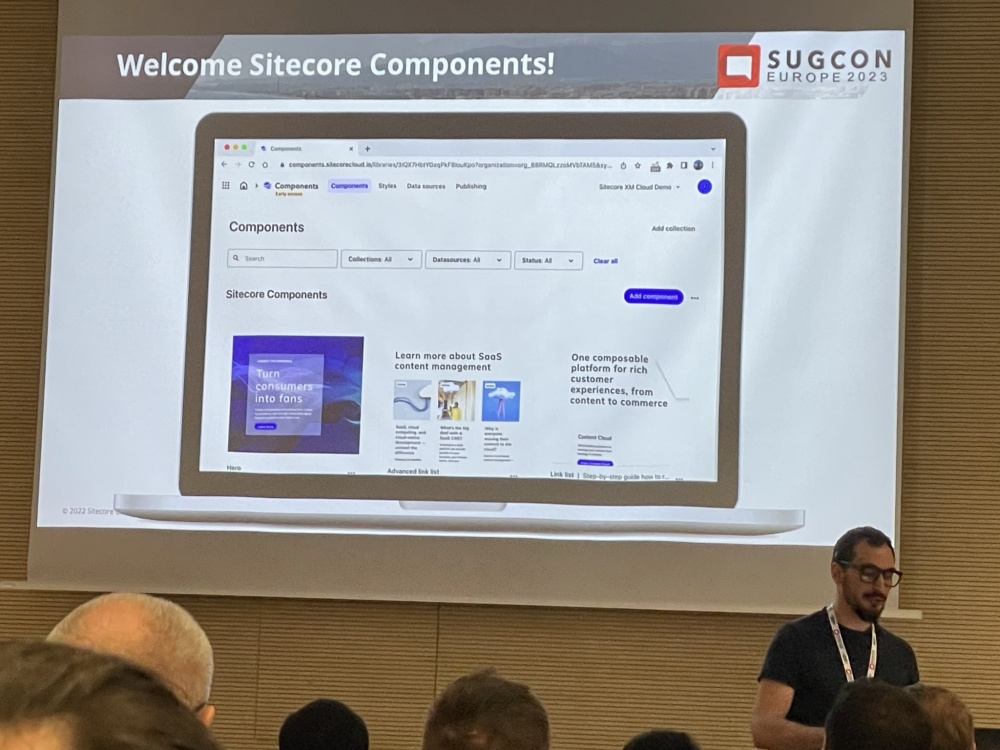
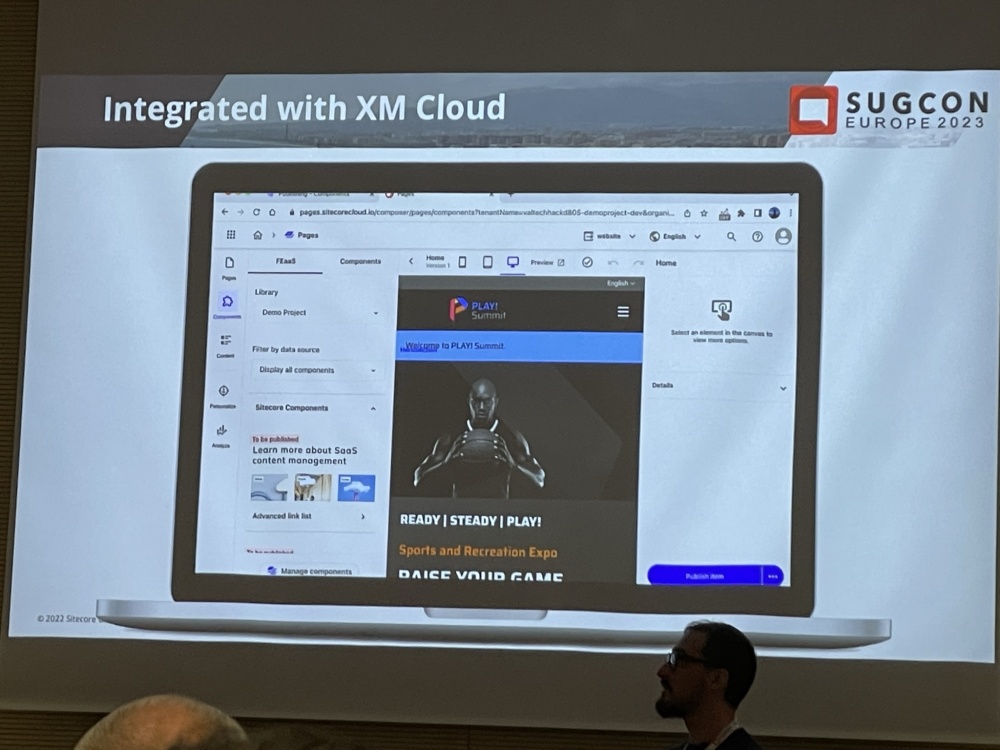
The next session was about the Sitecore Components builder in Pages in XM Cloud. I’ve heard a bit about this but not seen much of it in detail. I was hoping to see a full demo of it. I guess at the session was only 15 minutes there wasn’t time, but I still learned quite a bit about how it works.

IMG_0715
IMG_0716
IMG_0717
IMG_0719

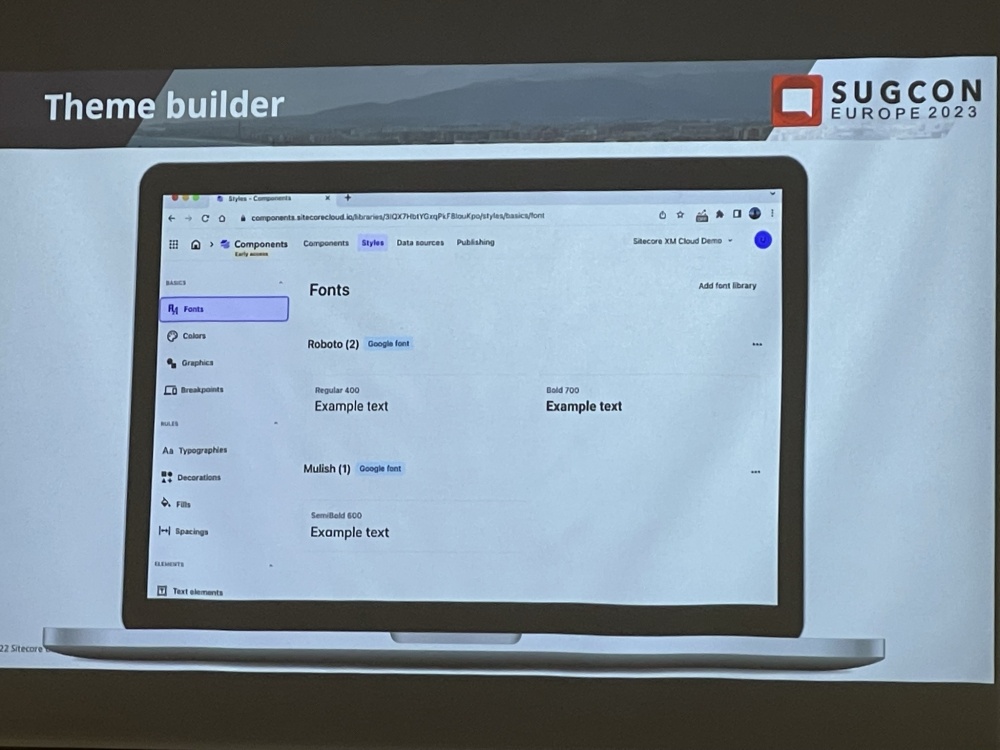
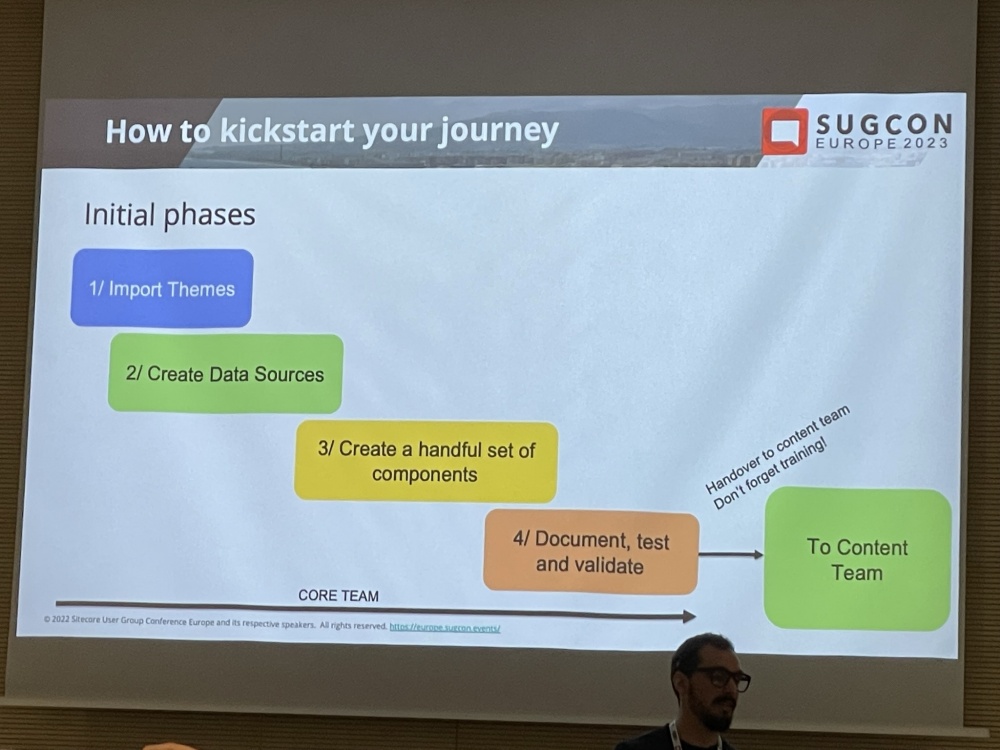
The Component Builder can be used without any development or code required at all. First Themes are setup with colours, fonts and breakpoints configured.

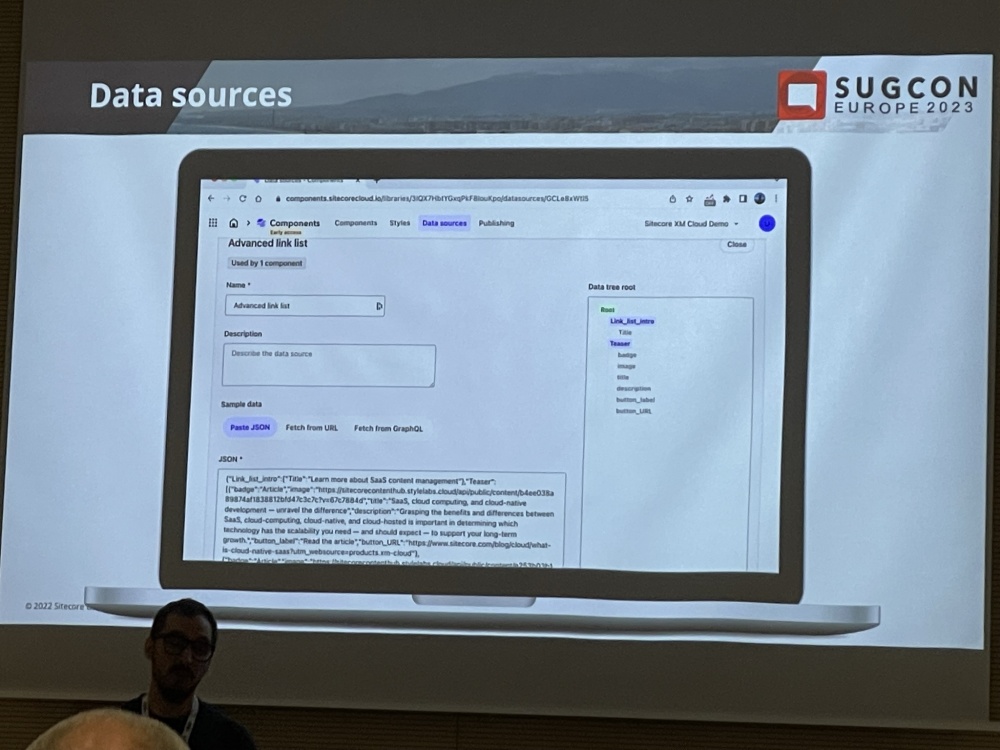
Then datasources are setup and mapped from either a url or json or GraphQL.

IMG_0720

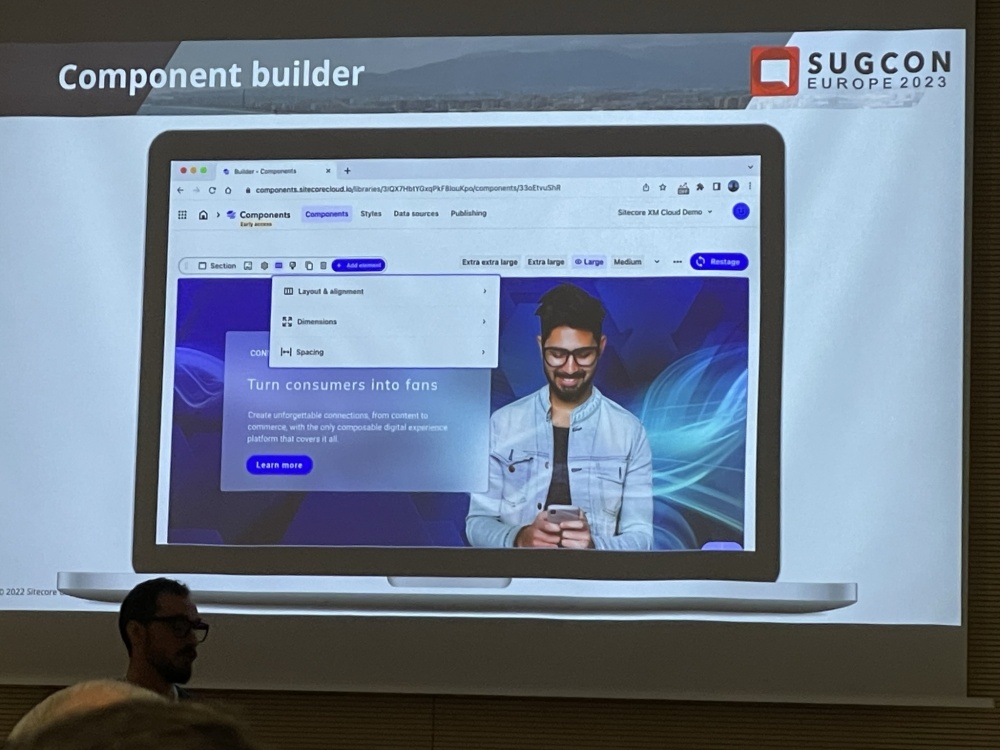
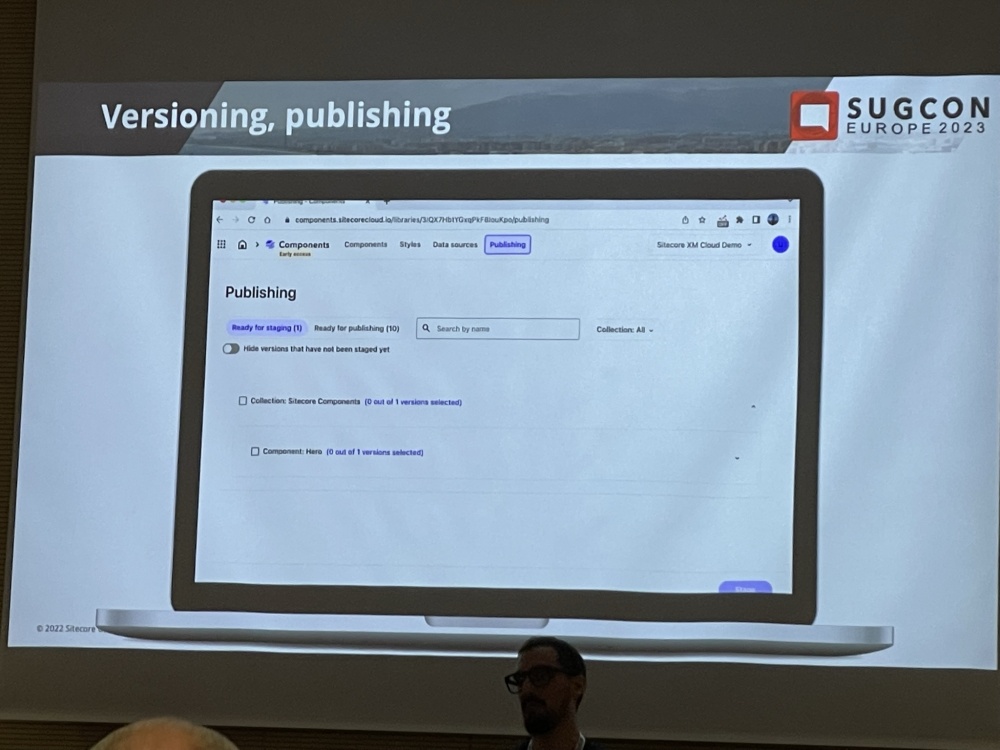
Then the components ‘look and feel’ – layout, dimensions and sizing can be configured in the Builder. This looks pretty neat. Then versioning and publishing is setup for the Component.

IMG_0721

IMG_0722

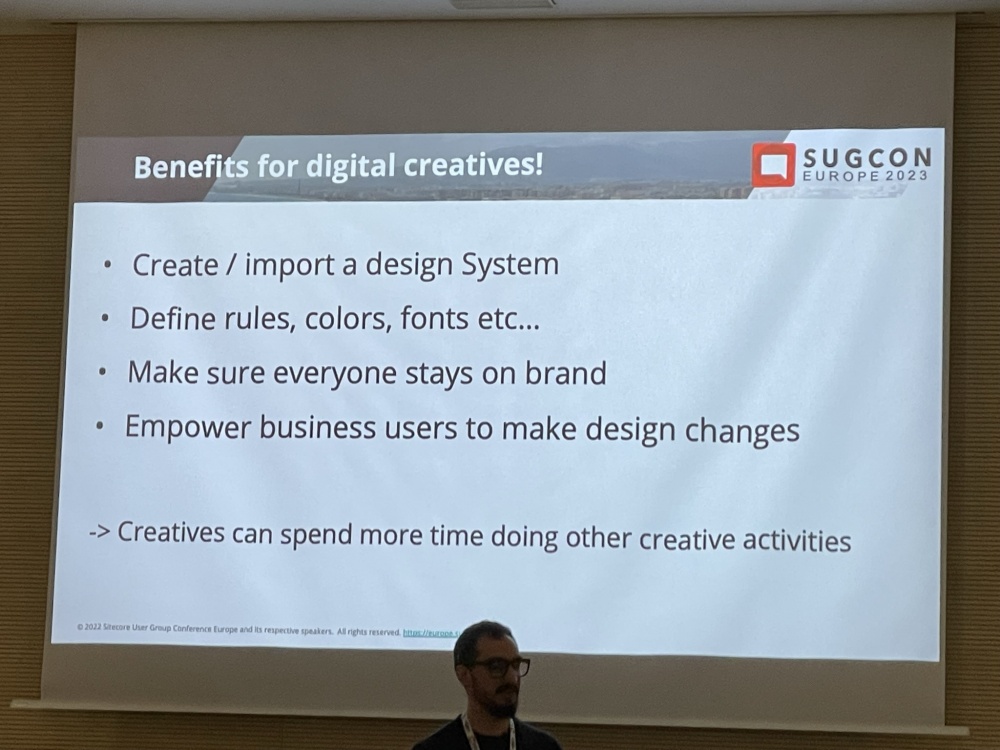
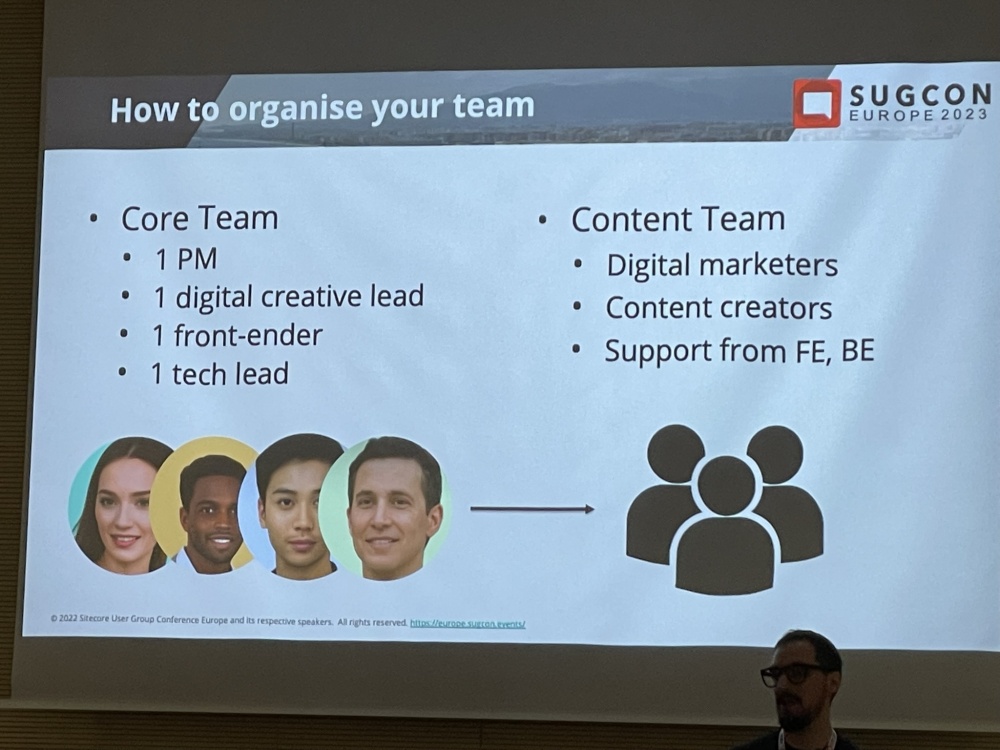
Lastly some details were shared around the benefits for digital creatives, it’s possible to get Sites built very quickly and easily using Components Builder.

IMG_0723
IMG_0724
IMG_0726
IMG_0727


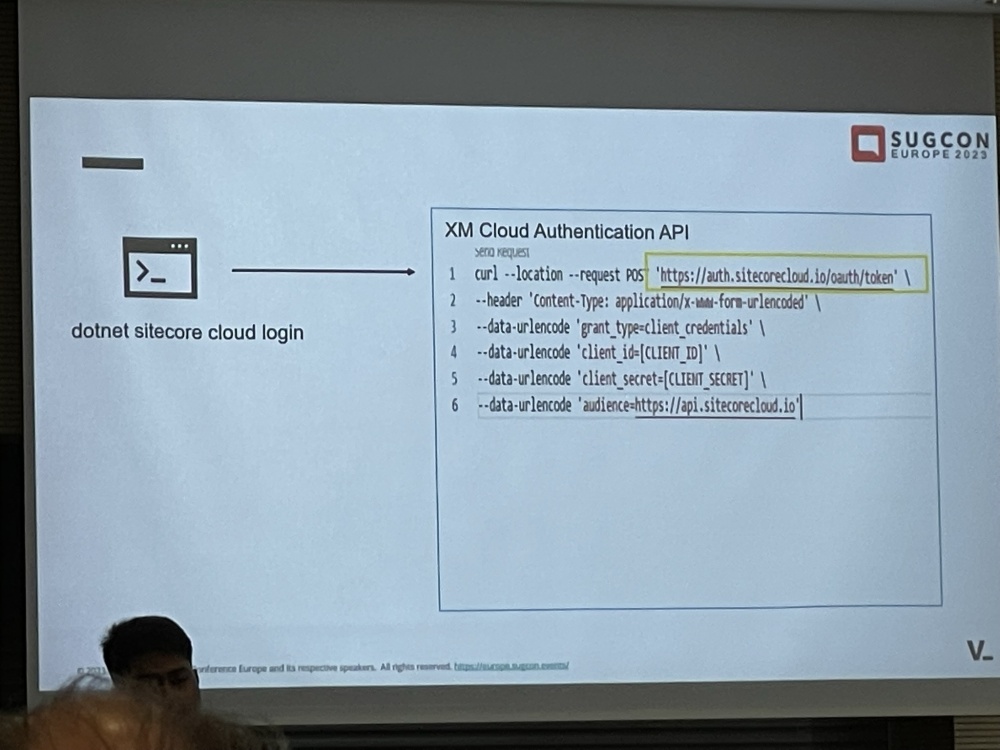
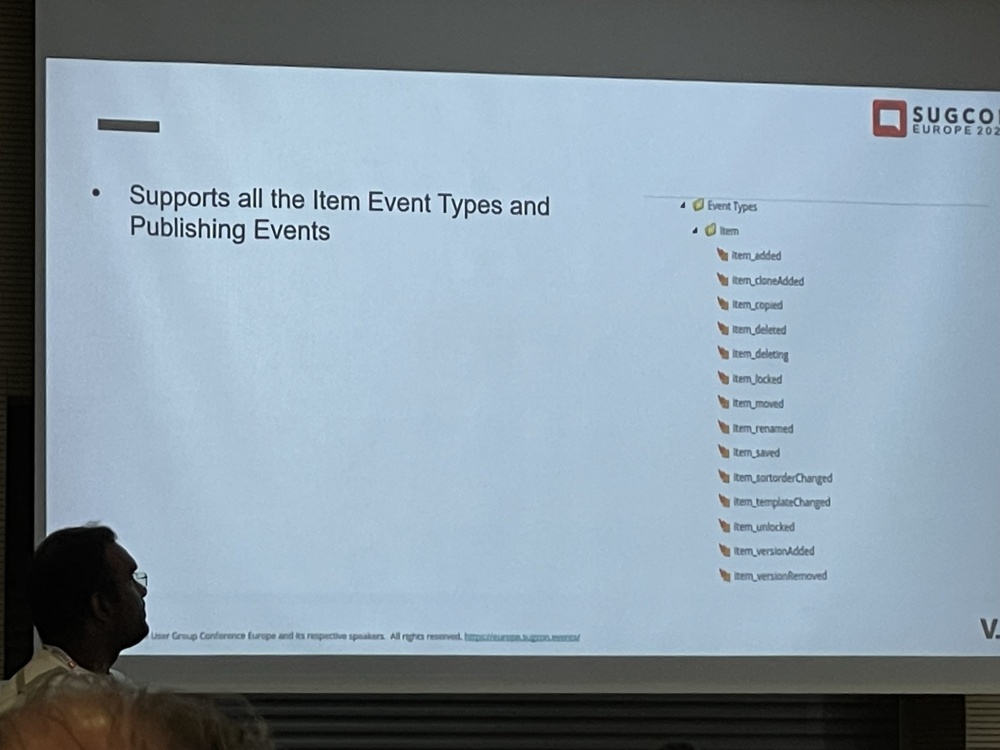
Leveraging XM Cloud APIs and Webhooks to powerup integrations – Ramkumar Dhinakaran & Elakkuvan Rajamani

IMG_0740

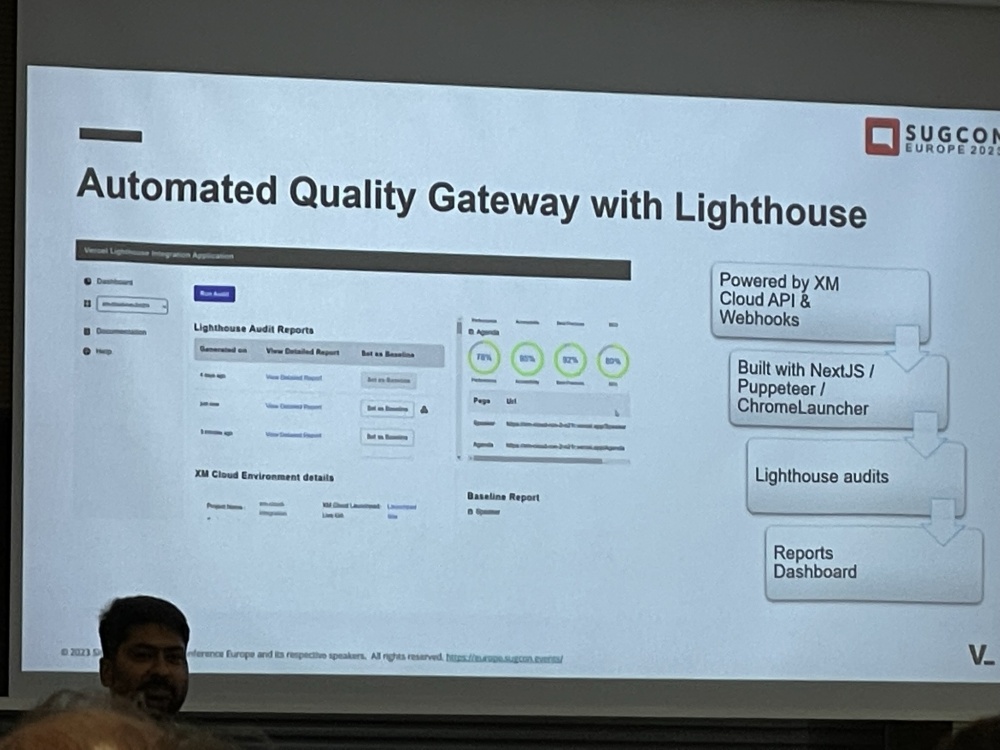
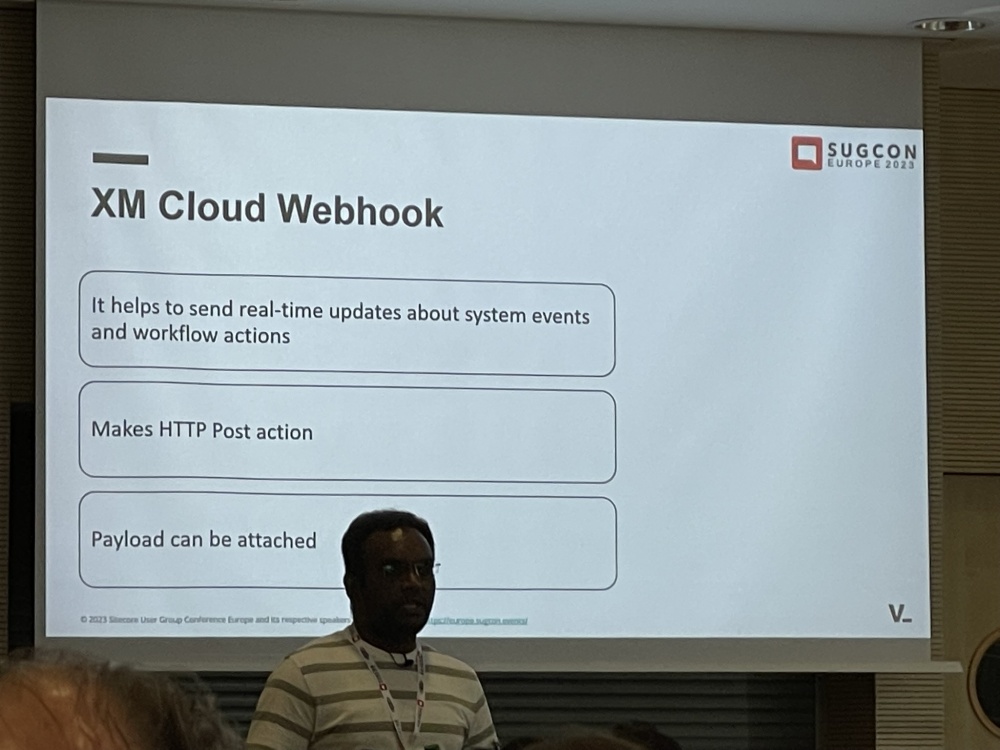
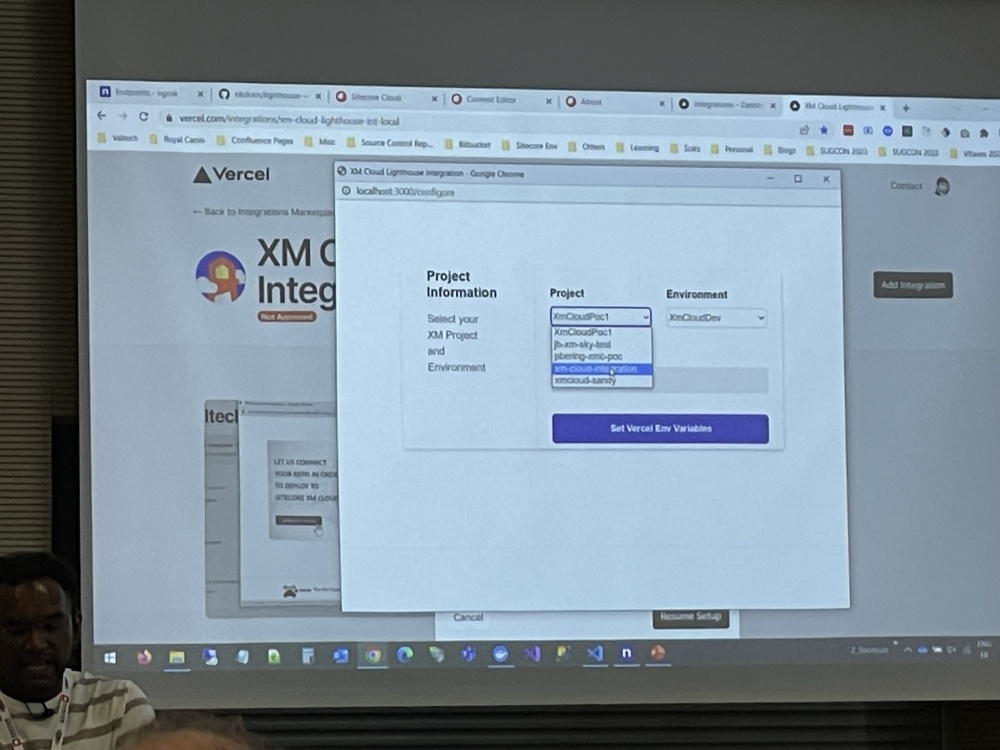
After lunch it was time for another session, this time on Webhooks. The use-case here was the XM Cloud Lighthouse Integration which would do an automated quality check of pages using Webhooks and report on it.

IMG_0731

IMG_0742
IMG_0745

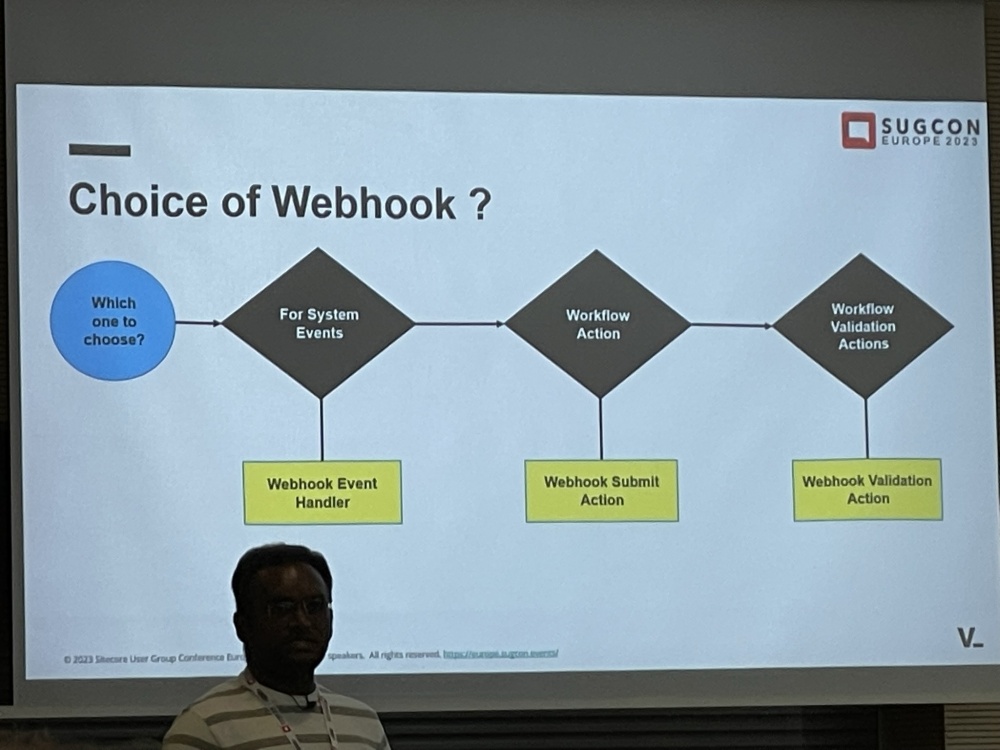
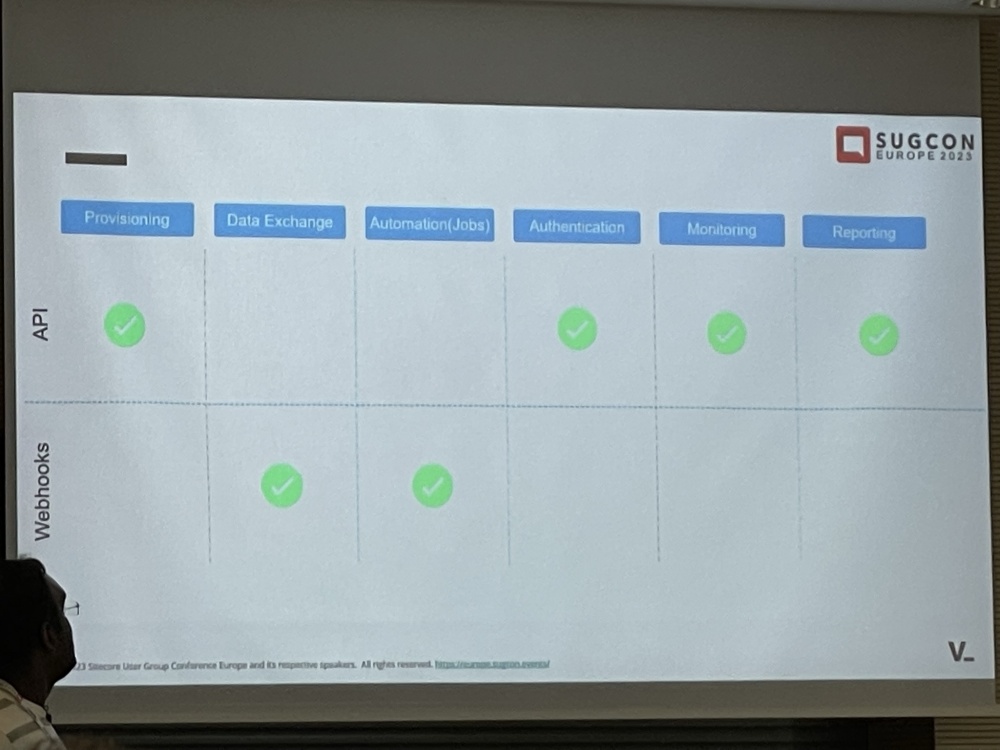
Depending on the integration required it might not be best to use a Webhook:
IMG_0756
IMG_0758

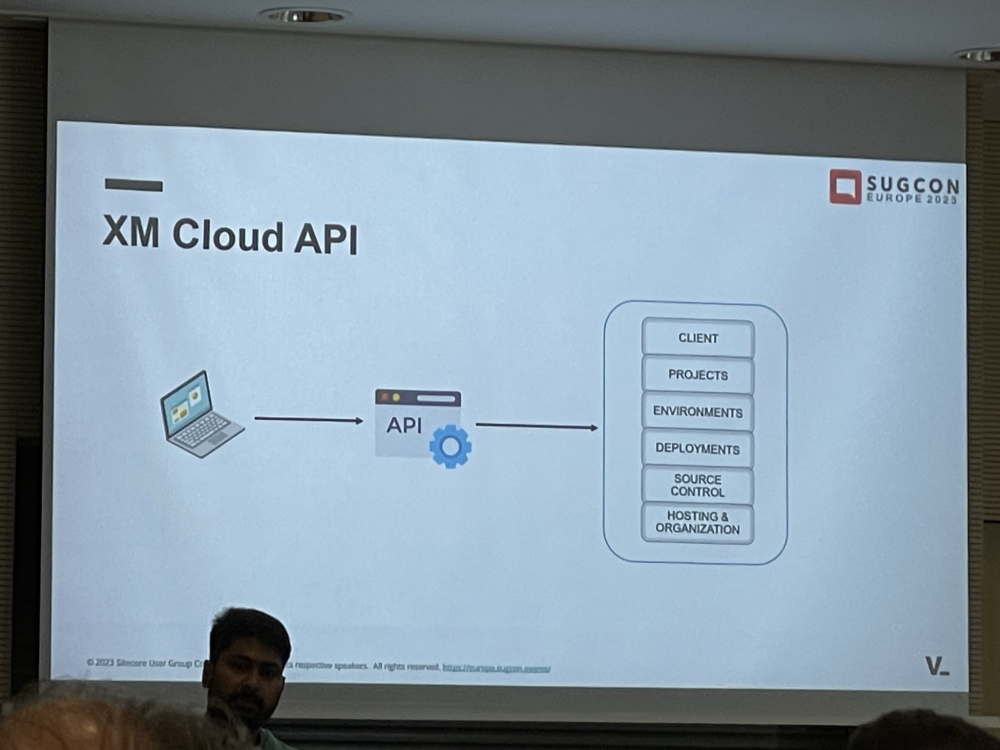
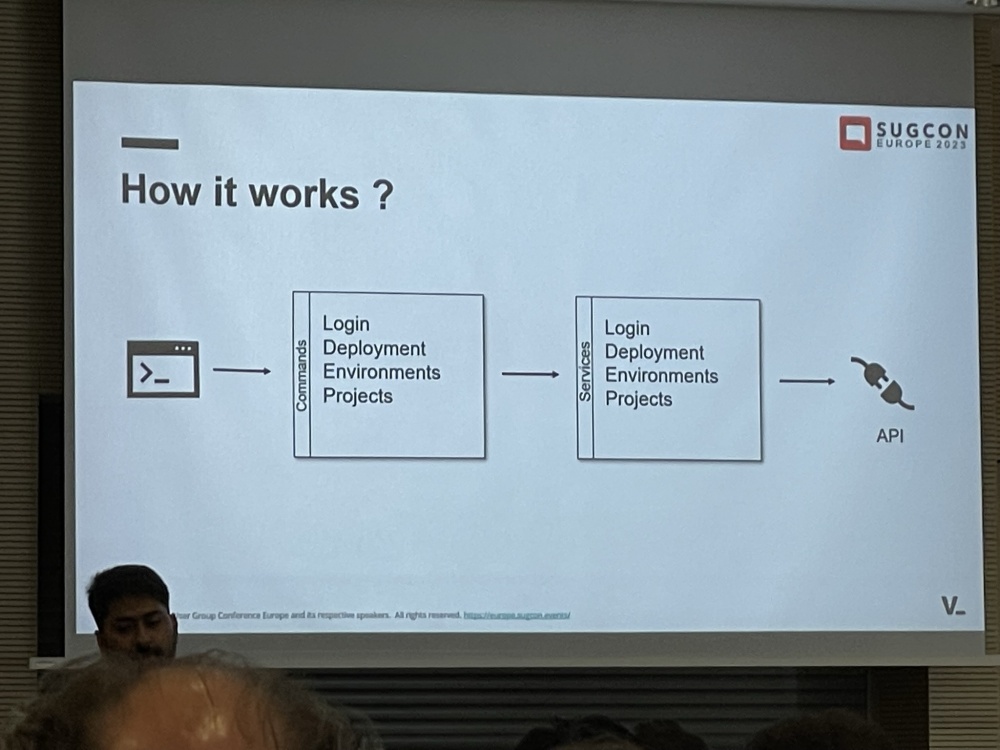
Quite a lot of detail was shared with how this all works and integrates.

IMG_0735
IMG_0736
IMG_0737
IMG_0747

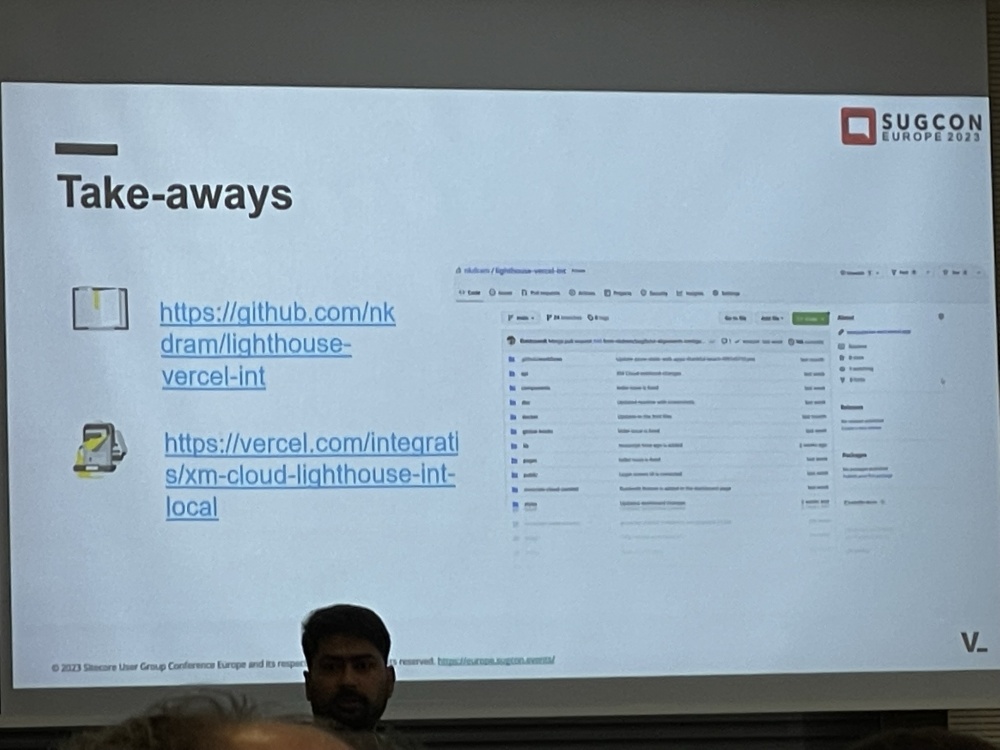
There were some links and takeaways shared at the end.

IMG_0763


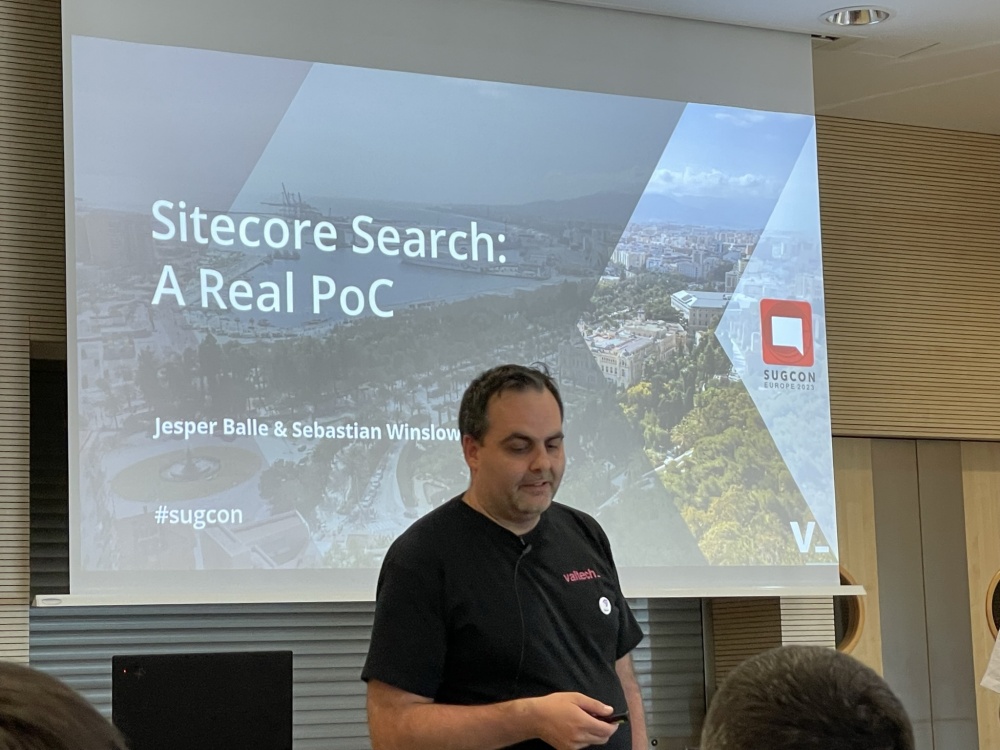
Sitecore Search: Real case PoC – Sebastian Winslow & Jesper Balle

IMG_0766

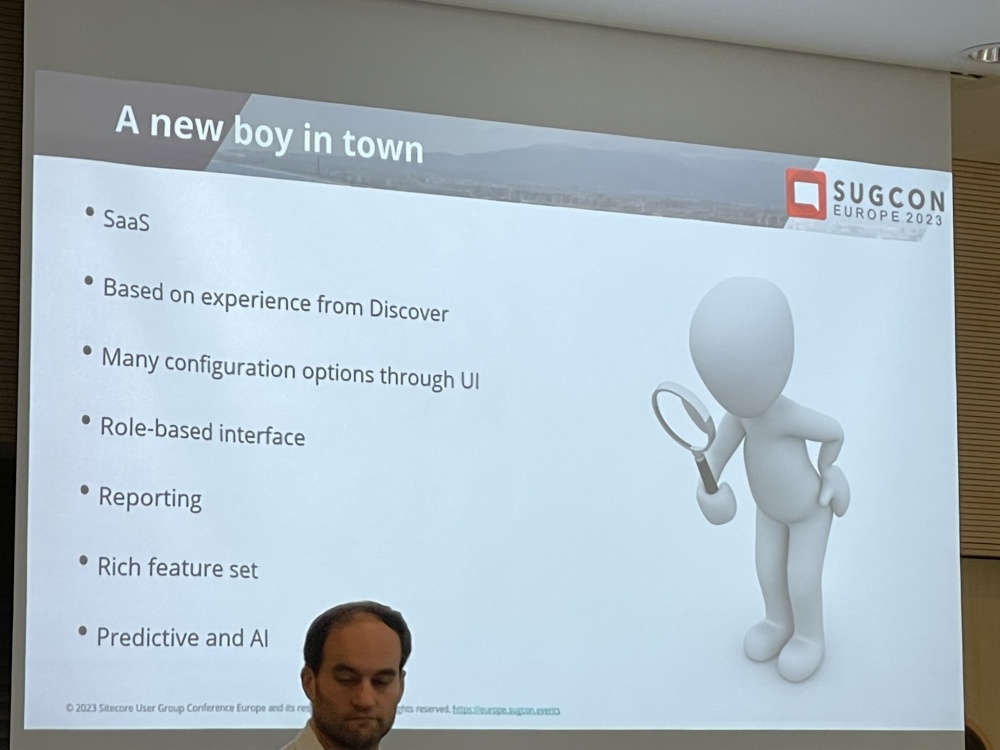
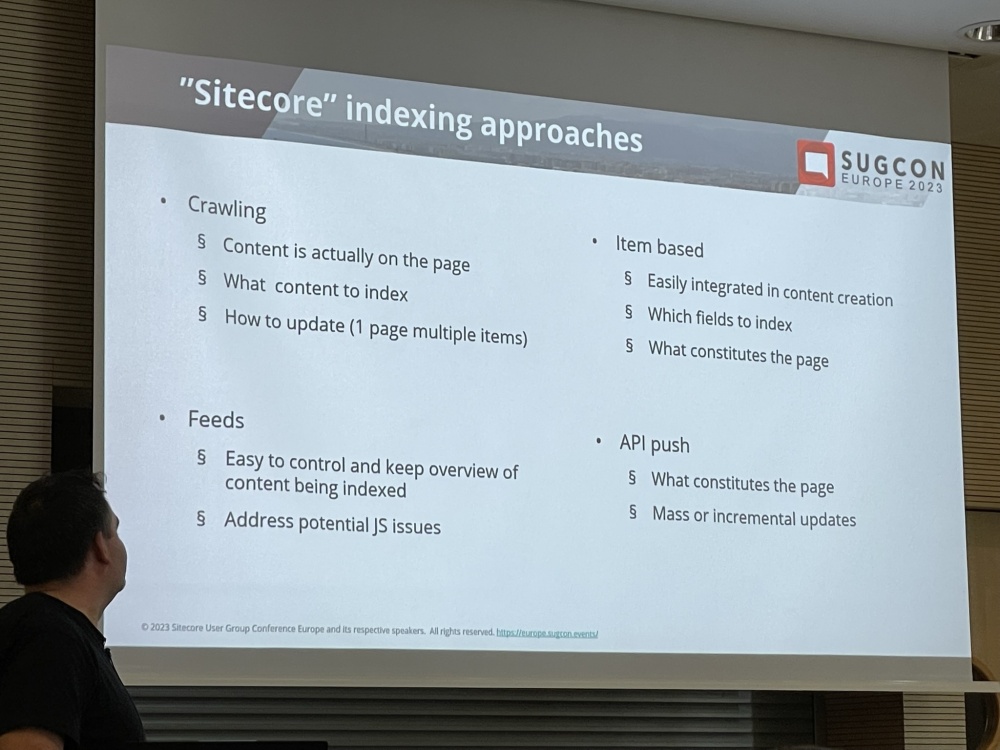
The 2nd to last session for the day was on the Sitecore search (based on Discover) which I was keen to learn about more as I didn’t know much about how it worked.

IMG_0770
IMG_0772
IMG_0773

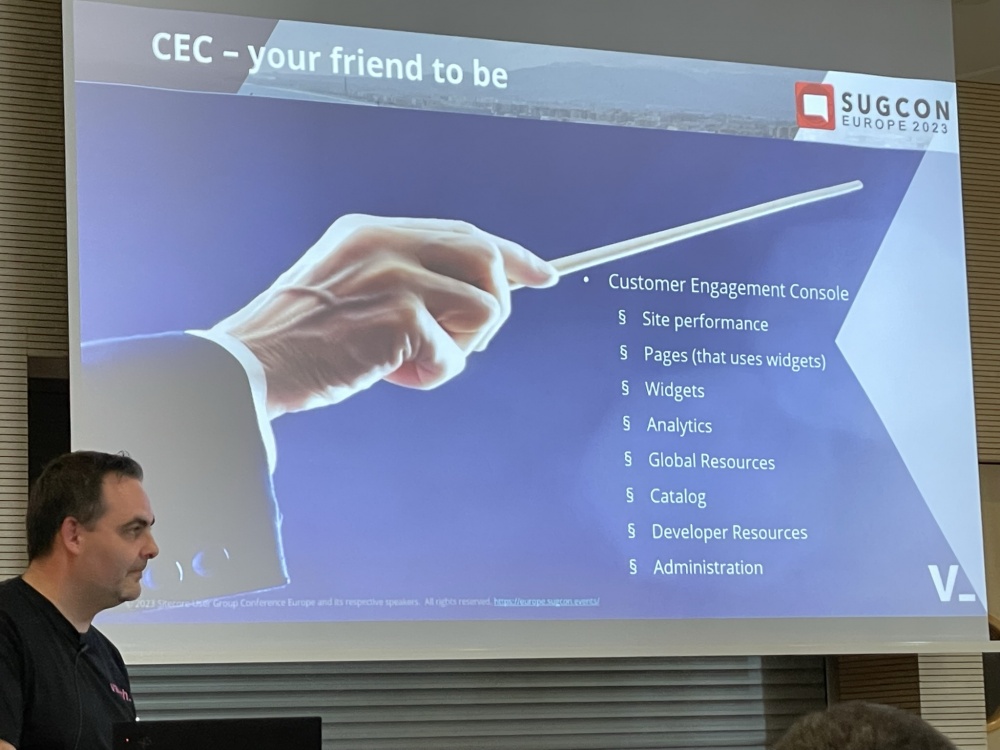
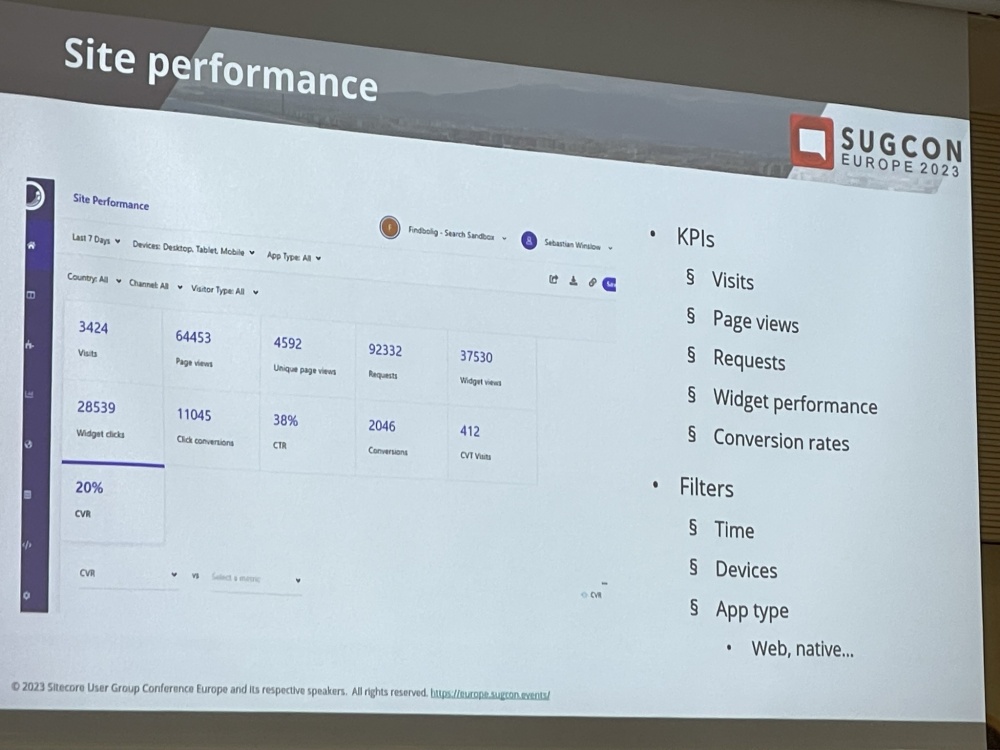
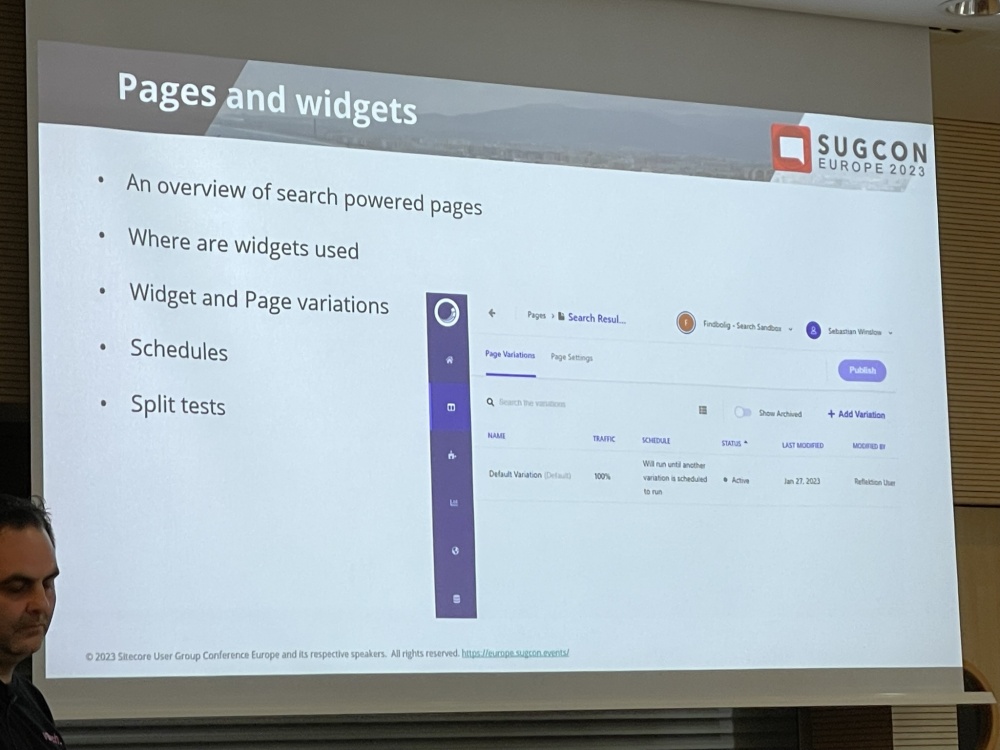
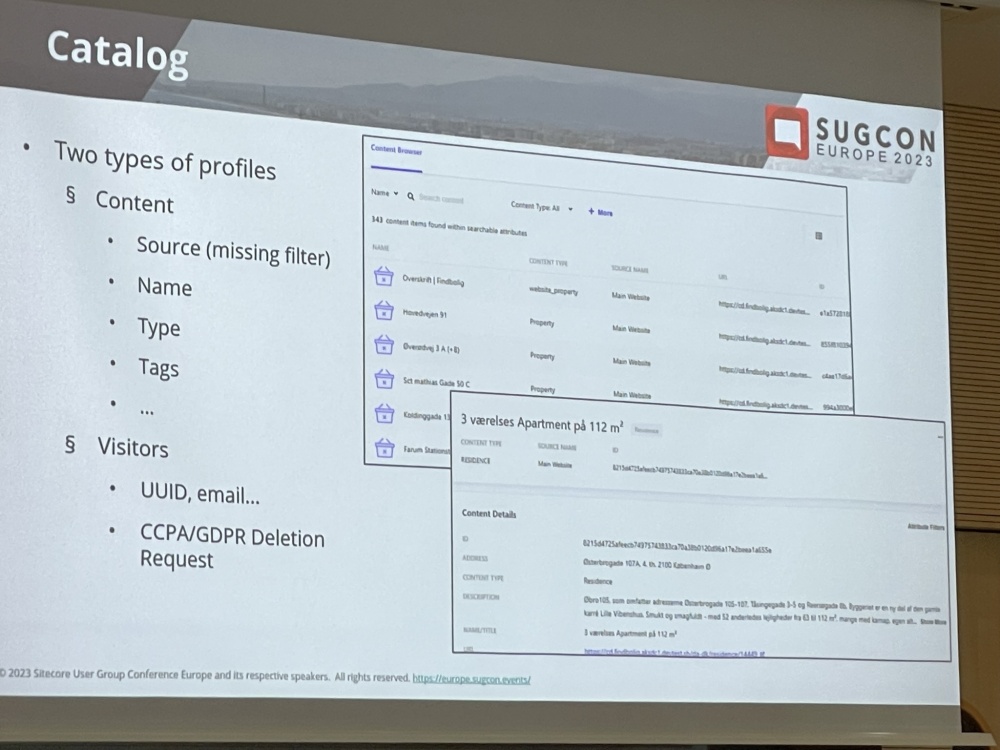
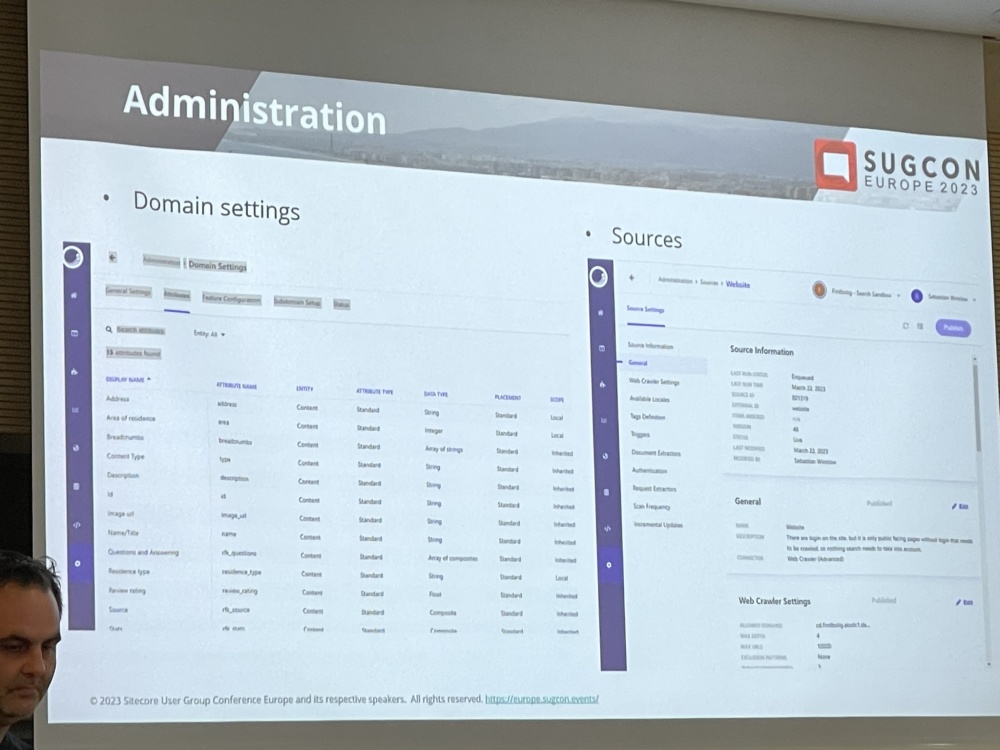
CEC looks pretty powerful and can be used to manage search, performance is key and widgets can be configured for search and catalog:

IMG_0774
IMG_0776
IMG_0778
IMG_0779

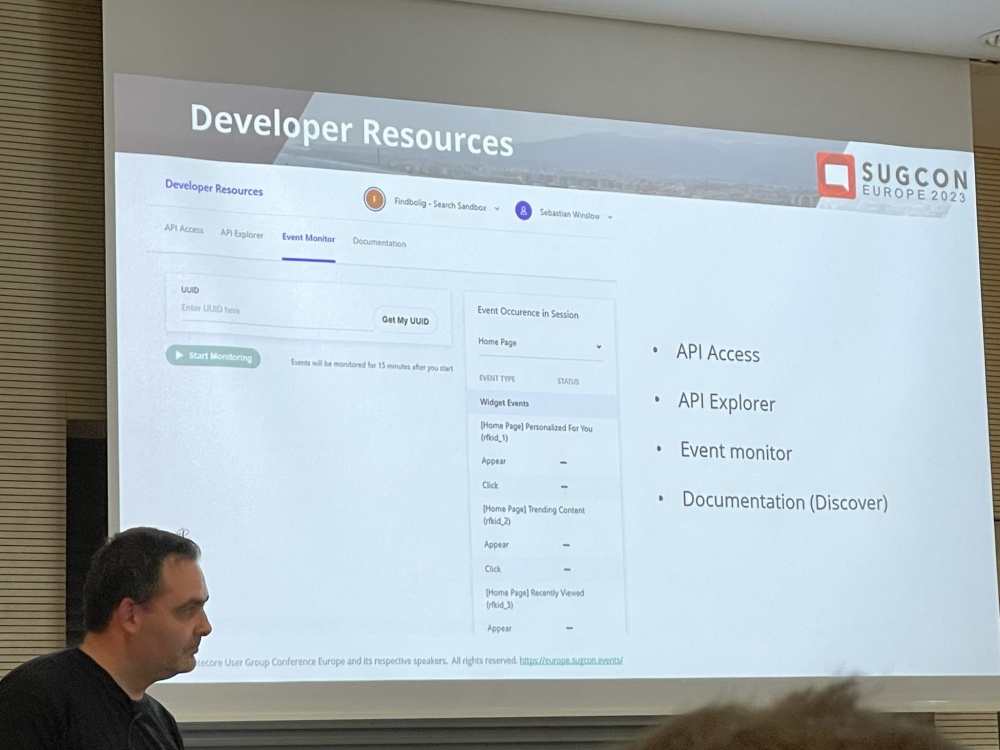
Some dev resources and admin info were shared:

IMG_0780
IMG_0782

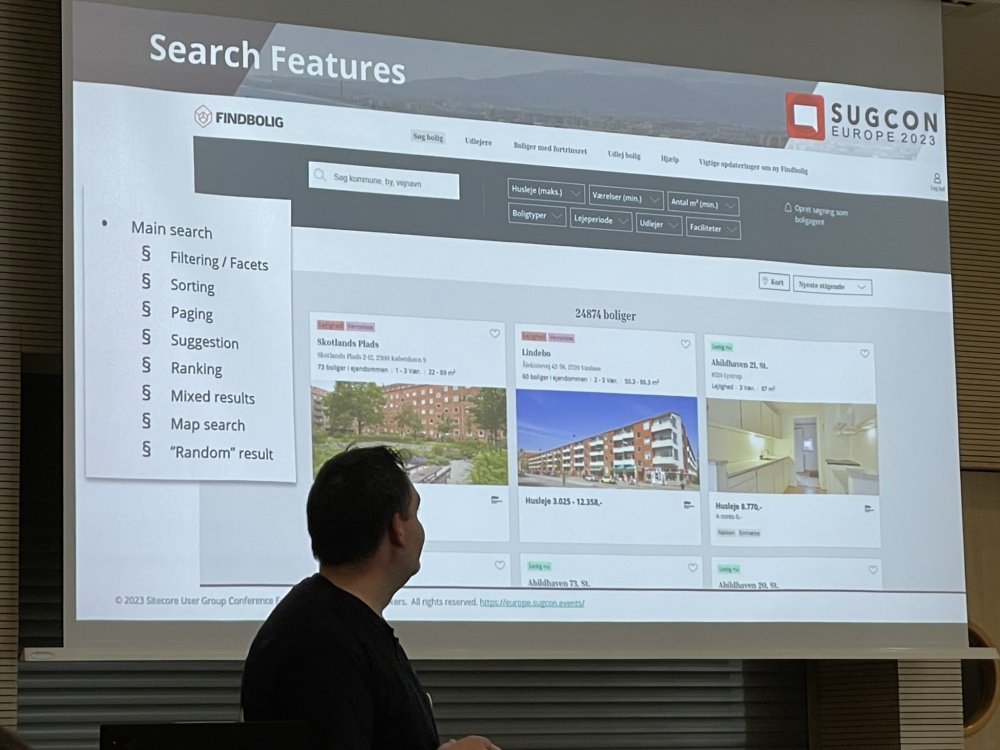
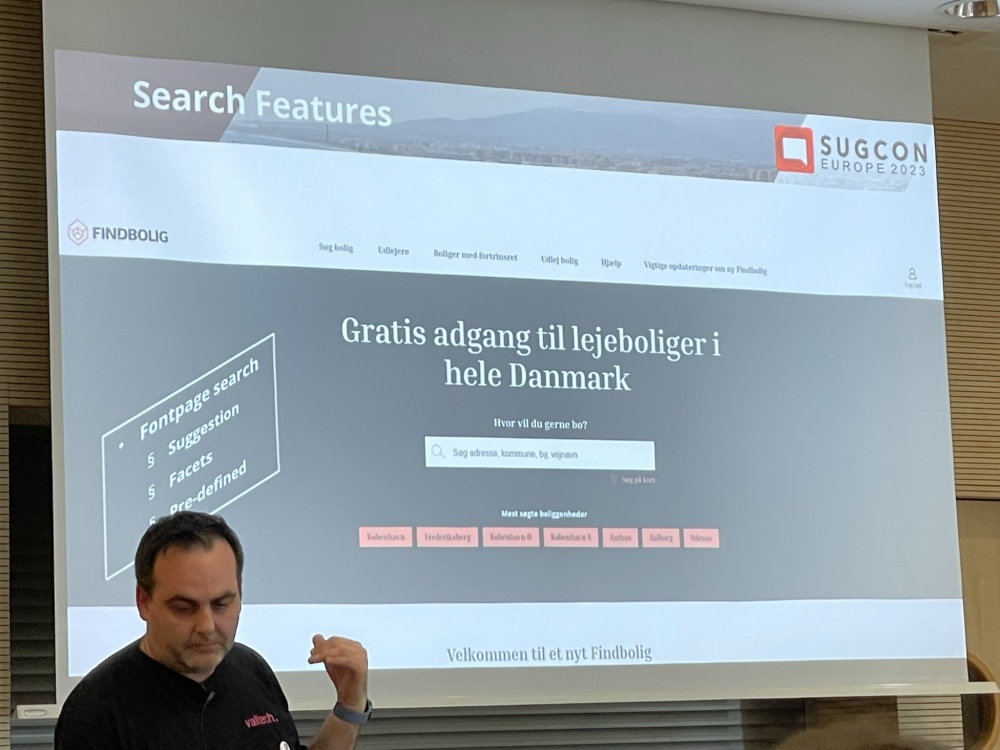
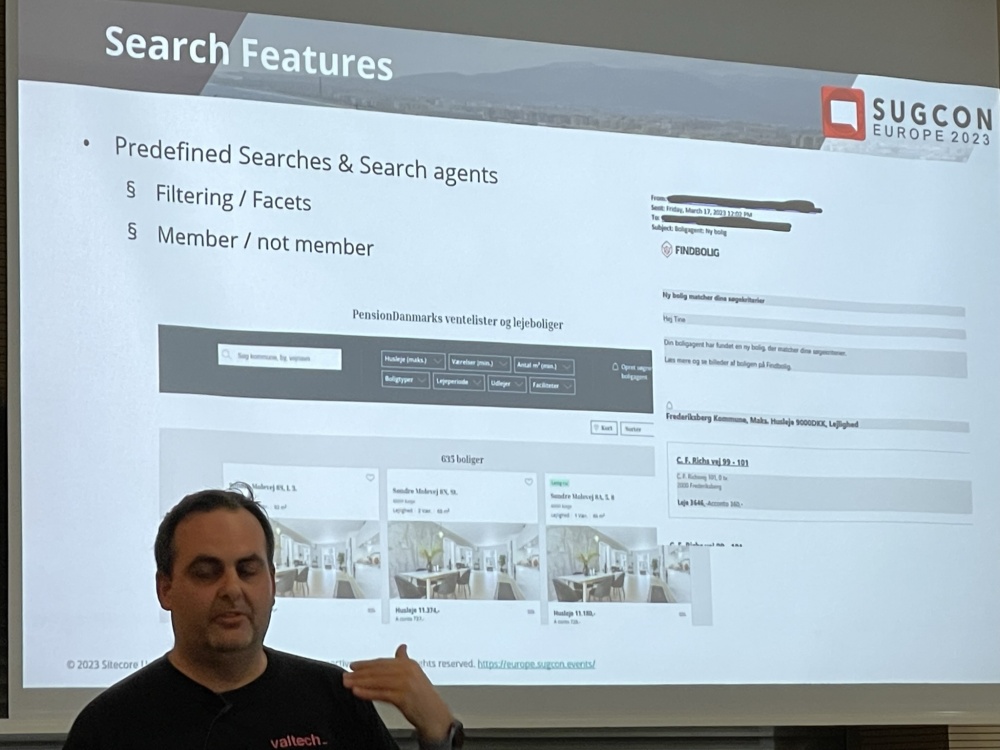
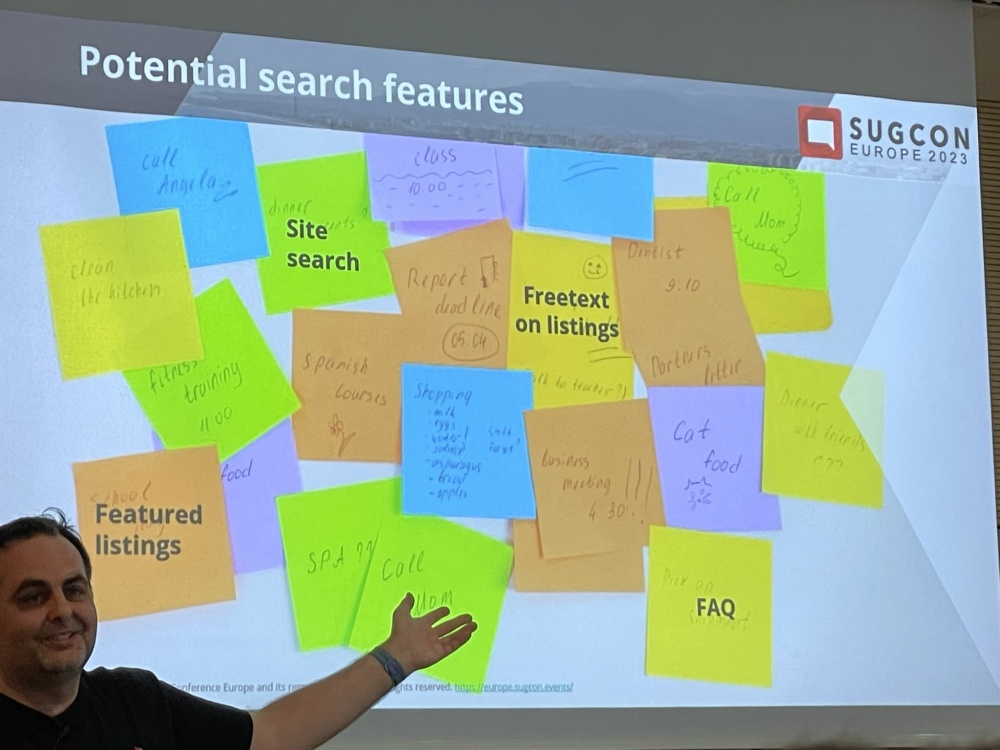
The use case for search was a property Site. There is still some features that need to be built.

IMG_0783
IMG_0785
IMG_0789
IMG_0790

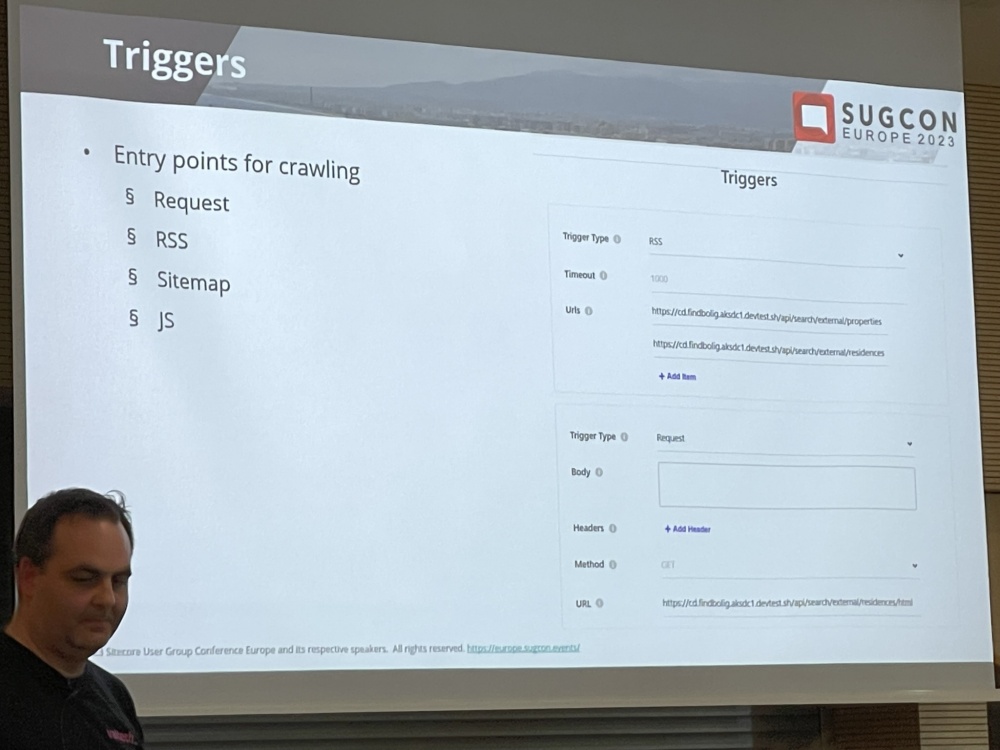
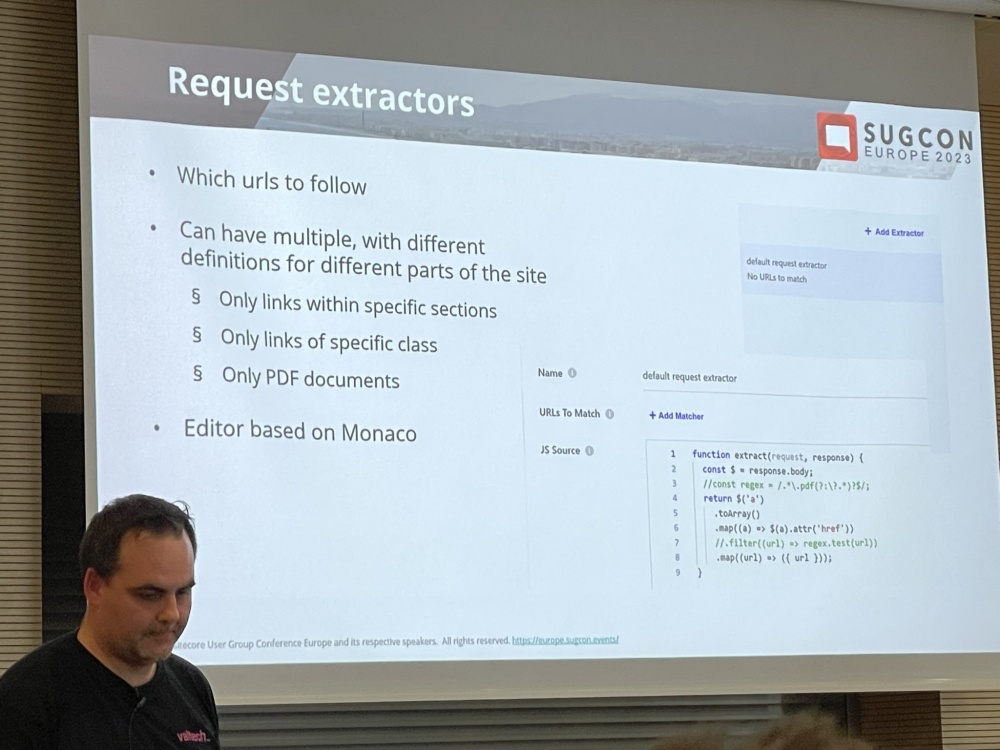
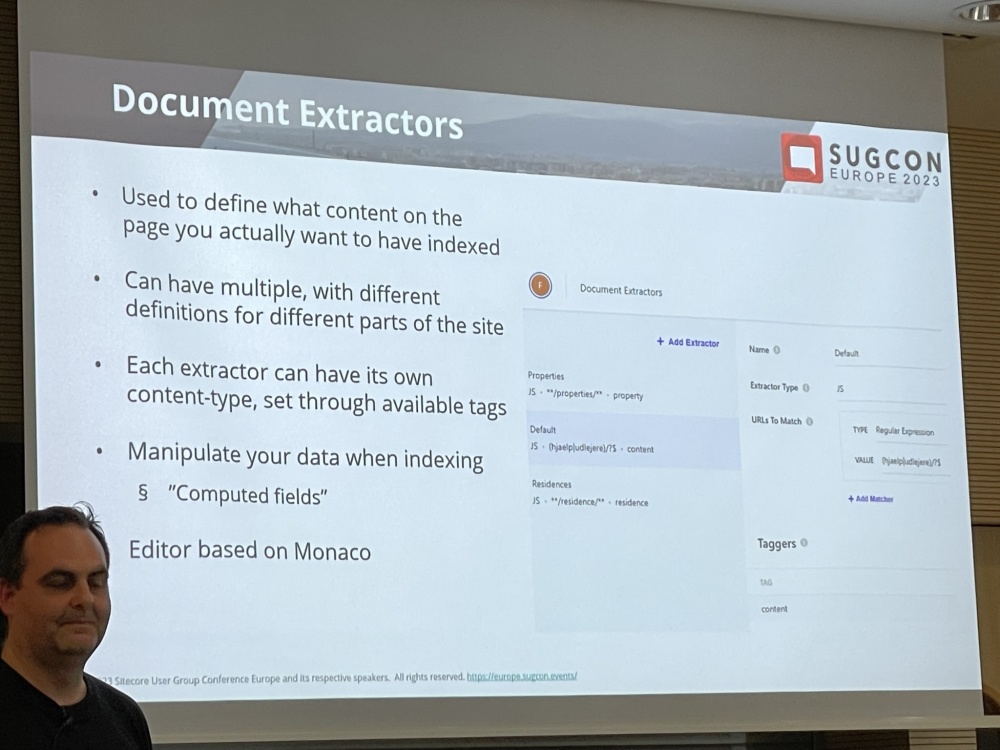
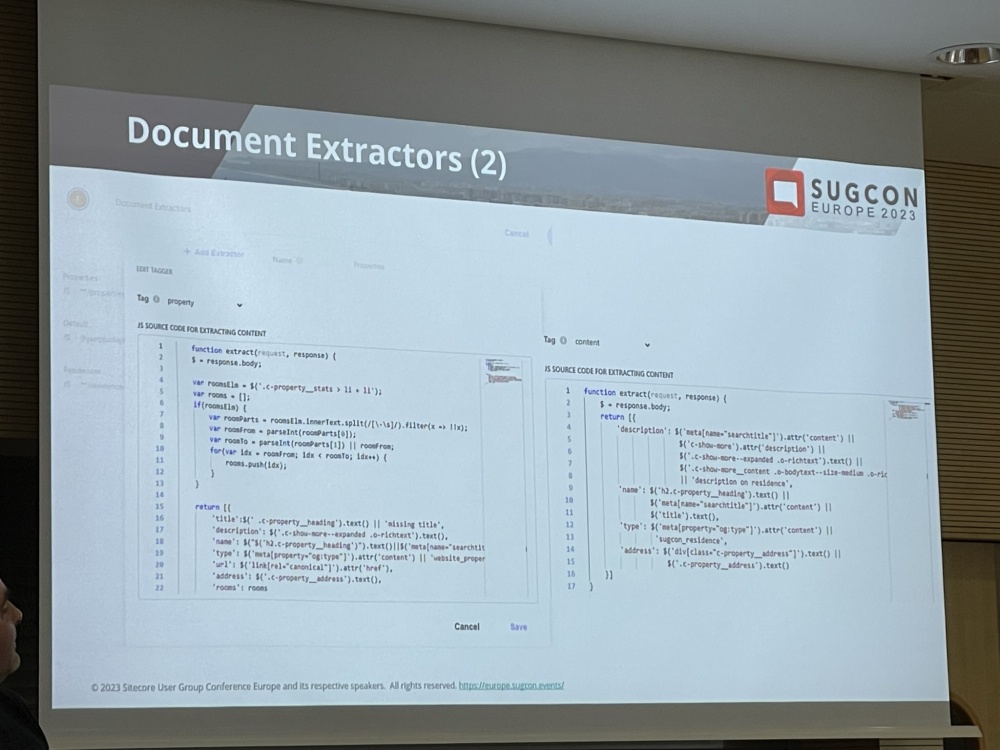
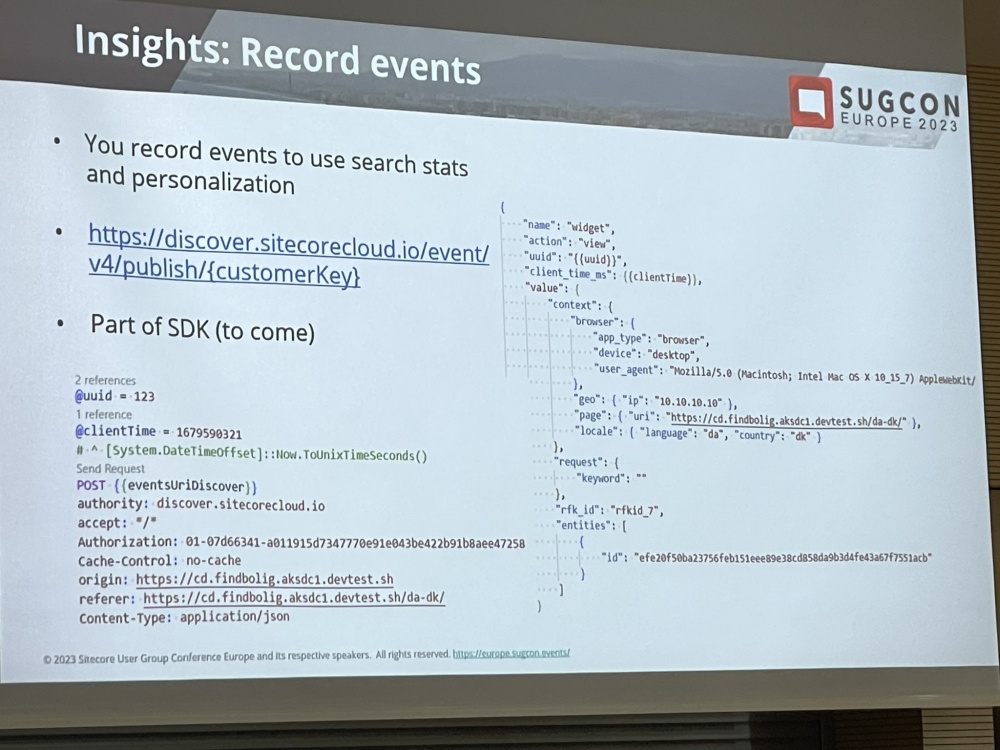
Some info was then provided on Triggers to get the content, Request and document extractors to process and manipulate the content.

IMG_0791
IMG_0792
IMG_0793
IMG_0794

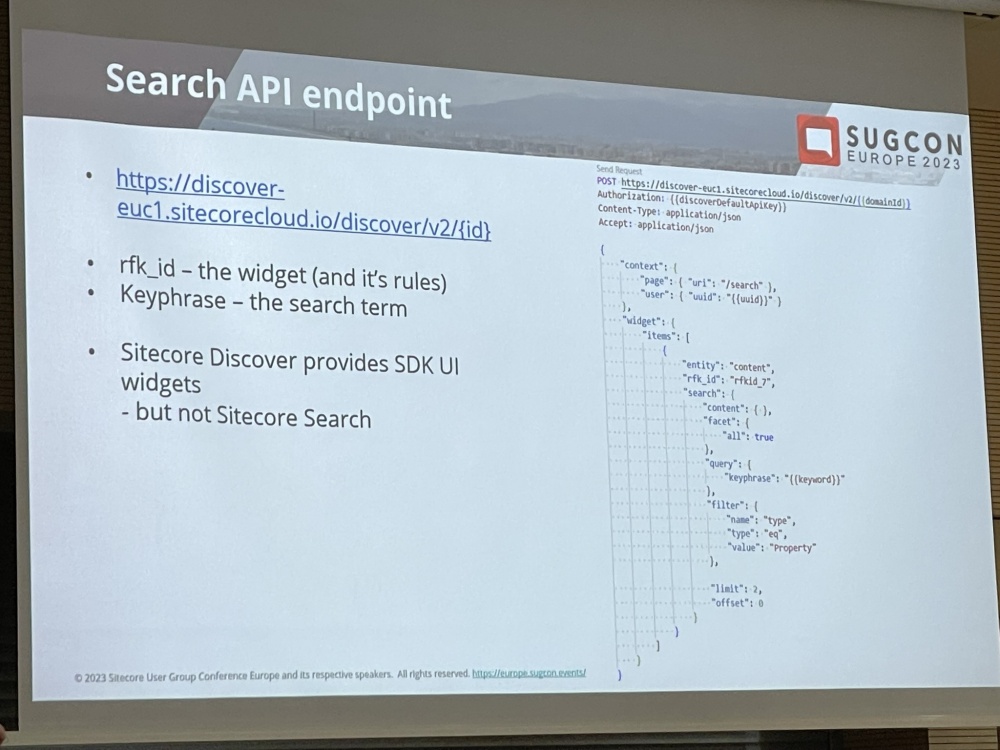
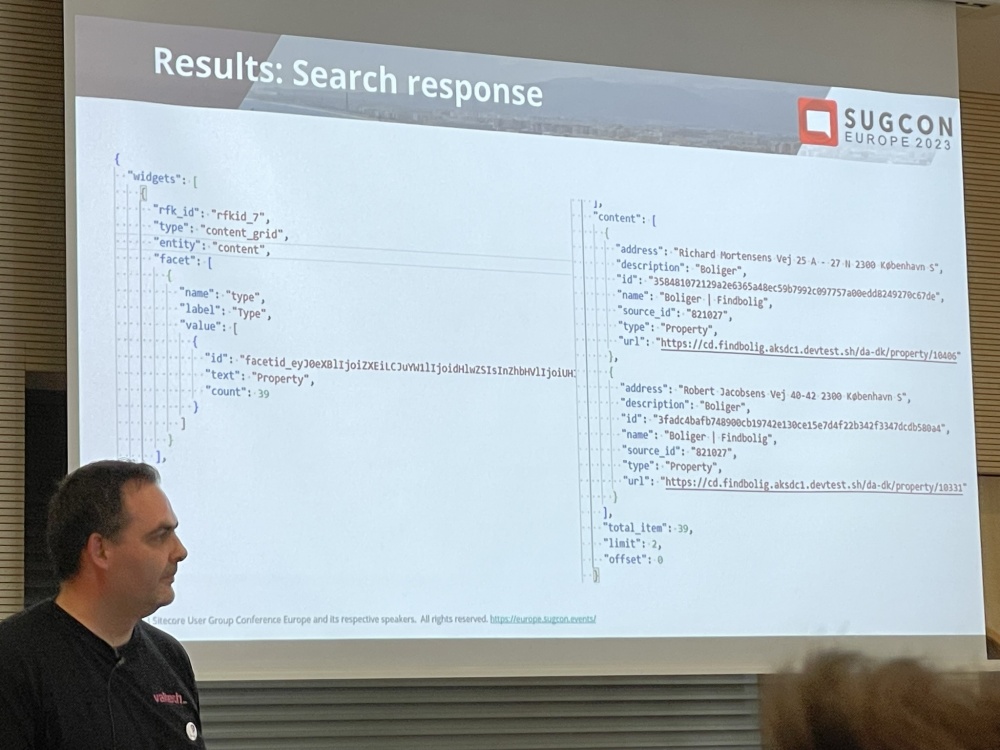
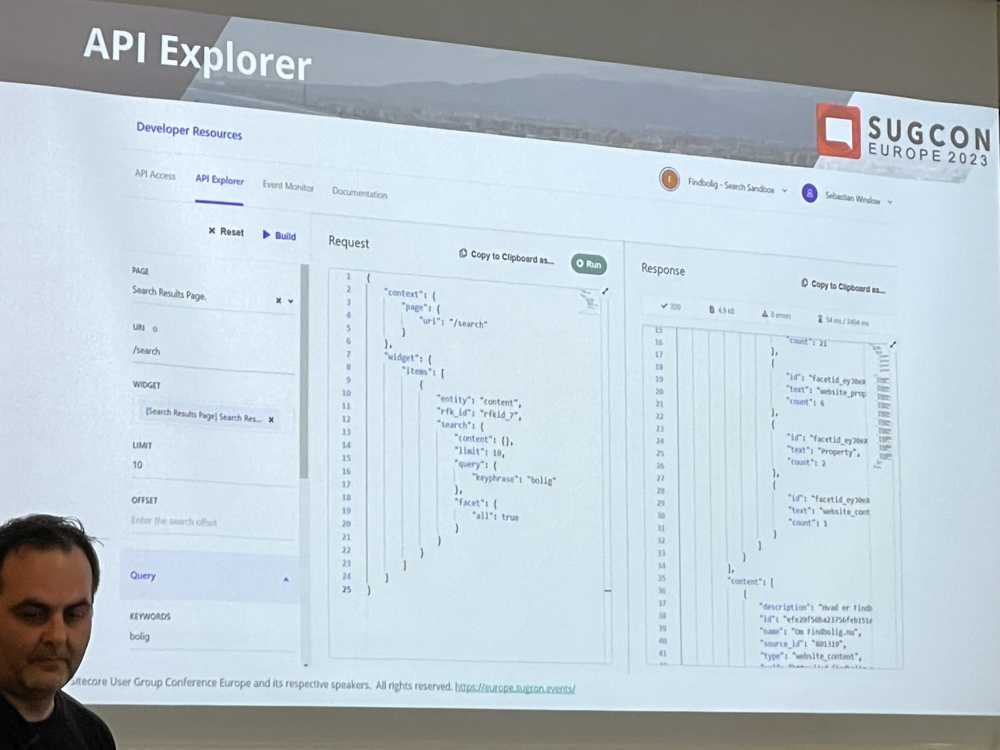
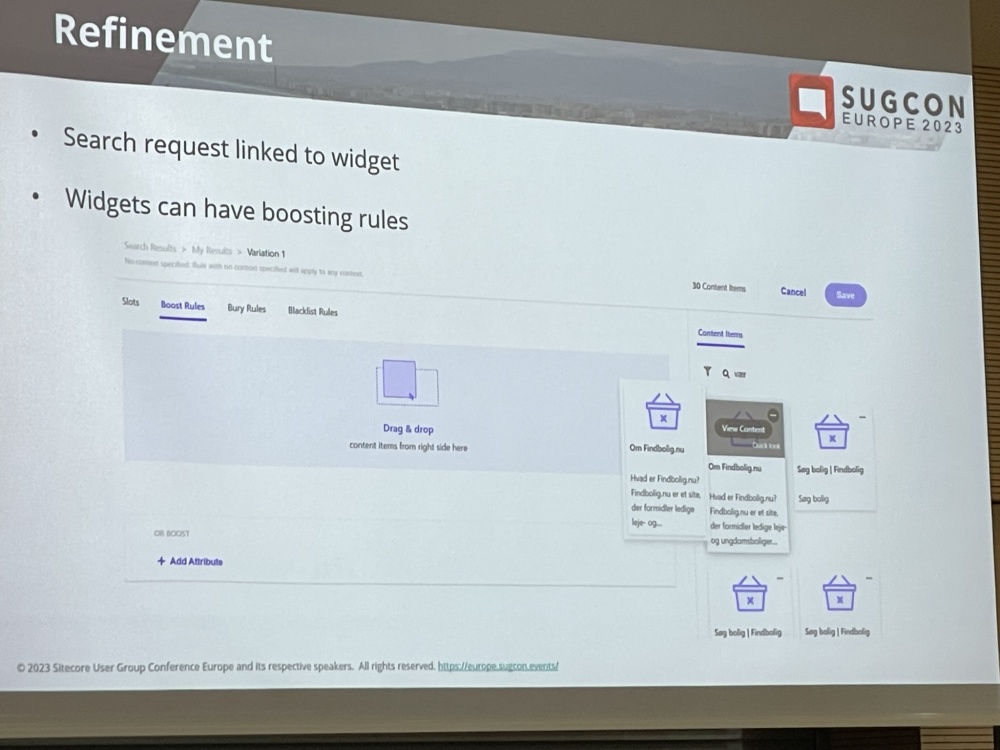
Search API endpoints, results response, API Explorer and ability to refine the widgets.

IMG_0796
IMG_0798
IMG_0799
IMG_0801

It’s early days and the search SDK is still not there yet but it’s coming. Be careful with how much content you try and index when testing but there are some significant benefits to using it.

IMG_0803
IMG_0805

This was a really informative session and gave me all the info I was looking for about how to go about implementing search.

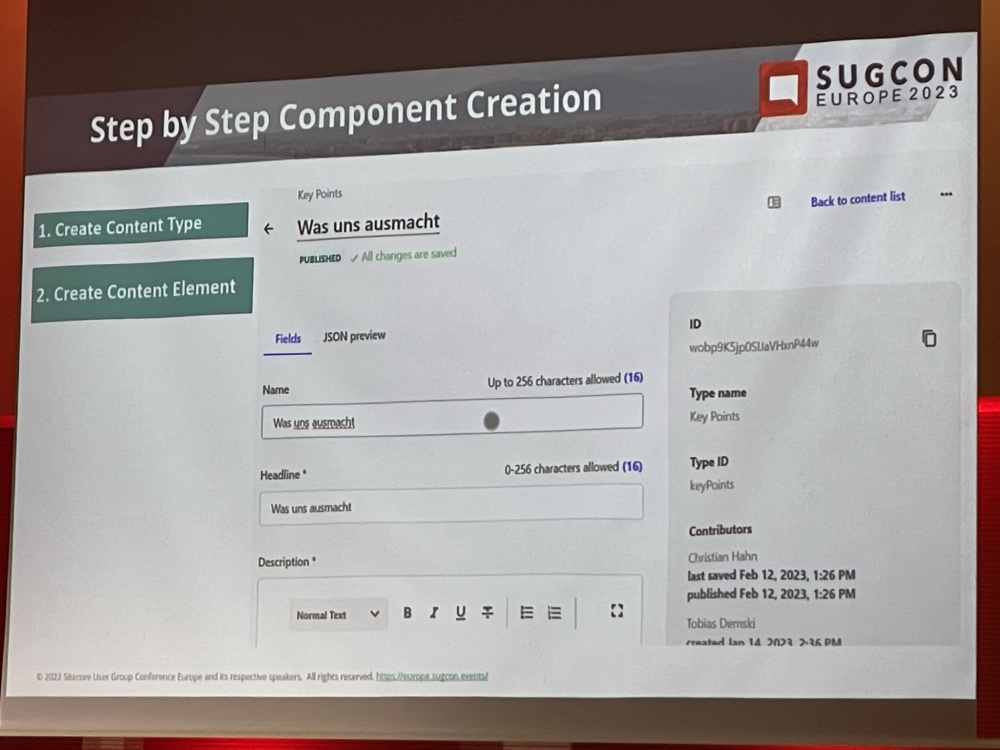
Experiences with Content Hub One – Journey of relaunching our Usergroup website – Katharina Luger & Christian Hahn

IMG_0807

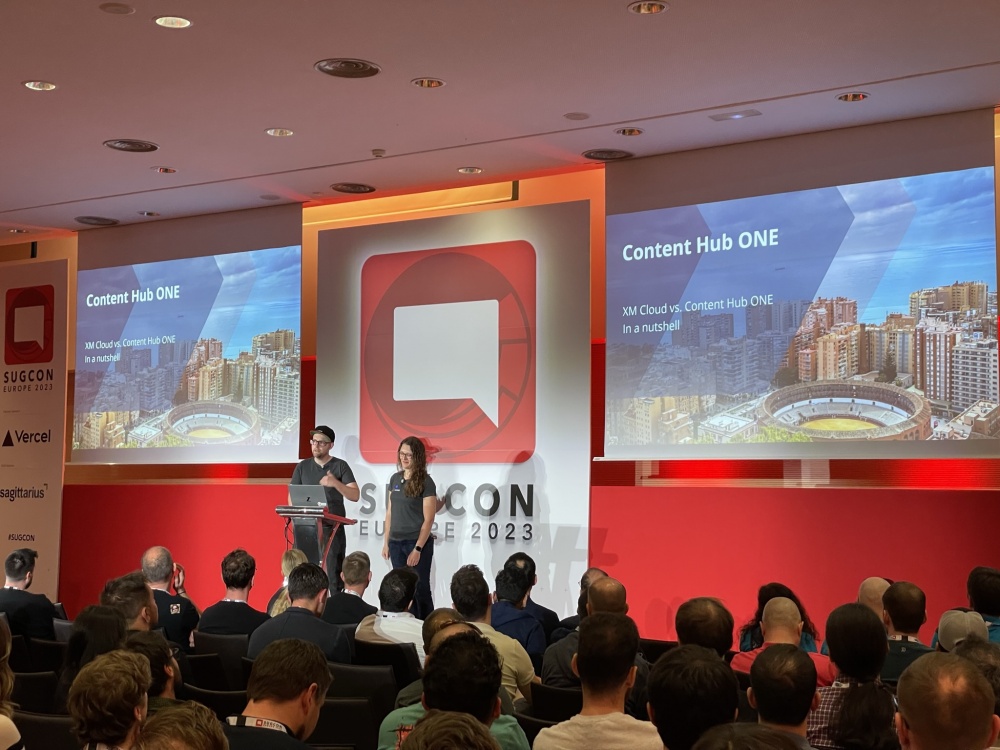
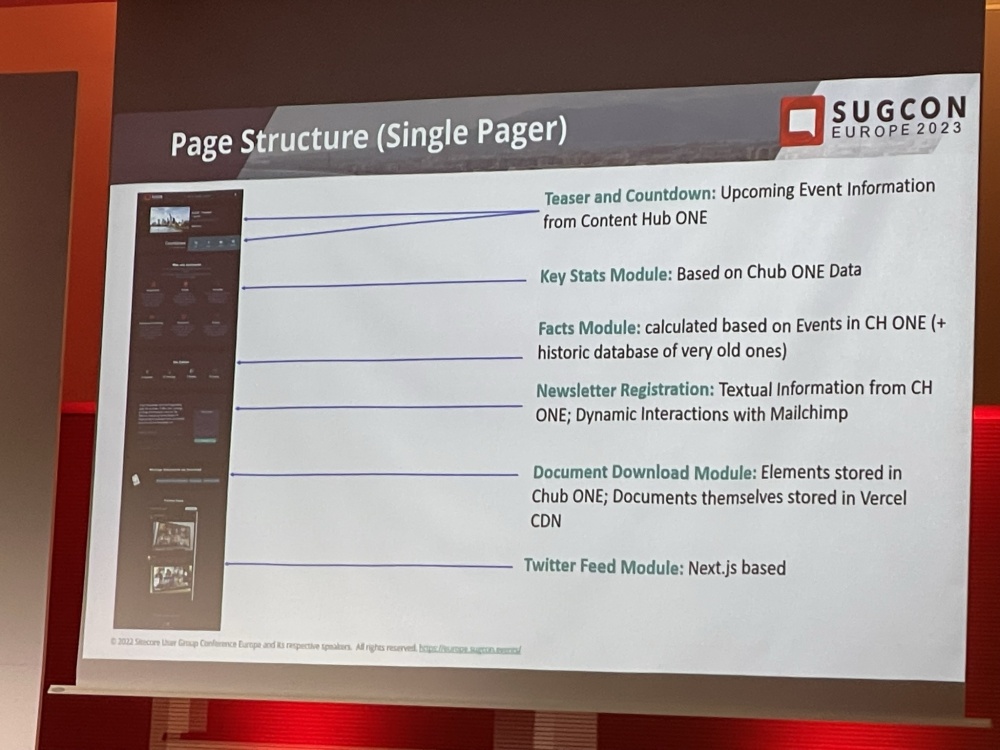
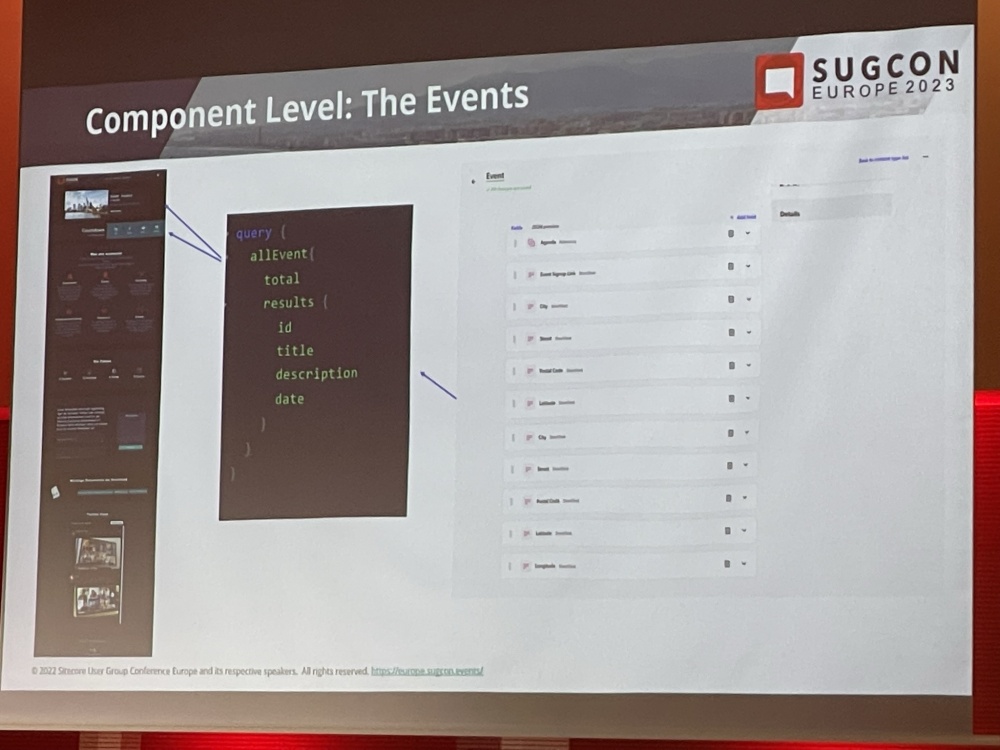
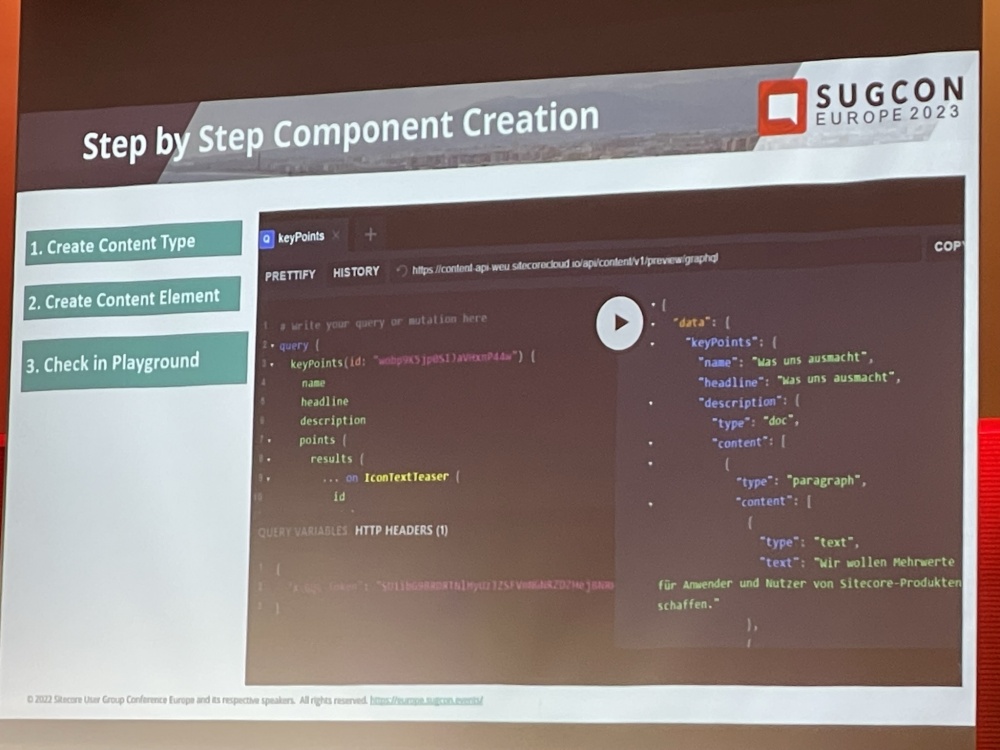
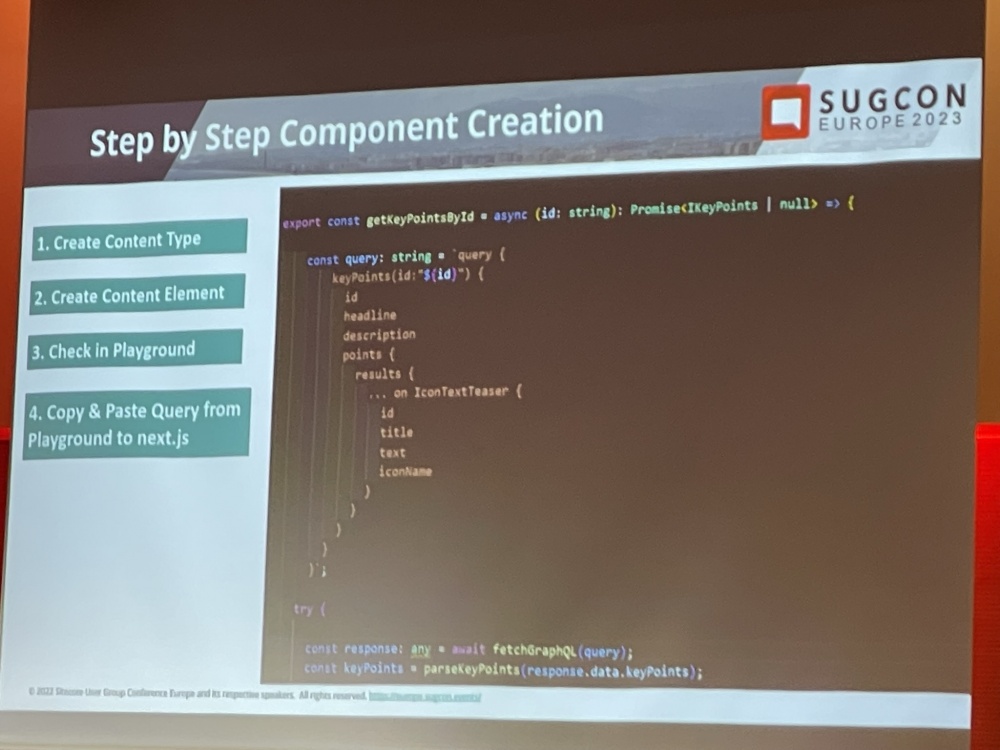
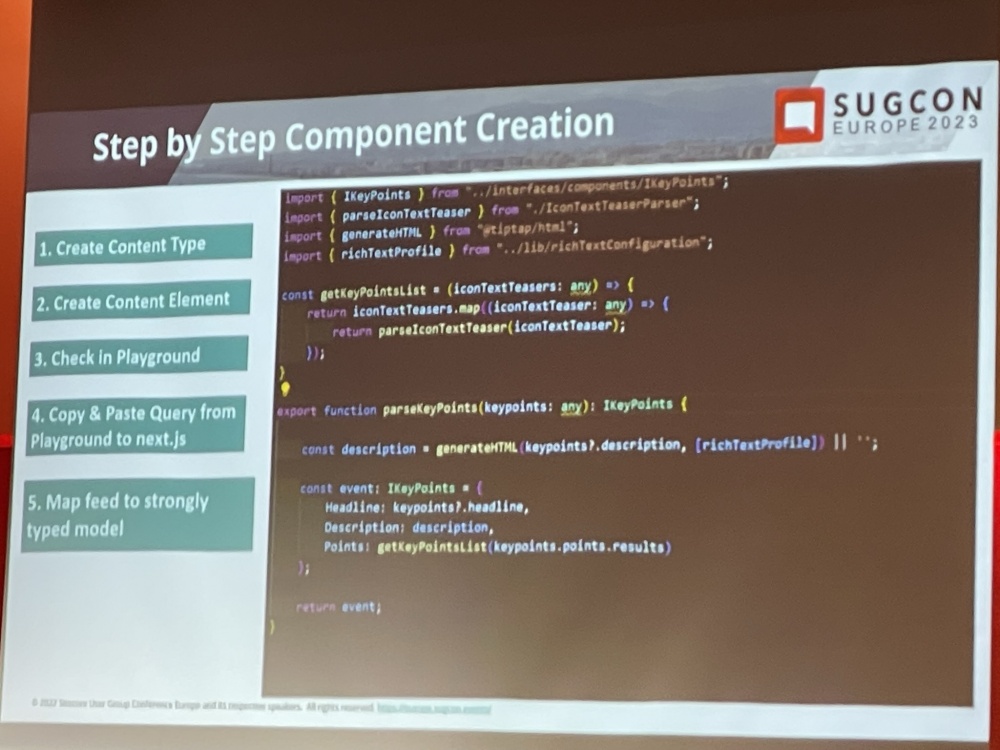
Then it was time for my last session of the day on how the Sitecore User Group Germany rebuilt their site as an SPA using Content Hub One.

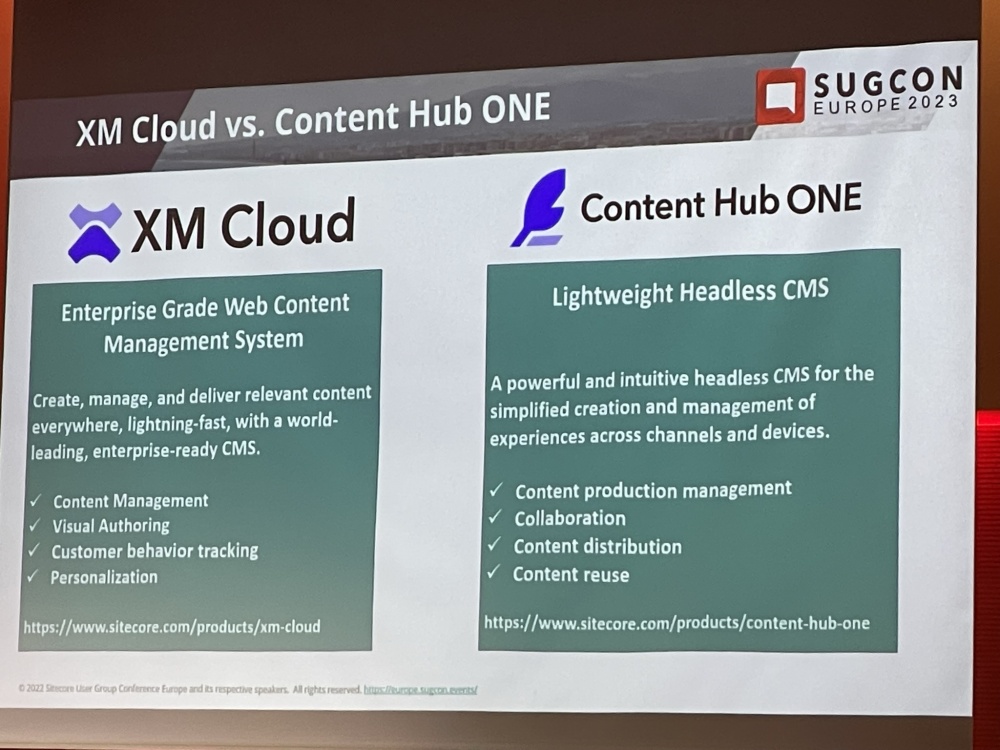
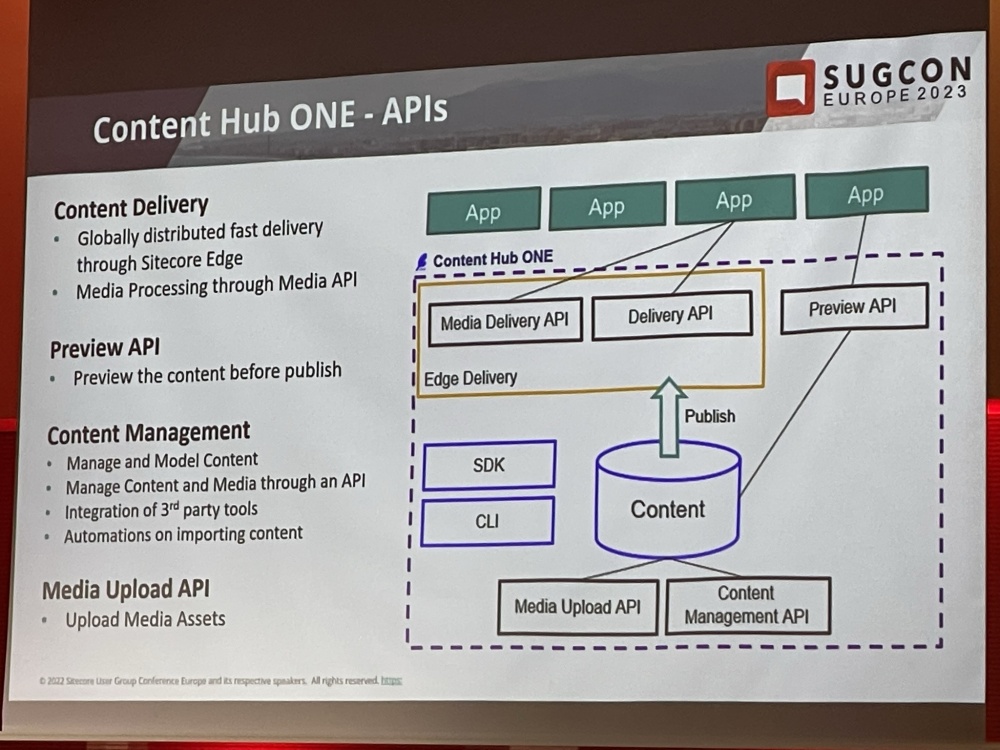
The slide below was probably the simplest comparison I saw all SUCON of the differences between XM Cloud and Content Hub One.

IMG_0808
IMG_0811
IMG_0816
IMG_0818

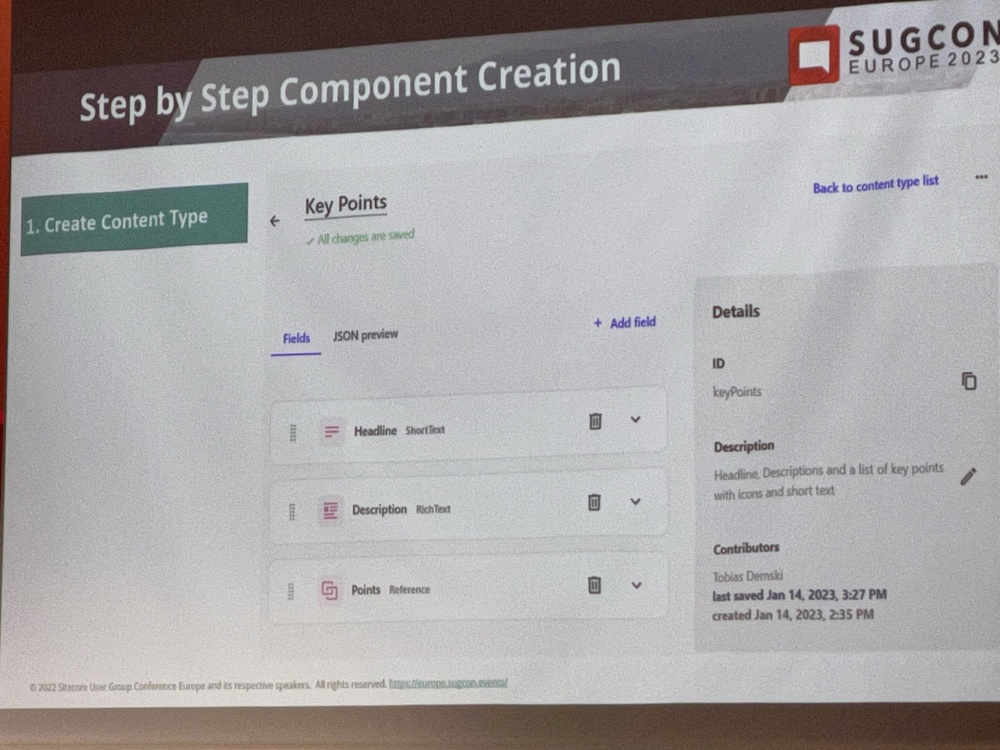
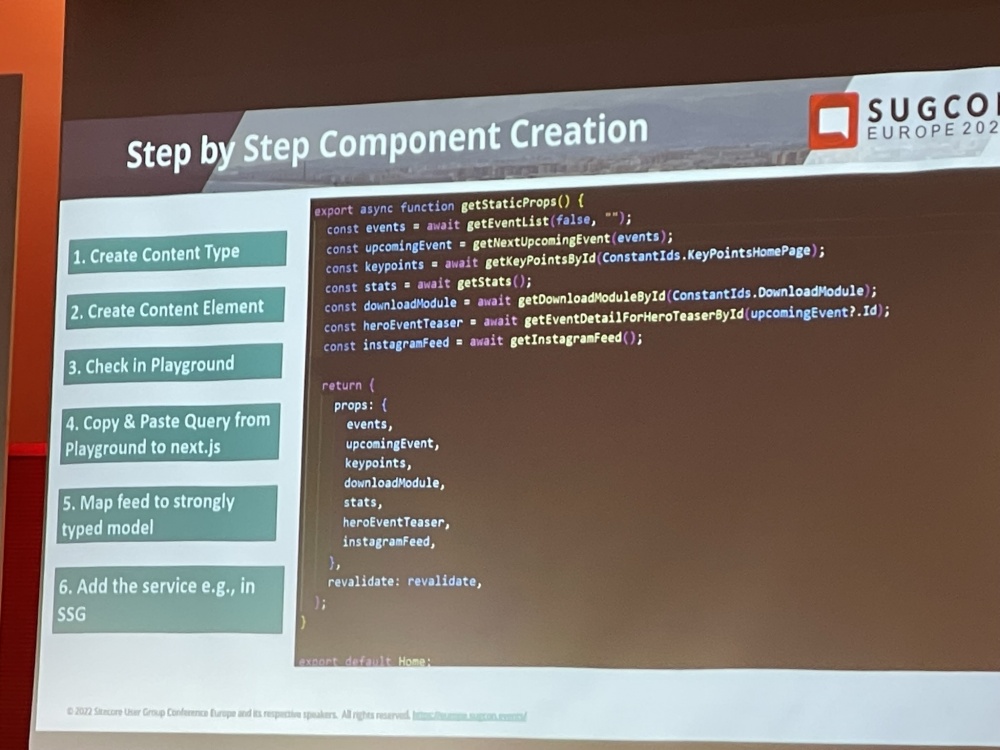
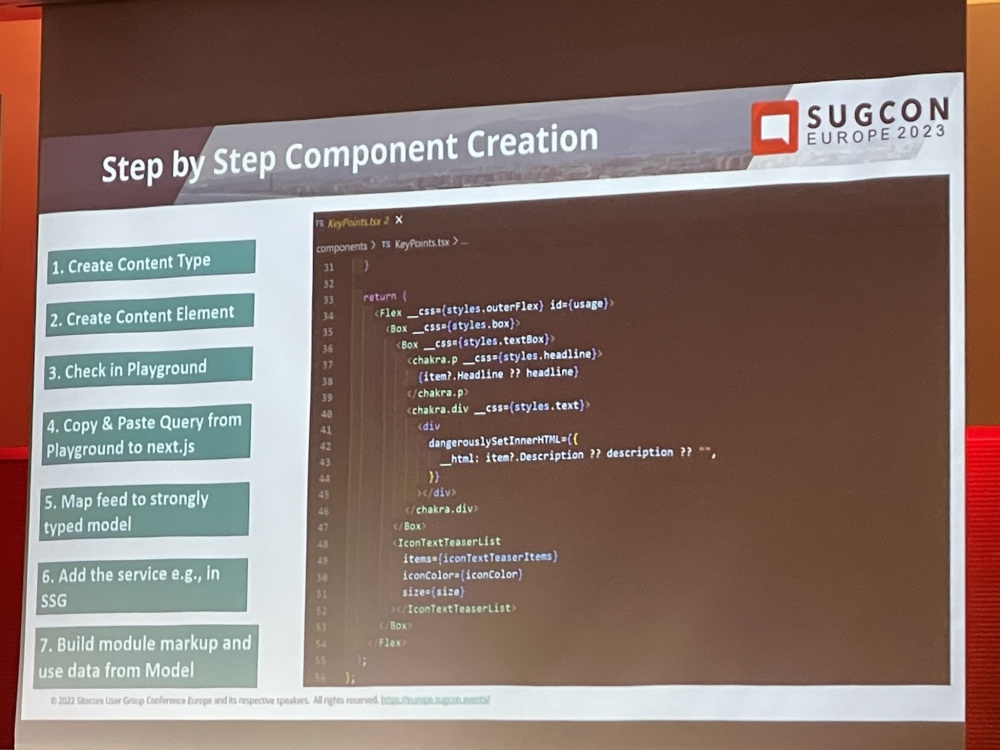
There are 7 Steps to component creation:

IMG_0821
IMG_0822
IMG_0823
IMG_0824
IMG_0825
IMG_0826
IMG_0828

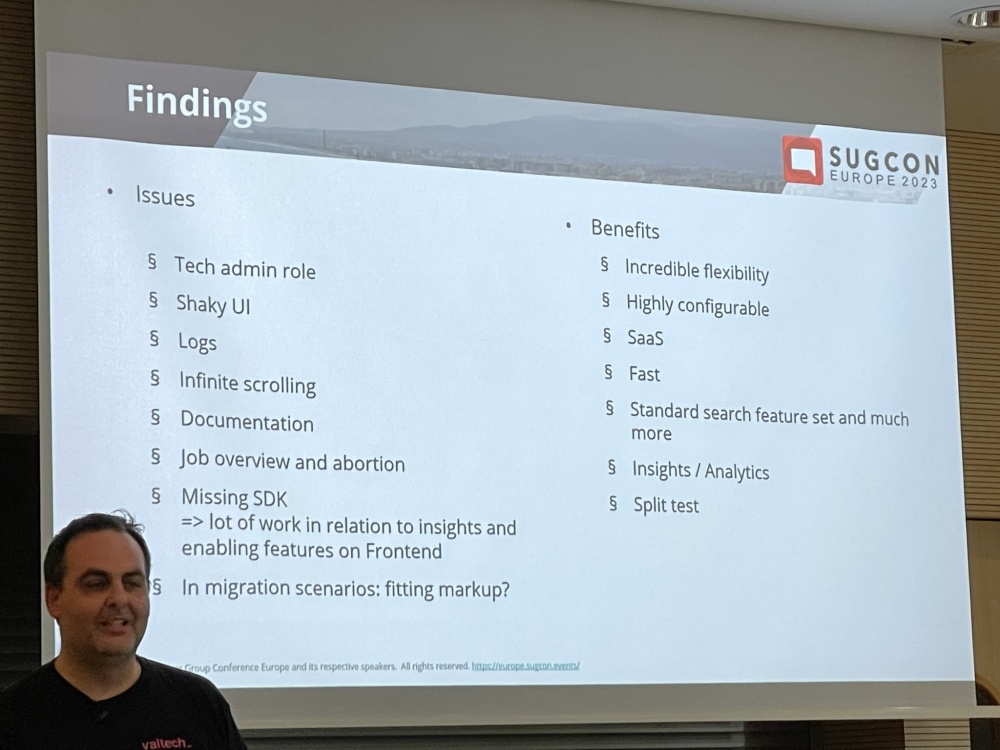
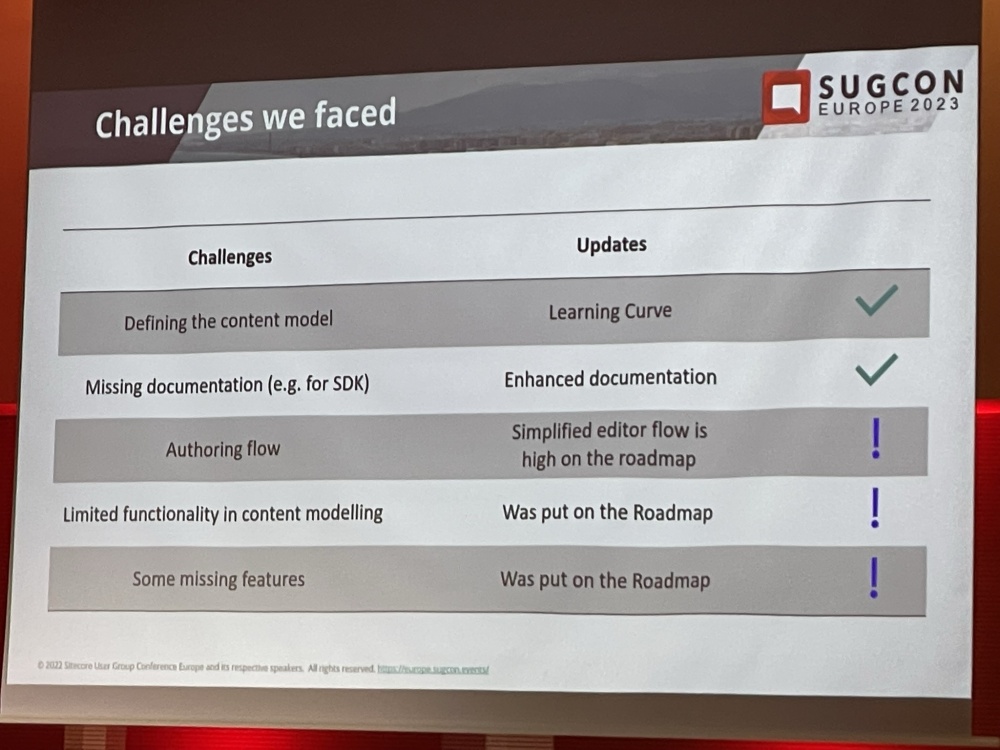
Lastly there were some challenges faced.

IMG_0831

This was a really great session and I’m looking forward to working with Content Hub One in the future.

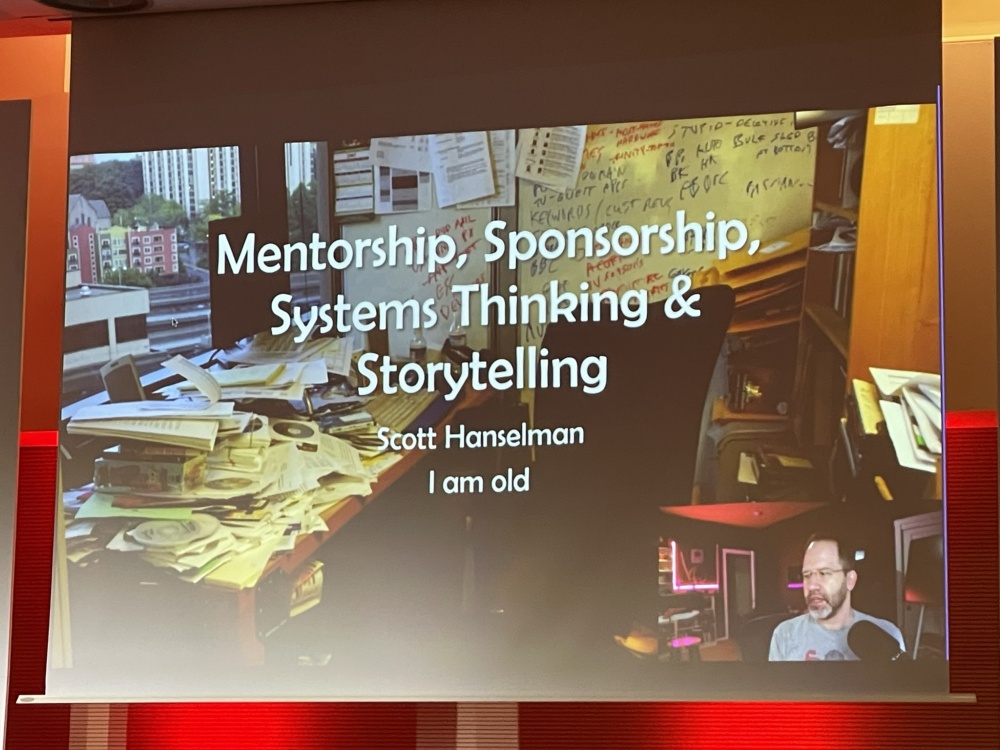
Virtual Closing Keynote by Scott Hanselman

IMG_0833

There was then an really entertaining and insightful talk from Scott Hanselman. He had some great advice, wisdom and stories to tell to us and I think everyone in the room was pretty captivated by his talk.

IMG_0848

With that it was the end of SUCON 2023, there was a big round of applause for all the organisers. These events take a hell of a lot of organising and a real commitment from everyone involved.


IMG_0855

It was time to go and have a few beers and reflect on what was a another brilliant SUGCON.

IMG_0862
Hopefully this is useful info for anyone that couldn’t attend this year or had too many beers and forgot what they learned :-).

Bulk Adding Captchas to WFFM Forms with Sitecore Powershell Extensions

Last week we had some Robots submitting a lot of WFFM forms across the website, creating thousands of submissions. I knew the quickest way to solve this was to add the out of the box CAPTCHA to the forms. However we had to put a solution in place quickly but with over 350 form instances across the website this needed a automated solution.

star-wars-robots-blured

I immediately thought SPE might come to the rescue here (as it often does), so  had a look on Google/SSE etc but couldn’t see anyone else who’d done this. So I fired up SPE and the following script is what I ended up with:

Add a CAPTCHA to all WFFM Forms with SPE

google-recaptcha

The script recursively loops through all the forms in the root folder set in script and checks if a CAPTCHA exists on the form already. If it doesn’t find one, it creates one as the last field in the form using the settings defined in the script. You can easily update any of the field settings to your liking such as the name and if it’s required etc.
It could also be modified to filter forms based on criteria such as name, folder or send/save actions if required too.

I hope this is useful for someone else in the future.

Disabling private cache for Sitecore pages not working on Sitecore 8.1 and 8.2

A while ago I had an issue with Sitecore 8.1 update 2 where I was getting “Cache-Control: private” set from Sitecore, even when <setting name=”DisableBrowserCaching” /> is set to true.  I was also able to replicate this up to 8.2 update 5.

Based on the docs here Sitecore is meant to return “Cache-Control: no-cache, no-store Pragma: no-cache” when DisableBrowserCaching is set to true.

I raised this issue to Sitecore Support and they eventually confirmed they could replicate the issue. There wasn’t a fix for it yet though so I ended up implementing my own. The reference number from Sitecore for this issue is: #116813.

I meant to blog about this a while ago but didn’t get round to it and then someone on Sitecore Stack Exchange had the same issue this week and it looks like there may still not be an official patch for it so I’ve put my code below to help others who come across this issue.

Add an Custom Pipeline


Patch in the Pipeline

<mvc.getPageRendering>
<processor patch:after=”*[type=’Sitecore.Mvc.Pipelines.Response.GetPageRendering.GetLayoutRendering, Sitecore.Mvc’]” type=”Custom.Sitecore.Extensions.Pipelines.MvcBrowserCaching, Custom.Sitecore.Extensions” />
</mvc.getPageRendering

Hiding unneeded Components to speed up Sitecore Experience Editor

Sitecore Experience Editor is very powerful but if you have lots of components on a page it can be slow to load sometimes. Because of this as a Sitecore developer you often find yourself looking at what you can do to speed it up. The first steps are usually to ensure you are following the recommendations in Sitecores Performance Tuning Guide. Also in more recent versions of Sitecore such as Sitecore 8.2 there are improvements in the performance of Experience Editor by Lazy Loading components in the Ribbon and so on – so if upgrading in the immediate future is an option this is recommended. If it isn’t and you are stuck on Sitecore 8.1 then also look at the following potential improvements: Disabling the My Items count (there is also a Support Hotfix for this now) and turning off the Suggested Tests count.

What else can I do to speed up Experience Editor?

So as the title of this post suggests we can also look at hiding components or partials that are not needed during Experience Editing. This might be things like a Google Tag Manager partial, Social Share Buttons or in our case ReciteMe and a partial that got a list of notifications from a 3rd party feed. These are all things that don’t need to be loaded when using Experience Editor and add to the page load time.

Show me the code

There are a number of ways to do this but since were using Sitecore MVC it seemed nice to do it with an MVC FilterAttribute. Create a class with the following code:

using System.Web.Mvc;
public class ExcludeFromExperienceEditor : FilterAttribute, IActionFilter
{
public virtual void OnActionExecuting(ActionExecutingContext filterContext)
{
if (Sc.Context.PageMode.IsExperienceEditorEditing || Sc.Context.PageMode.IsExperienceEditor)
{
filterContext.Result = new EmptyResult();
}
}

public void OnActionExecuted(ActionExecutedContext filterContext)
{
// Not required
}
}

This uses the inbuilt Sitecore PageMode.IsExperienceEditorEditing and PageMode.IsExperienceEditor to check if Experience Editor is being used. It then returns an empty view result to the controller.

Then decide which of your components and partials are not needed in Experience Editor and decorate their controller actions with the new FilterAttribute like so:

public class GoogleTagManagerPartialController : BasePartialController
{
[ExcludeFromExperienceEditor]
[ChildActionOnly]
public ActionResult Index()
{
//code removed for simplicity
}
}

Thats all there is to it. You can exclude as many components in this way as you like very quickly and you should see some performance gains from doing so. Just make sure you don’t accidentally exclude anything your content editors need to see when editing the page!

Feel free to tweet me or leave a comment if you have other ways of doing this or some improvements.

Simple Markdown Support In Sitecore

Markdown is a really lightweight way to support simple HTML formatting, such as bold or italic without using a Rich Text editor. It’s often used in ReadMe files and sites like Stack Overflow. This post describes how we can also use it with Sitecore with just a few lines of code, you can read more about Markdown on the John Grubers blog.

What is markdown and why would I want to us it?

So why might you want to add support for simple formatting to plain text fields in Sitecore?.

You might want to do this because you have a text field which you don’t want content editors to be able to use full rich text editing with, but you want to give them a bit more control over the styling. You might also do this the make it quicker and simpler for content editors.

In the example I’m going to explain here we wanted to use Markdown to allow the Content Editors to bold part of the text in a single line text field but not all of it. In this case the price.

markdown-hero-example-crop

Markdown works by wrapping the plain text with punctuation characters such as “*” or “#” in order to apply html tags to the plain text when it is rendered.
e.g when rendered out this:

##Title Of  Section##

becomes this:

<h2>Title Of Section<h2>

How do I do this?

The first thing you will need is a mechanism for processing the Markdown within your text. You could write your own Markdown service and return the processed text. However since others have already been through the effort of doing this It makes sense to use them.

Installing a Markdown NuGet Package

I spent some time researching into different options and decided upon MarkDownDeep. It’s quick, supports most Markdown features and can be installed via NuGet from here: https://www.nuget.org/packages/MarkdownDeep.NET.

Install this into your project as follows in Visual Studio Nuget Package Manager Console:

Install-Package MarkdownDeep.NET

Once you have done this you need to create a HTML Helper Extension that is going to be used in our views to process the Markdown.

public static class HtmlHelperExtensions
{

public static IHtmlString Markdown(string text)
{
Markdown markdownTransformer = new Markdown();
string html = markdownTransformer.Transform(text);
return new MvcHtmlString(html);
}

public static IHtmlString Markdown(this HtmlHelper helper, string text)
{
return new MvcHtmlString(Markdown(text).ToHtmlString().Replace(“<p>”, “”).Replace(“</p>”, “”));
}

}

Using Markdown in a Component

The next step is to add this to a view, we’l use an example of a simple Sitecore MVC Hero component here. Create a view with the following content and add it to Sitecore in the usual way:

@using Glass.Mapper.Sc.Web.Mvc
@using Sitecore.Mvc
@inherits GlassView<Custom.Models.Renderings.Hero>
<section class=”hero”>
     <div class=”hero-inner”>
             <h1>
              @Html.Glass().Editable(x => x.Title)
              </h1>
              <p>
                 @if (IsInEditingMode)
{
       @Html.Glass().Editable(x => x.Text)
}
else
{
       @Html.Markdown(Model.Text)
}
              </p>
       </div>
</section>

The important part here is: @Html.Markdown(Model.Text), this processes the Markdown and renders it.
You may notice that here we are using Glass Mapper (http://www.glass.lu/), however this would work in the same way with standard Sitecore MVC. We also do a check (using IsInEditingMode) to see if the page is being edited in Experience Editor before we render the Markdown.

Adding Markdown in Sitecore

Once you’ve done this then you can test it works by going into your component in Sitecore Content Editor and adding double asterisks (**) around part of the text like so:

hero-markdown-example-sitecore

This will make it bold. You could also use a single asterisks (*) to make it italic. You should also be able do this Experience Editor if you wish.

The Final Result

Once you  have saved this update and view the page with your component on it you should see something like the following:

markdown-hero-result

If you look at the HTML you will see it doesn’t contain the ** around the £99 anymore and instead has been converted to: <strong>£99</strong>

The full rendered markup for this example should be as follows:

<section class=”hero”>
         <div class=”hero-inner”>
<h1>January Sales Now On</h1>
<p>Prices starting at <strong>£99</strong> each</p>
          </div>
</section>

We have used this on a number of components and it works really well. Hopefully it will be useful for you too.

My thoughts on SUGCON 2016 – Day 2

badgeThere was an early start for Day 2 (especially after a late-ish night involving a few strong Danish Beers), but I knew there were some intriguing talks today so didn’t want to miss anything.
You can read about Day 1 here if you missed it.

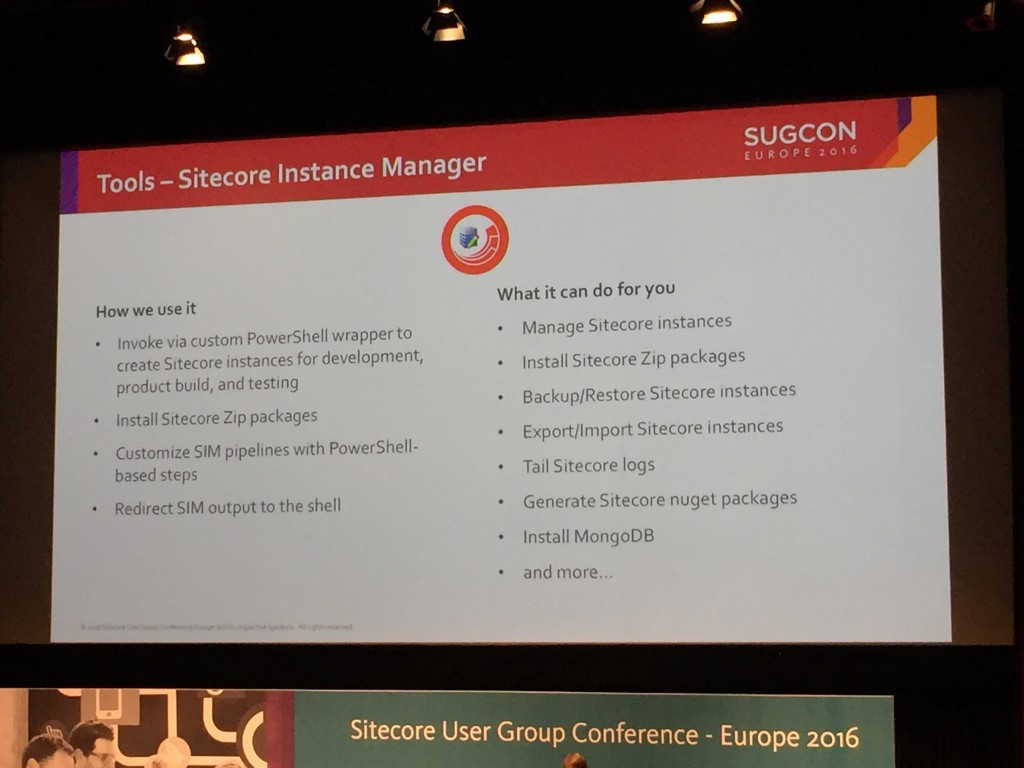
The first session that caught my interest was Nick Wesselmans talk on how Active Commerce use SIM, Powershell, Octopus Deploy and Azure to automate product builds.

Using SIM, Powershell, Octopus Deploy and Azure to automate product builds.

Nick gave an overview of how they created a PowerShell wrapper for SIM to automate Sitecore instances for product builds for their Active Commerce product.

IMG_5762

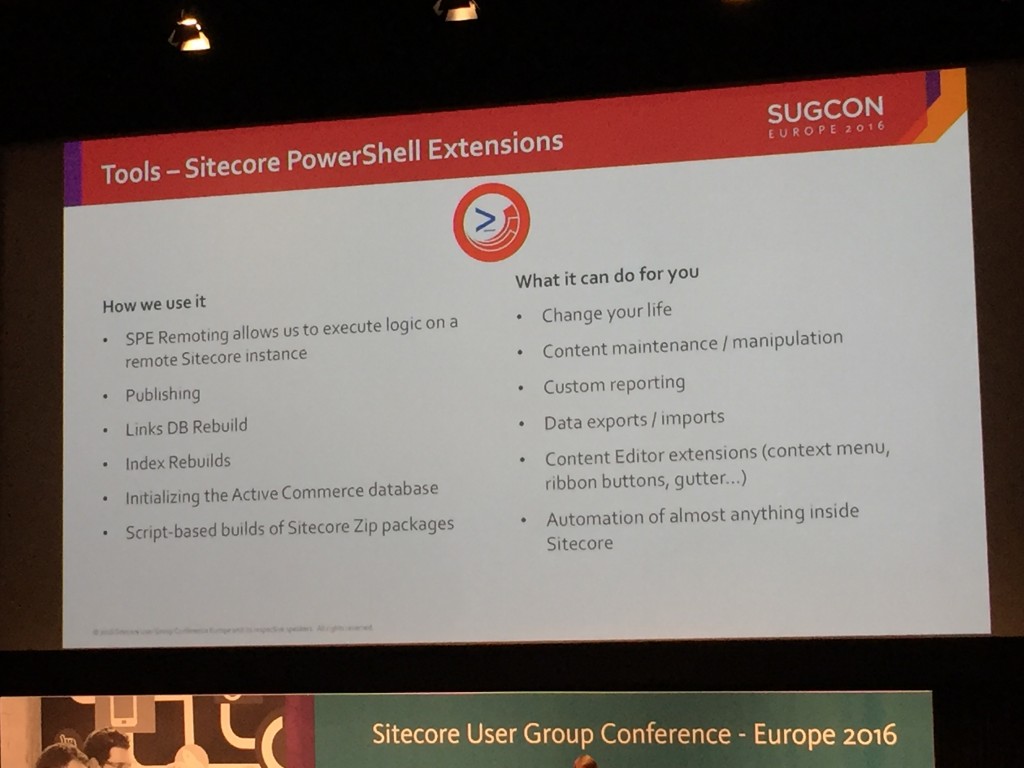
He also talked about how they use Sitecore Power Shell Extensions (SPE) to do things like automate publishing, rebuild the links database and initialise Sitecore Zip package builds. I’ve experimented with SPE but I’ve not used it in anger and this has given me ideas for how I might use it more on current or future projects.

IMG_5764

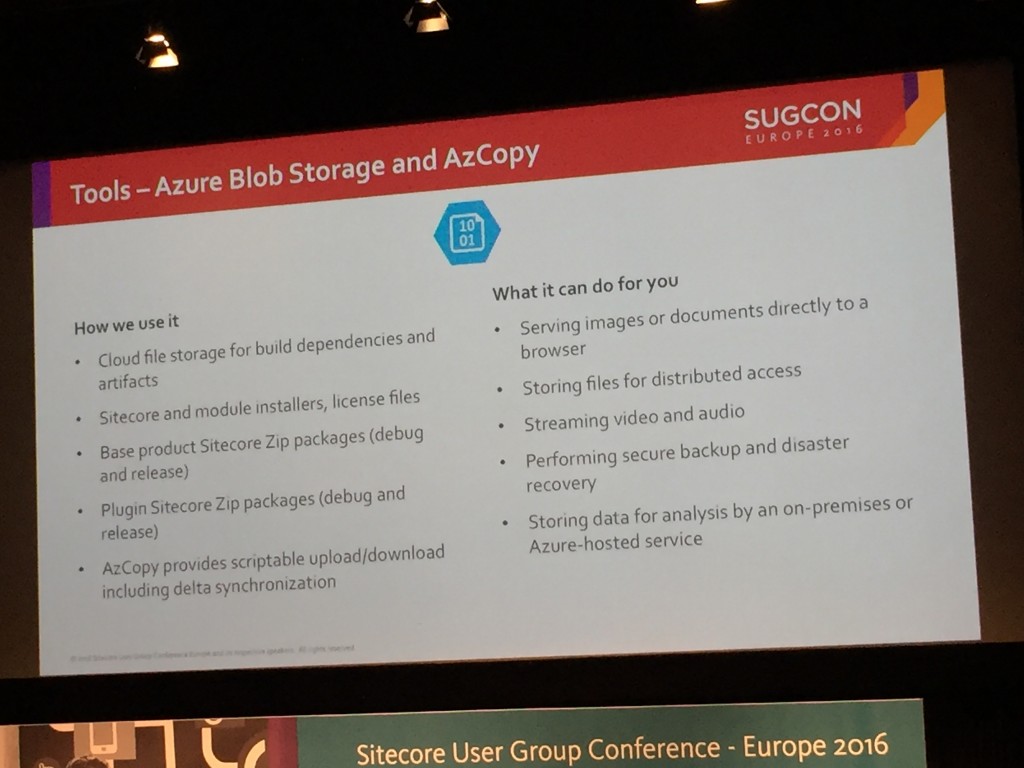
Finally, he talked about their use of Octopus for deployment of packages and invoking PowerShell scripts and Azure IaaS and Azure Blob Storage and AzCopy which is used for quickly spinning up VMs for hosting the product build and test environments. I liked the idea of these being scripted to only run during business hours.

IMG_5768

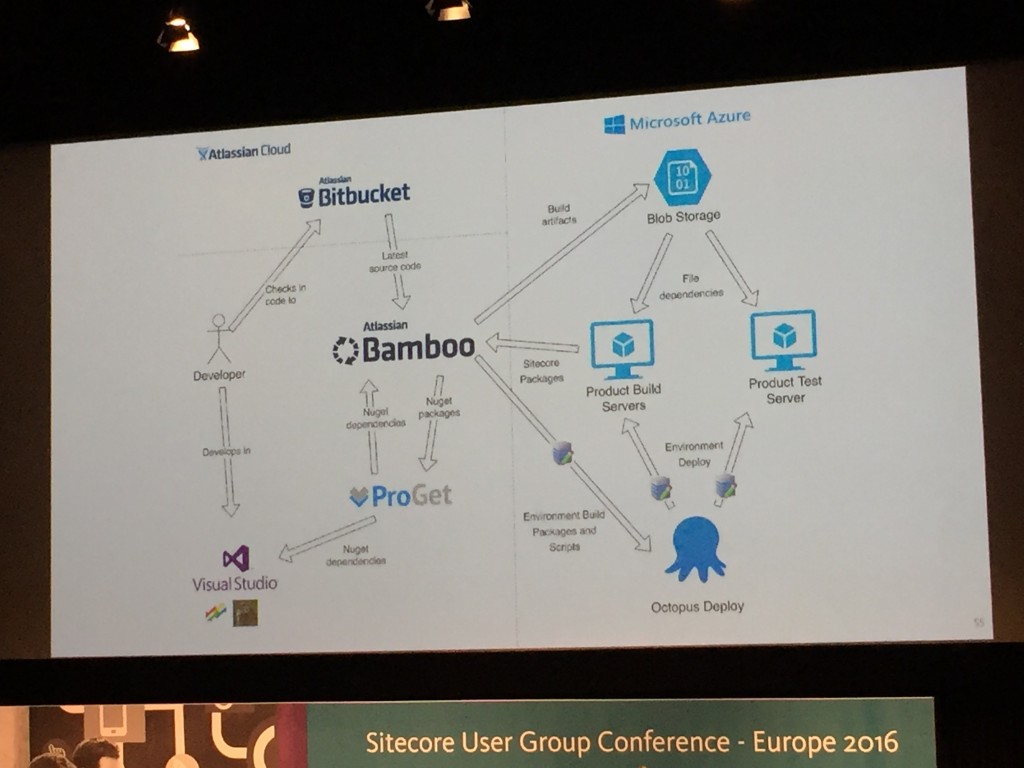
The Active Commerce team also use Bamboo for their build server (but are thinking of moving to Team City). Nick showed us that their build pipeline looks like this:

IMG_5773

It was nice to see some familiar approaches here, albeit with different tools in some instances and some new ideas too.

You Me and Sitecore MVC

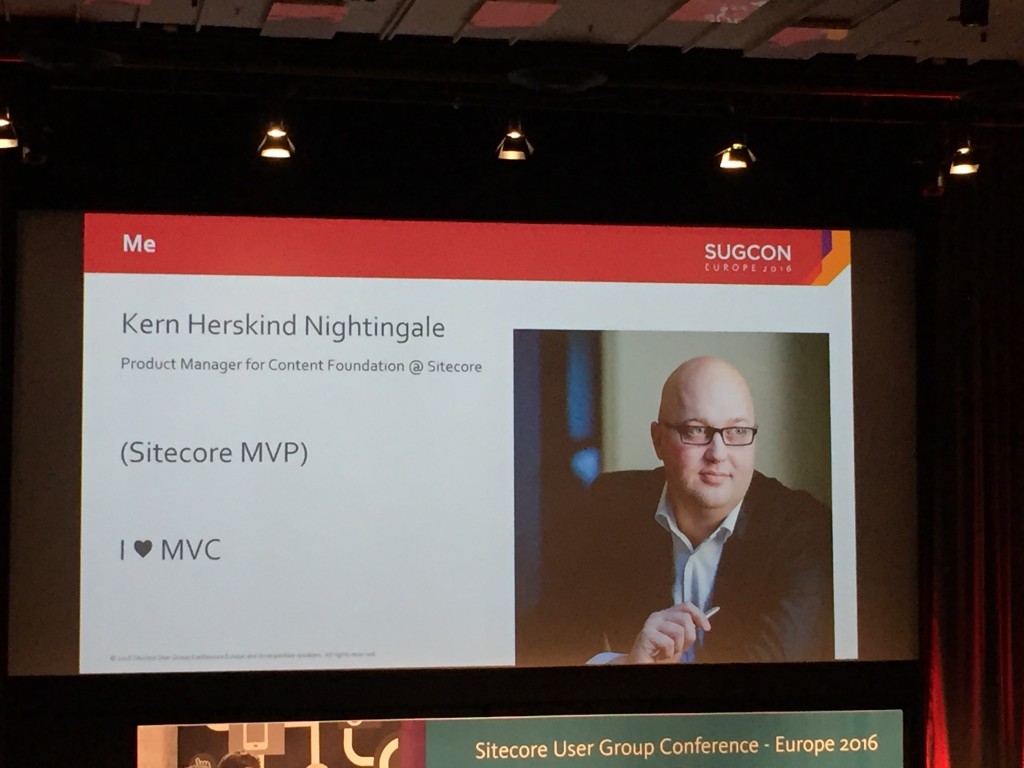
After a short break Kern Herskind delivered and entertaining (and Circus themed) presentation on Sitecore MVC. He even rode a unicycle at the end!

IMG_5777

Kern gave a general overview on MVC for those not familiar with the concepts and then how Sitecore MVC works and whats available out of the box. Not much of this was new to me but it was good get a refresher anyway.

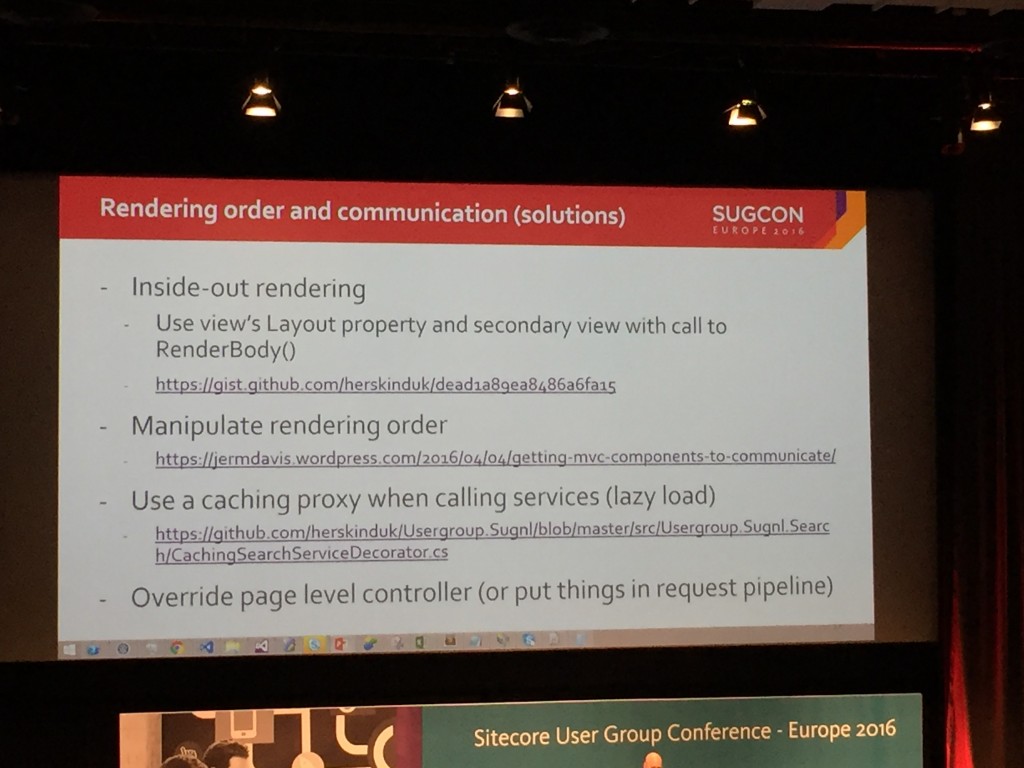
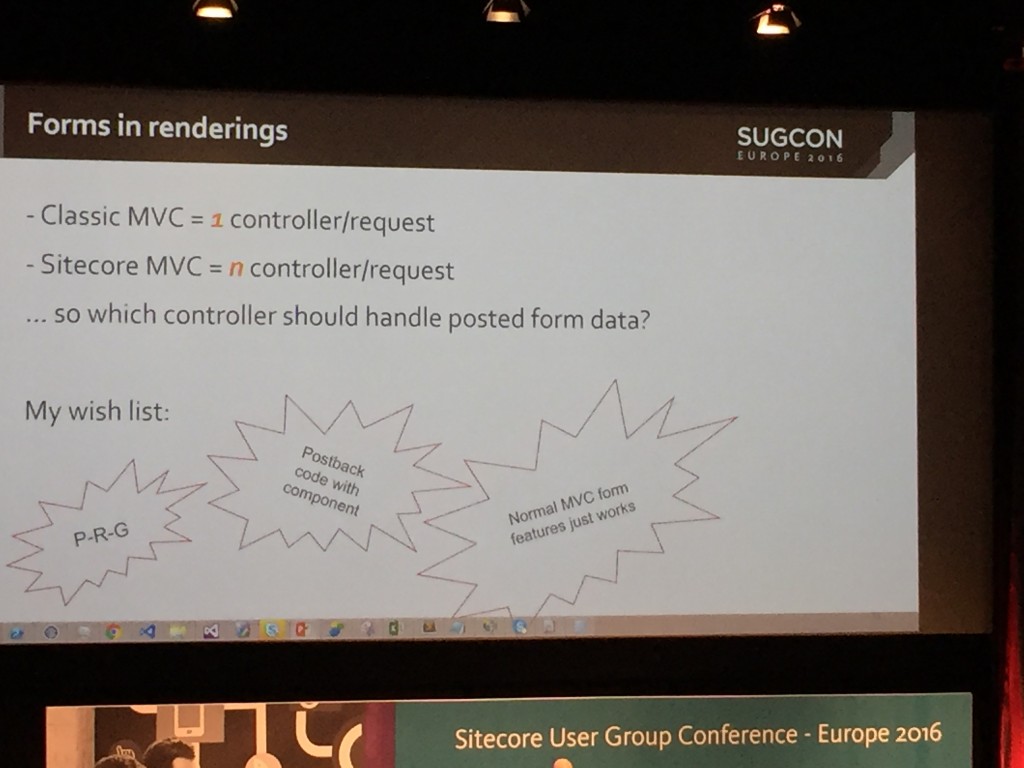
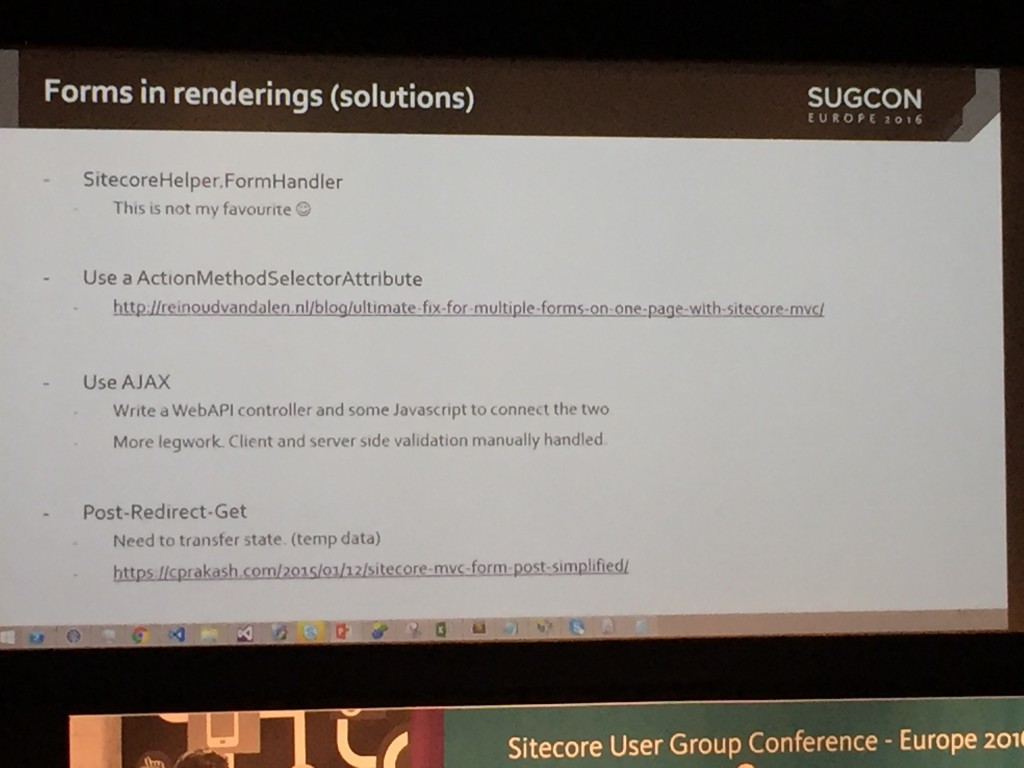
Then Kern talked through some of the downfalls of Sitecore MVC and how he has gone about solving them. Things like renderings not being able to alter any HTML that is rendered prior to them being rendered and multiple form posting issues.

IMG_5781

IMG_5782

IMG_5783

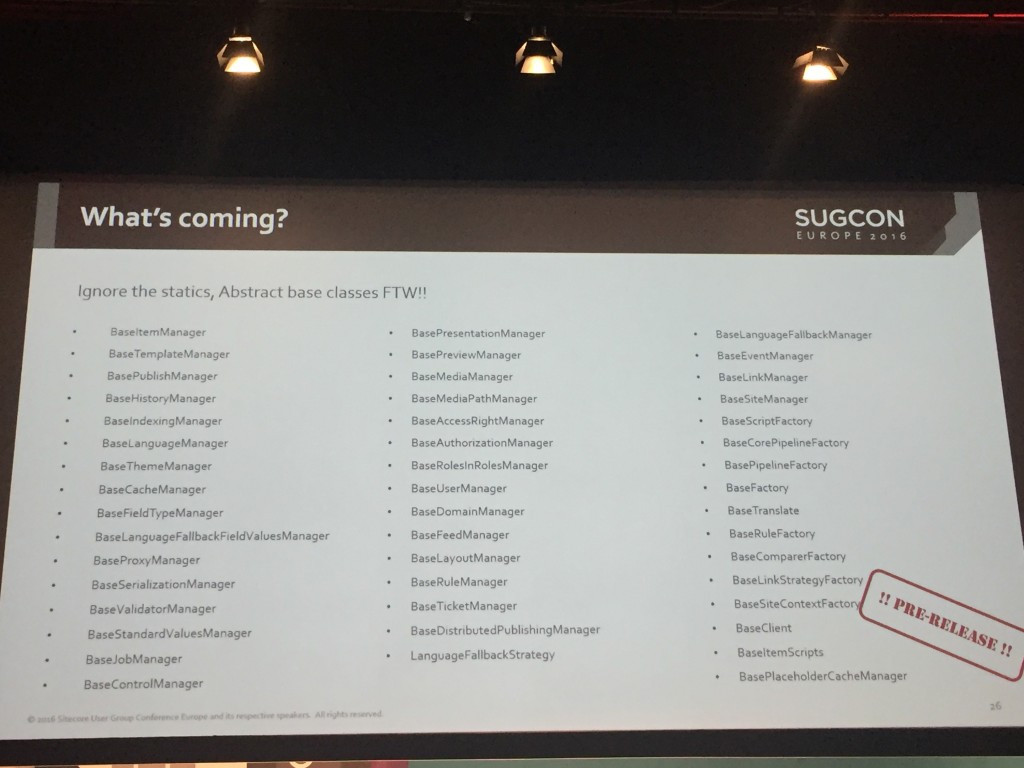
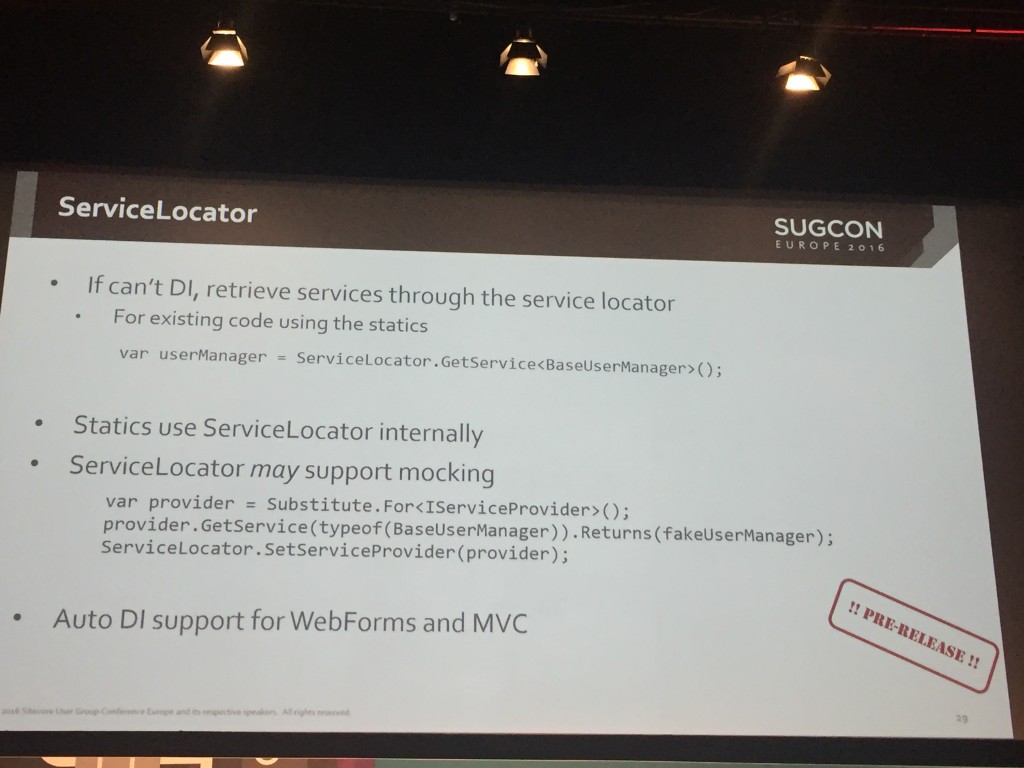
We then go a sneaky peak of what coming up for Sitecore MVC, such as abstract base classes and better ServiceLocator and DI support:

IMG_5869-3

IMG_5873

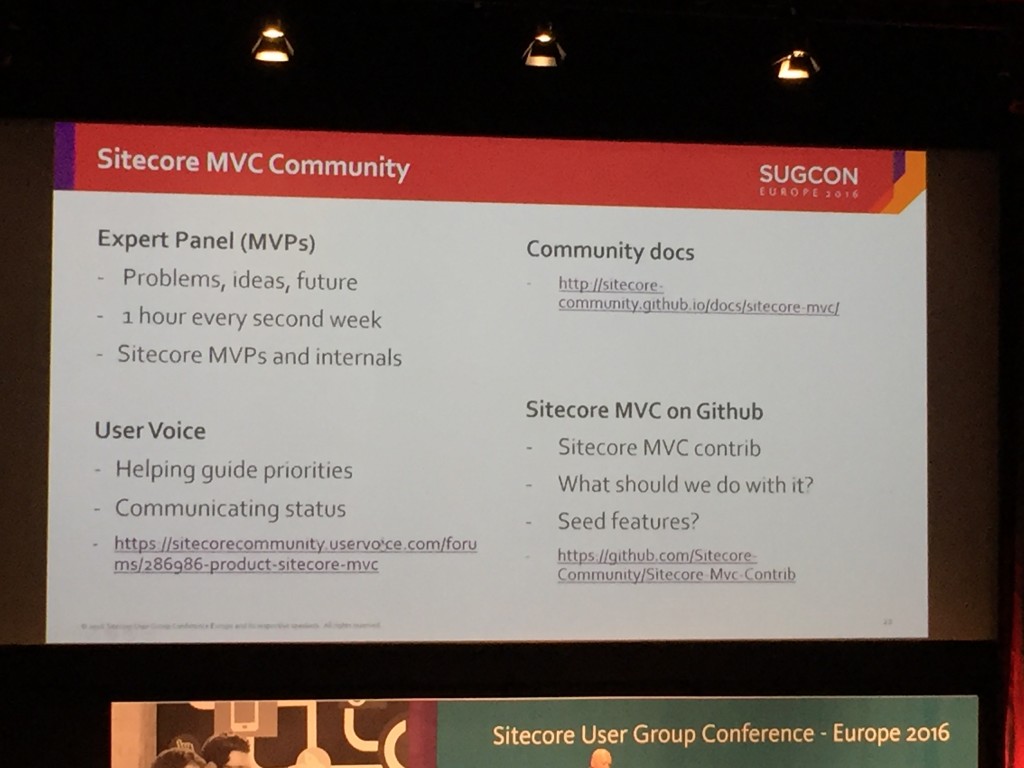
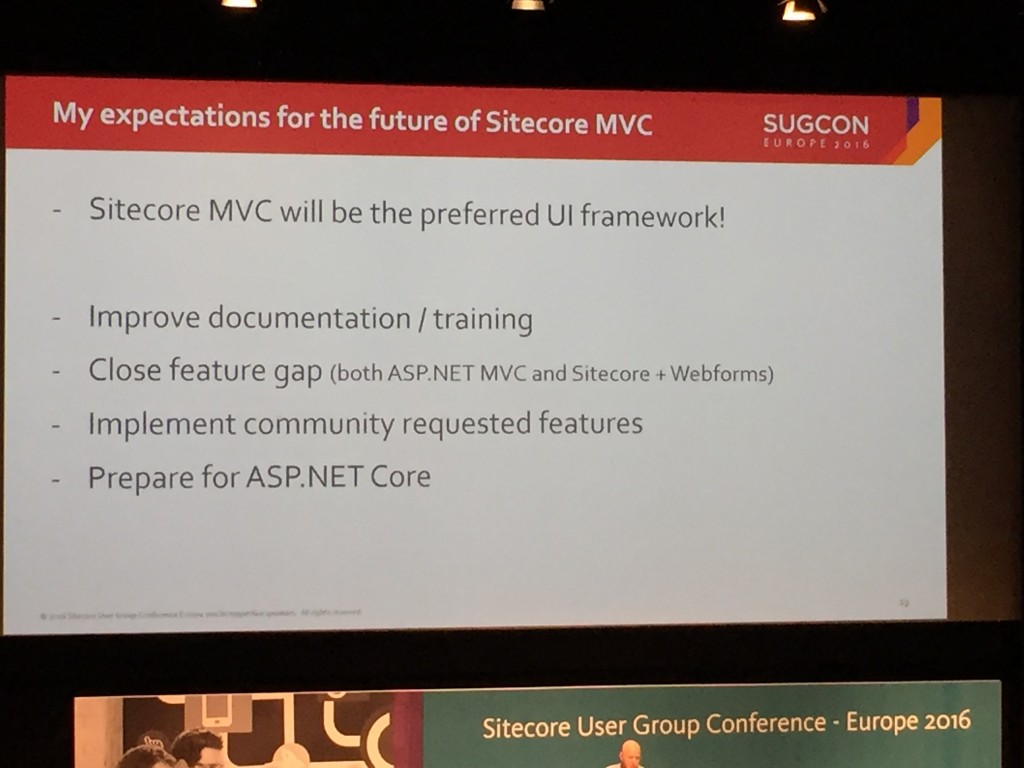
Kern finished by talking about the future of Sitecore MVC and expectations for the future.

IMG_5787

Good to see better documentation and closing feature gaps on the list of improvements.

IMG_5788

The key message here being that Sitecore MVC is going to continue to be the preferred UI Framework.

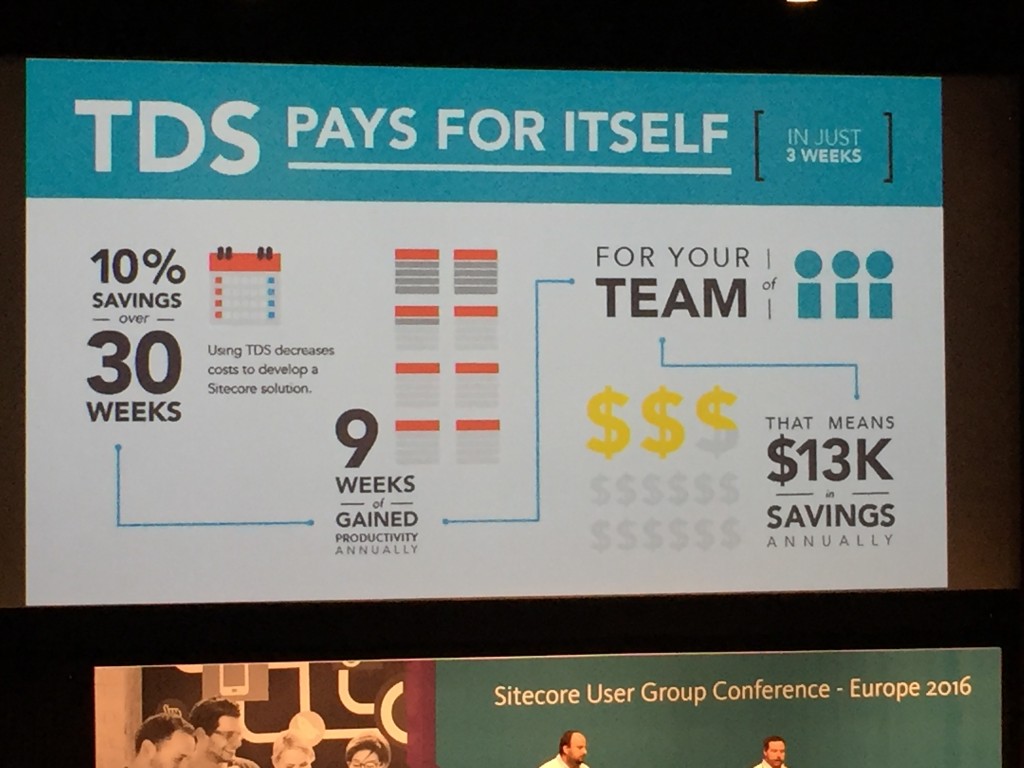
Hedgehog then did a quick talk on their TDS product and helped to answer the question a lot of developers might have, “why should I pay for TDS instead of using Unicorn”.  The answer is probably in these two slides, maybe go and show them to your Boss :-).

IMG_5791

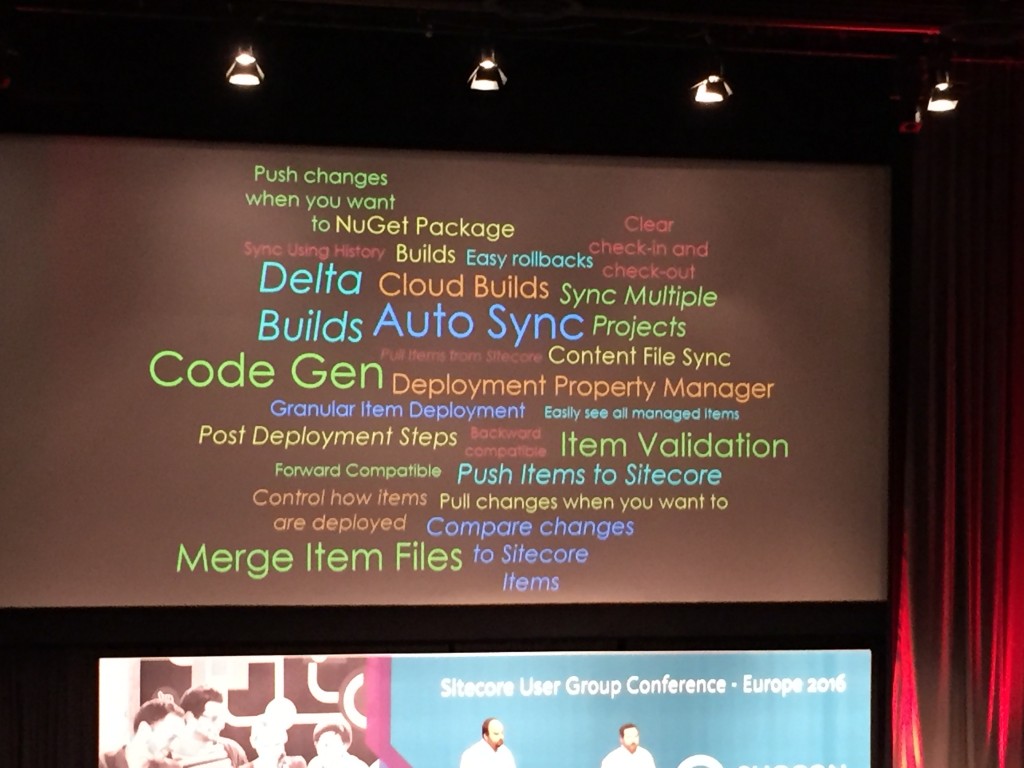
Essentially it does a lot more besides just syncing items between sitecore instances:

IMG_5792

I haven’t used it but I’ve head good things about it from other Sitecore Developers.

After lunch (which was excellent by the way) I opted to attend two talks on Sitecore Habitat. One by Ruud Van Falier called Introducing Sitecore Habitat and the 2nd by Anders Laub on Practical Habitat: Embrace the Architecture.

Introducing Sitecore Habitat

For those who don’t know what Habit is, it is an Architecture approach for Sitecore development and is designed to give best practice guidance on how to structure your Sitecore projects. I have taken a look at it a few times but not really used it and the feedback from other Sitecore developers I’d spoken to was that it was quite complicated, so I was interested in finding out more about it.

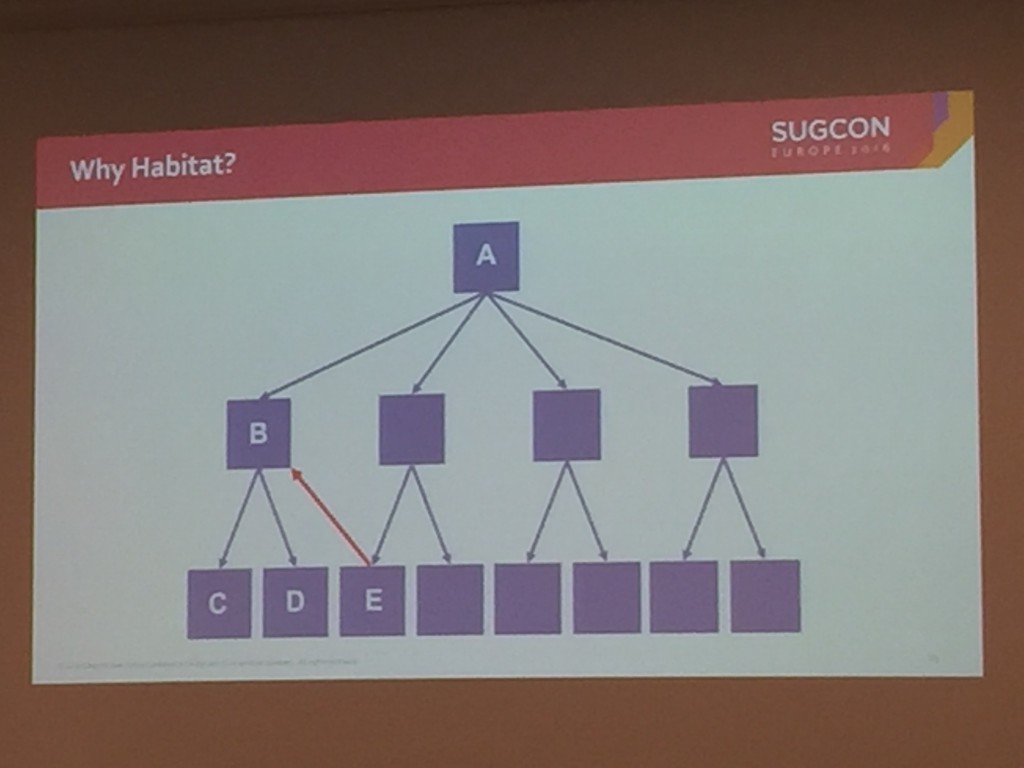
Ruud was presenting to a packed room with quite a few developers stood up at the back, obviously as keen as me to know more. He started with the basic concepts of Habitat, explaining how all modules are self-contained and that there should be no communication that goes upwards between modules.

IMG_5796

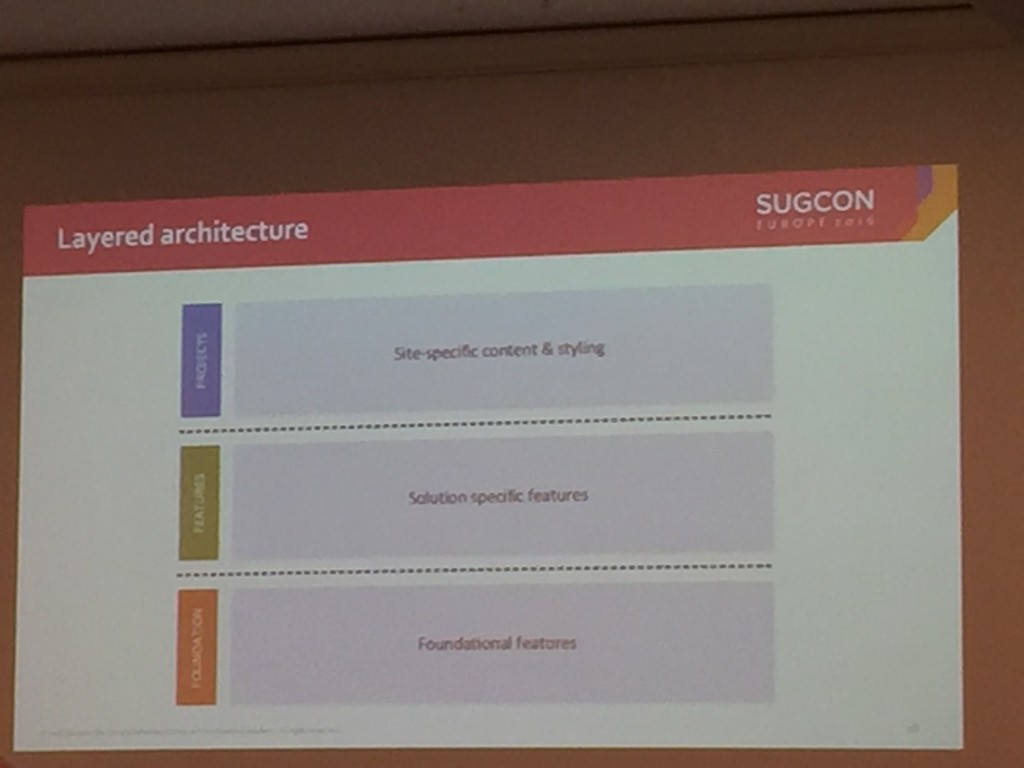
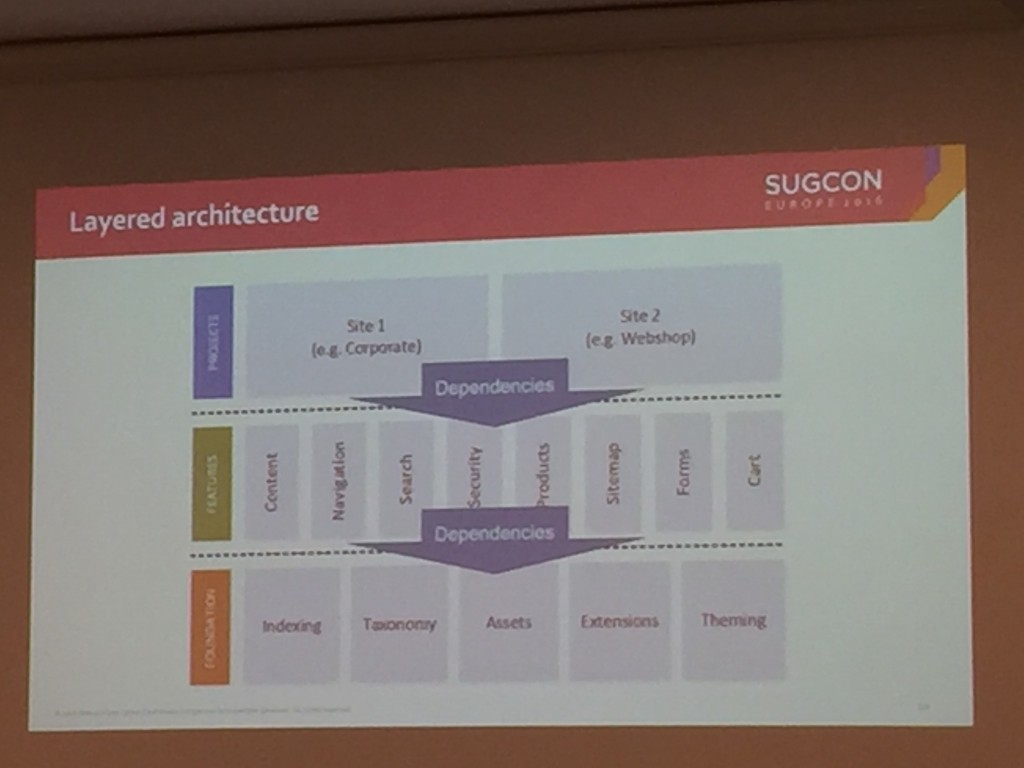
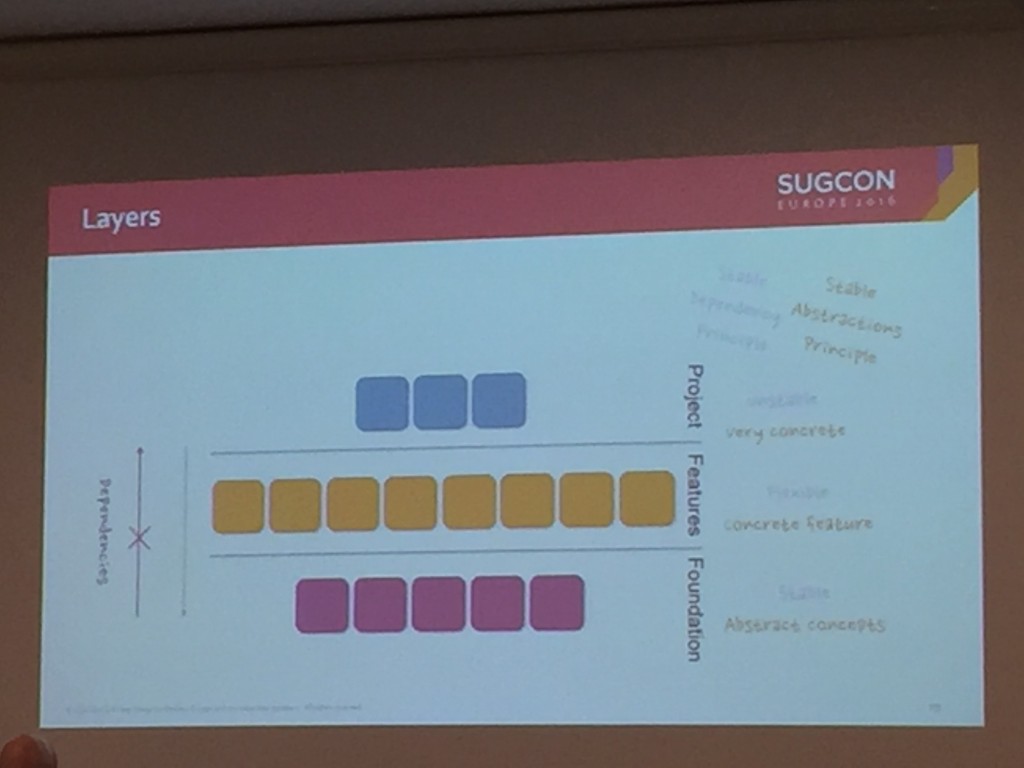
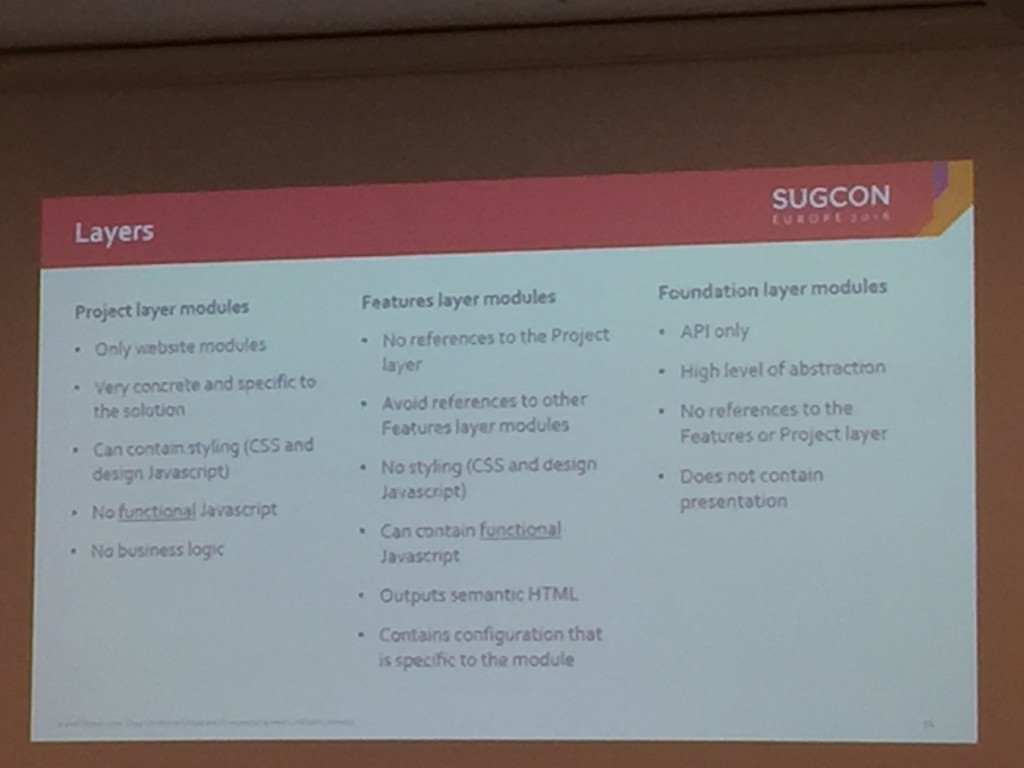
He also explained the the 3 layers of Habitat: Foundation, Features, Projects.

layers

Ruud then discussed examples of elements that might live in these layers and how the dependencies flows downwards.

IMG_5806

He then showed the technology stack, which are probably familiar tools to most of you. Sitecore 8.2,  MVC,  Dynamic Placeholders, Unicorn, Bootstrap, JQuery, Sass and Gulp.

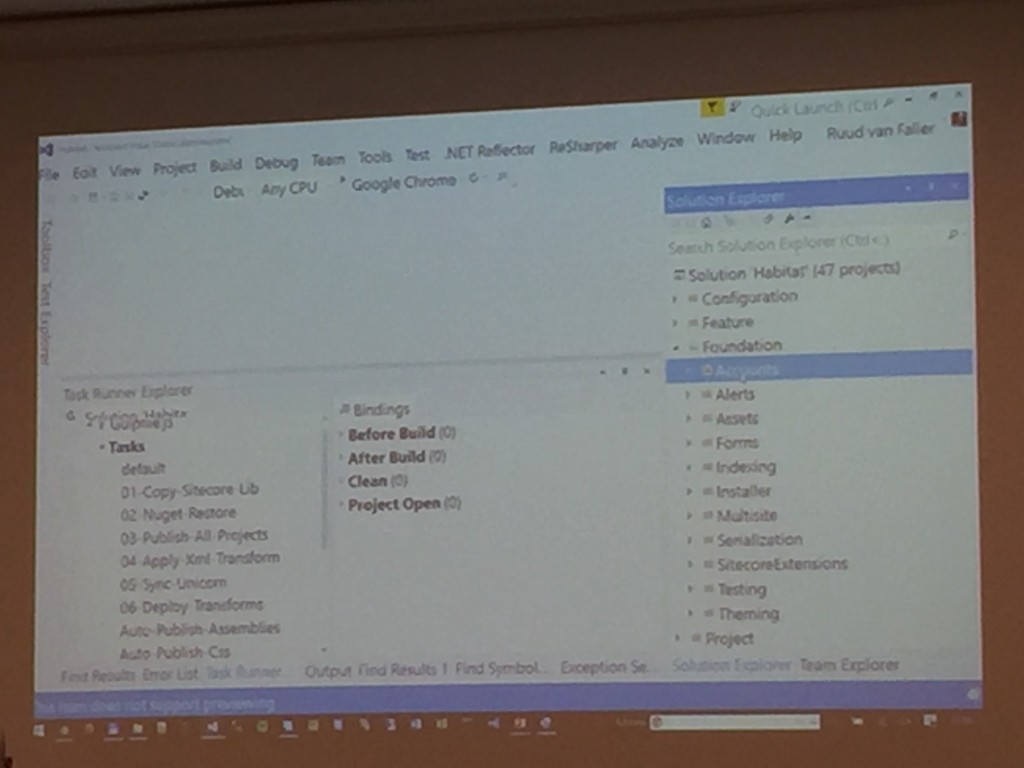
A run-through of the Habitat solution structure then followed and an explanation of the different build tasks used.

build

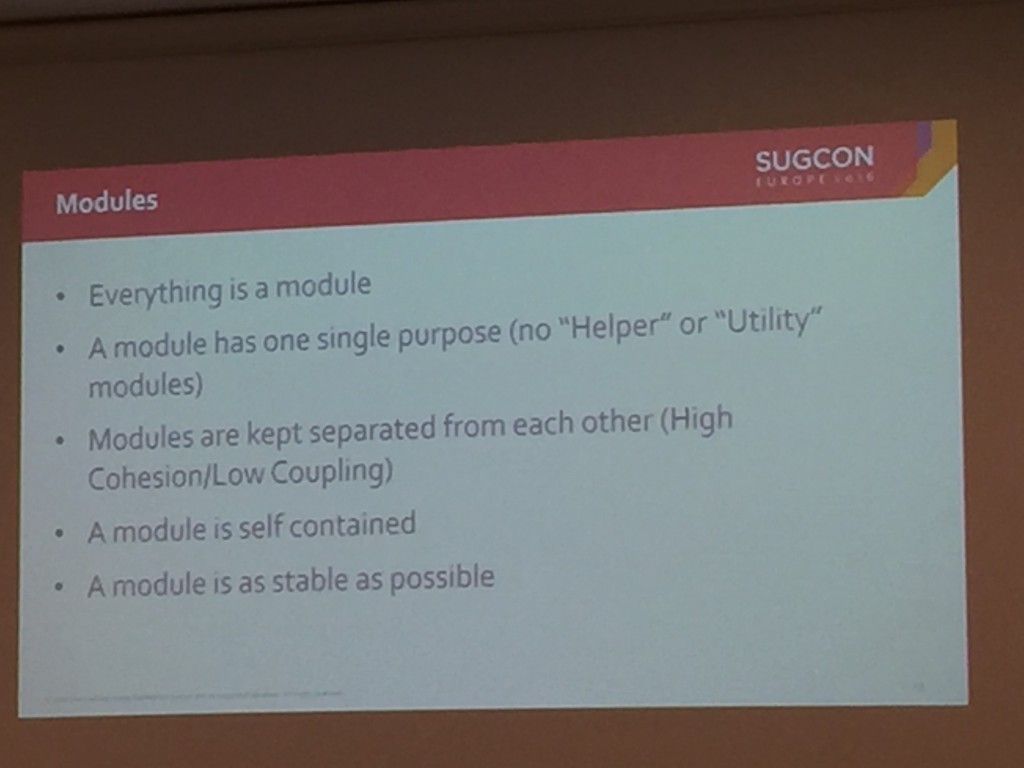
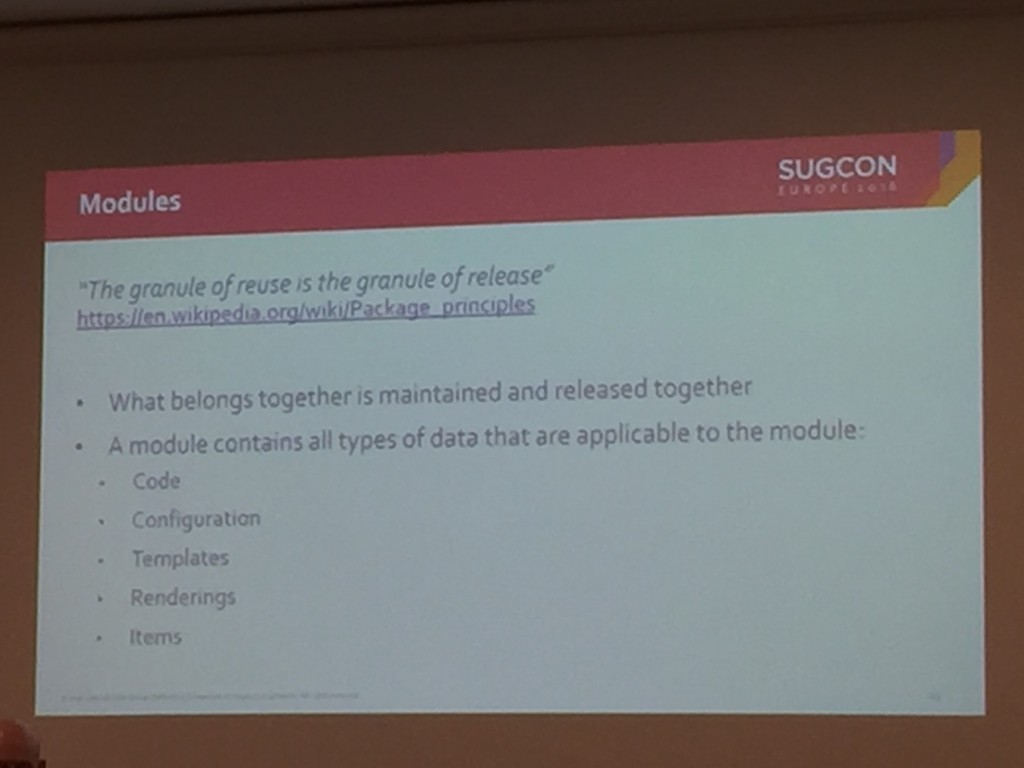
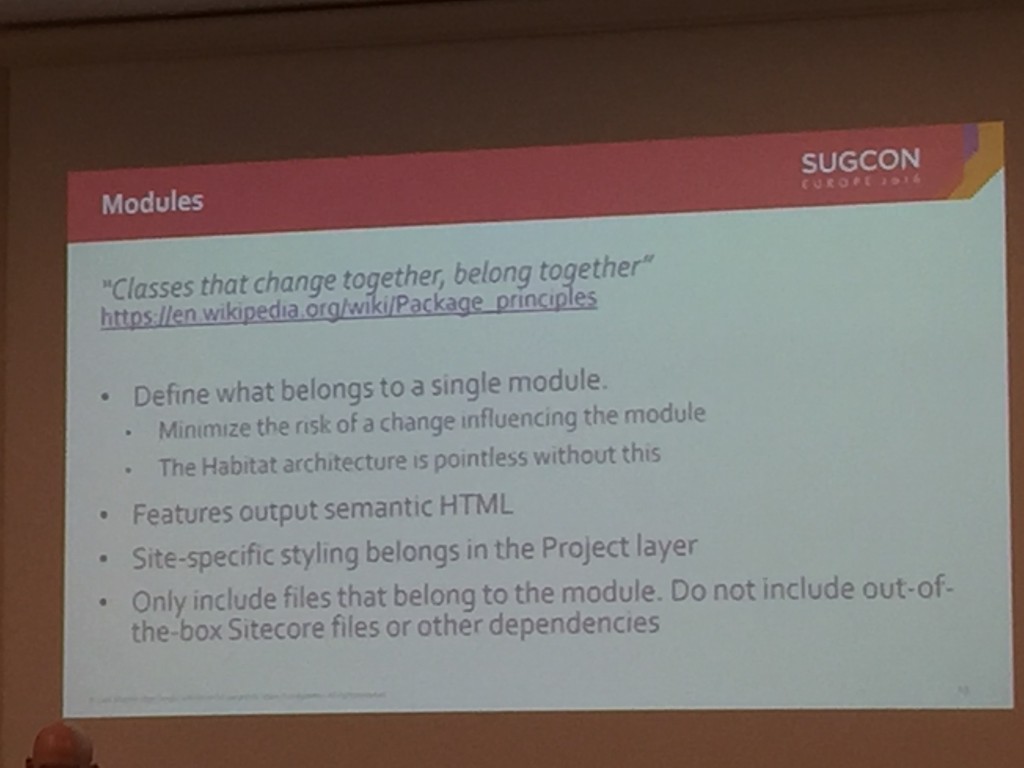
There was then a more in-depth explanation regarding Modules:

IMG_5816

IMG_5818

IMG_5820

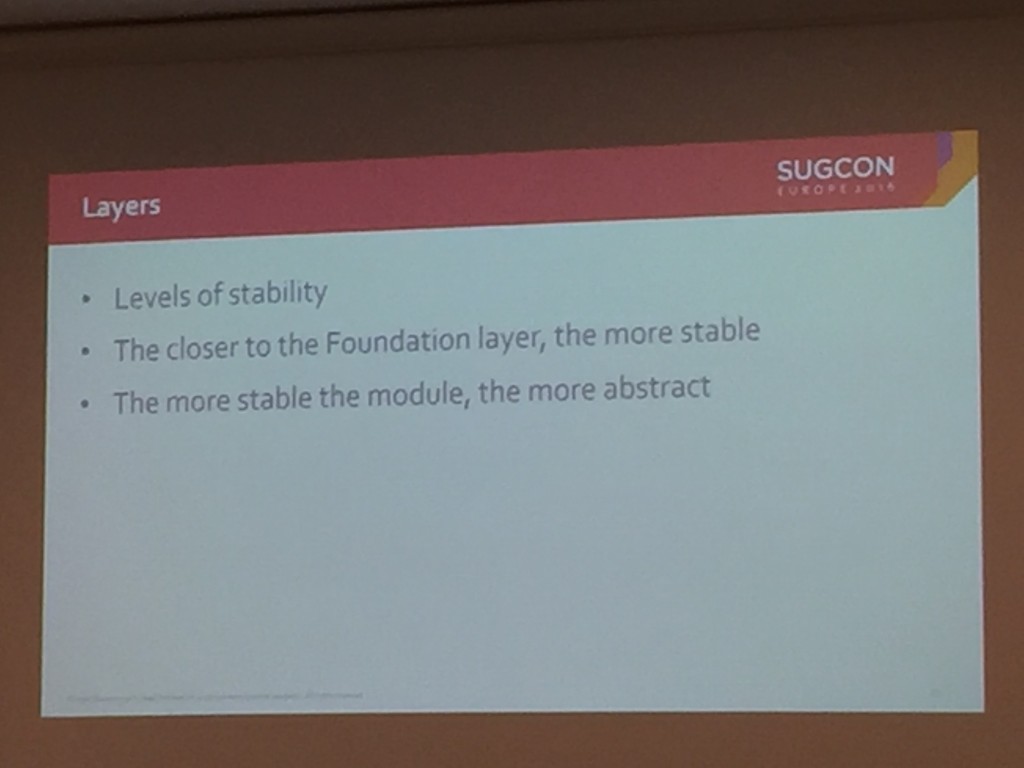
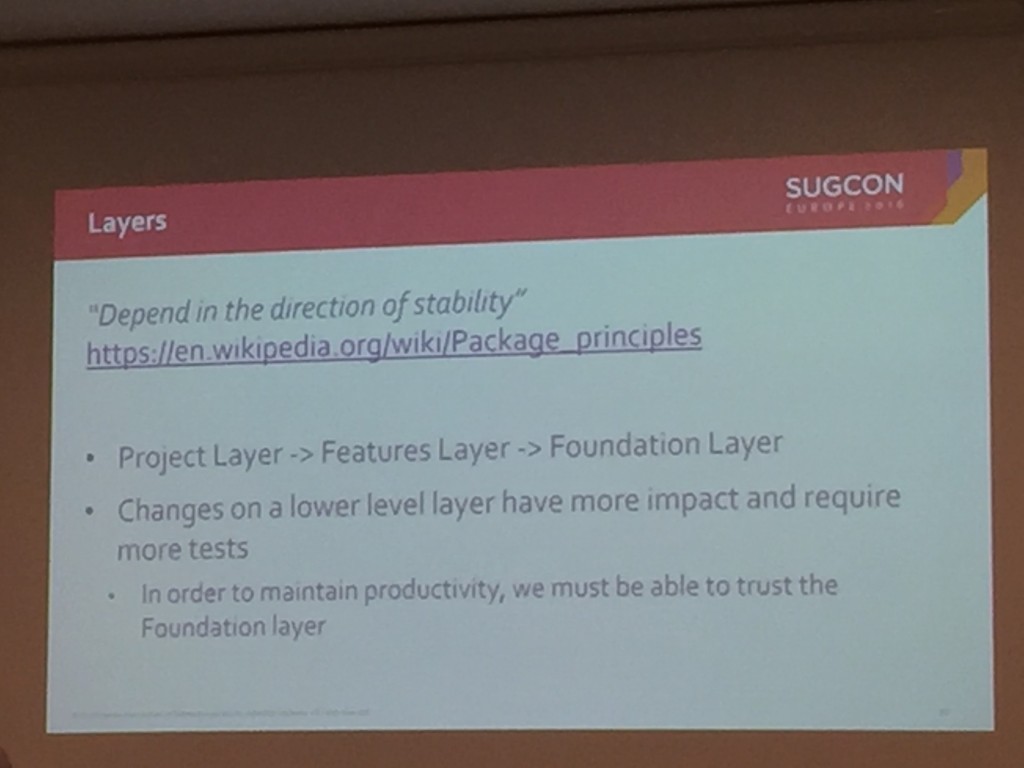
And then more detail on layers:

IMG_5822

IMG_5828

IMG_5832

IMG_5834

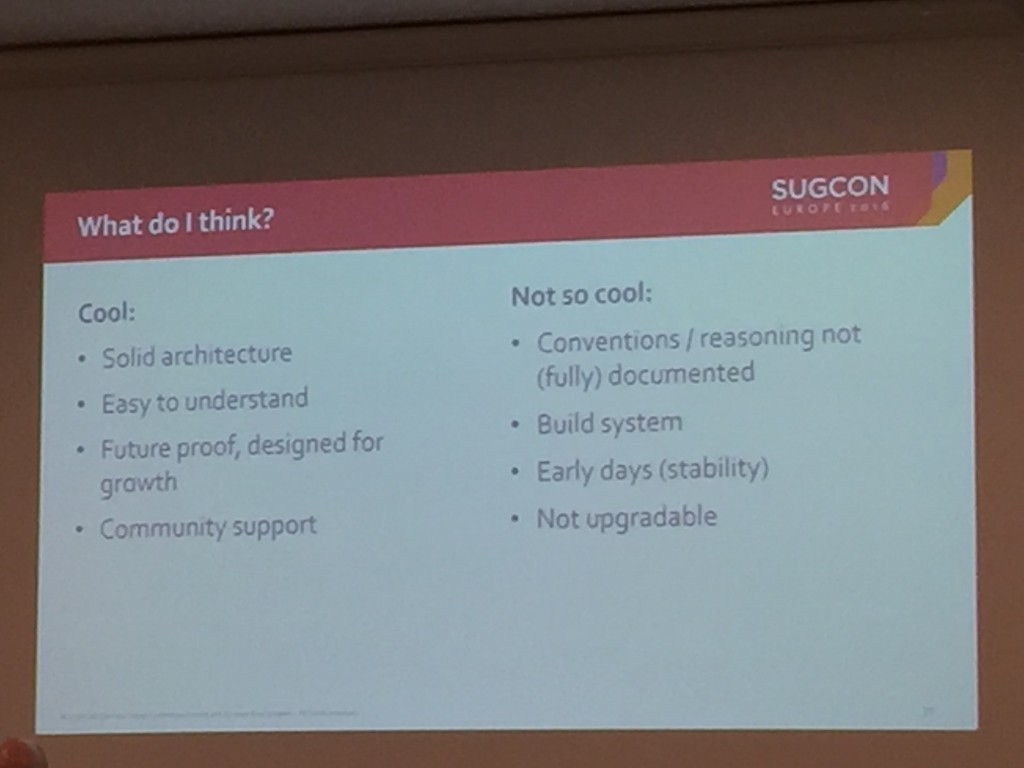
Finally, a pros and cons slide and questions:
IMG_5836

Ruud was honest about the fact that Habitat is in the early stages and is changing every day, he also said it’s not meant to be taken as a ‘Boiler Plate’ for Sitecore solutions – more a guideline. However, I left the session will a lot of things to investigate further and will definitely be taking a closer look at Habitat and how some of It’s concepts can be applied to the projects I am working on.

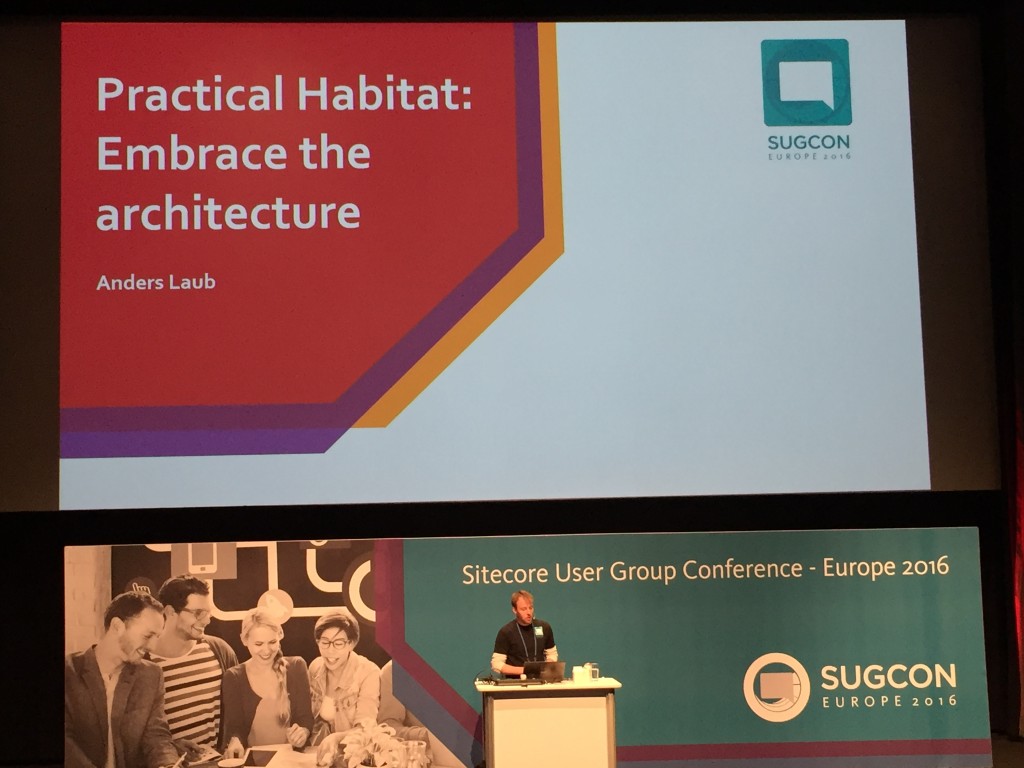
Practical Habitat: Embrace the Architecture

With my appetite now whetted for Habitat I went straight to the next session on embracing the architecture.

Anders talk started with a general discussion around Architecture and then moved to Habitat and why Pentia use it as an architecture for their solution:

IMG_5837

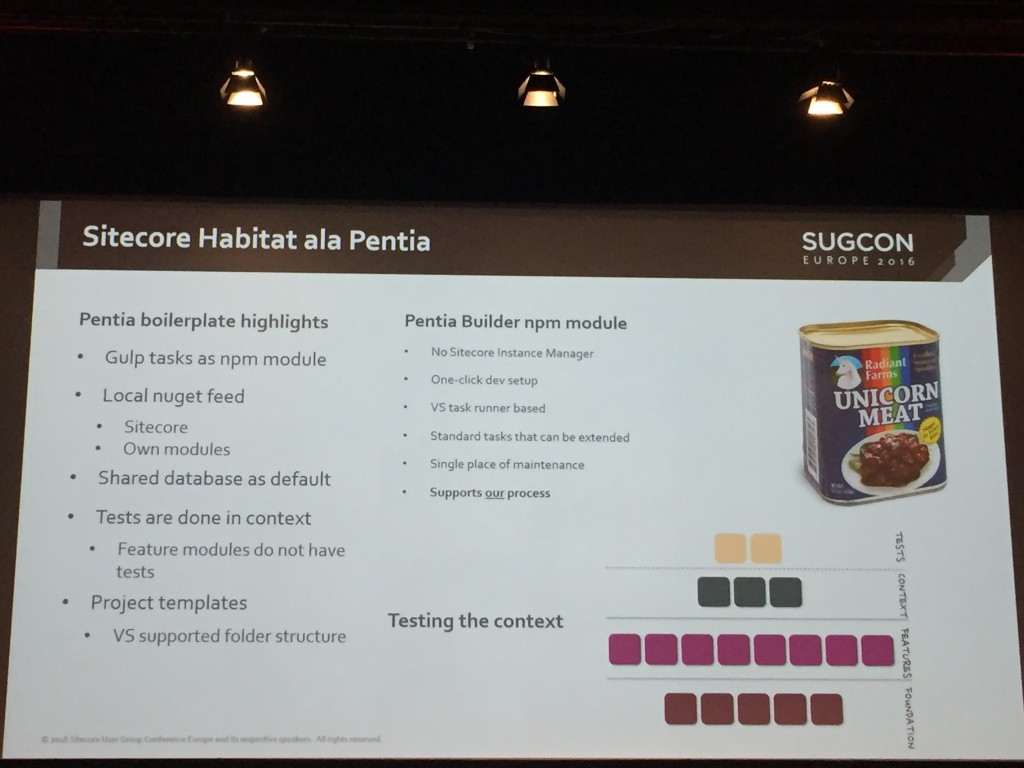
He then dived into a demo of their solution and explained how it differs to the default Habitat setup. I have a video of this somewhere which I’ll try and add here when I get a minute.

He then discussed a few foundation modules they have created and how it really works well for them as an approach.

IMG_5840

Anders took some tough questions from the crowd well (such as the number of projects in Habitat – which is many) and I think by the end of the session most of the room will be taking another look at Habitat.

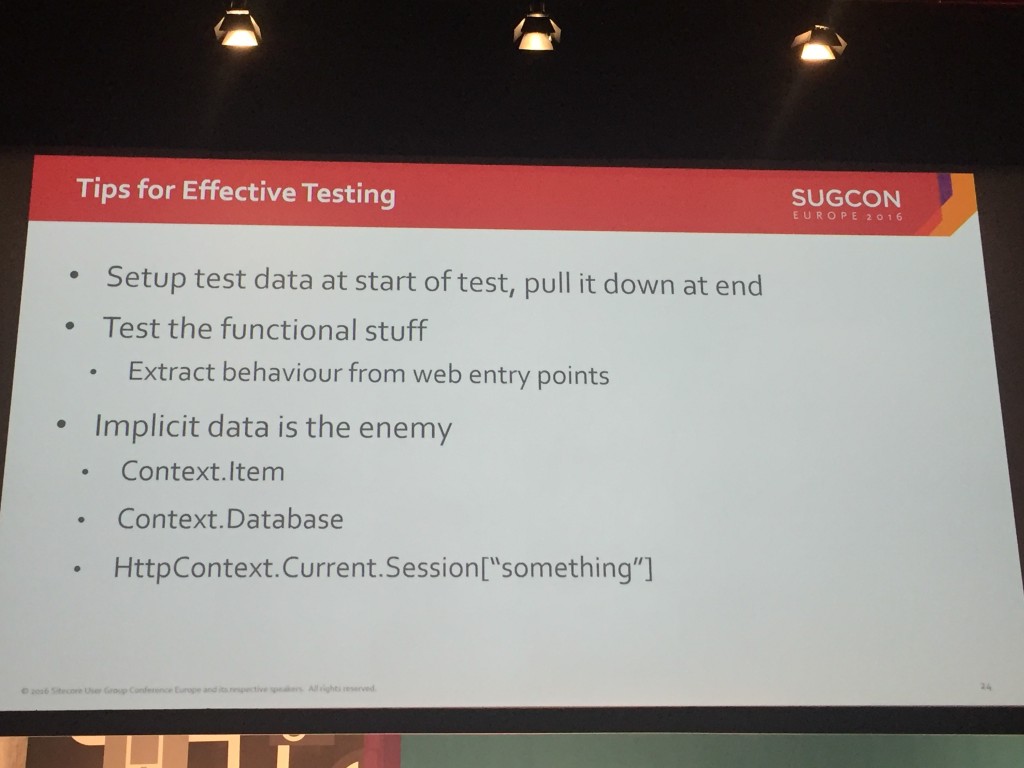
Ladies and gentlemen start your testing.

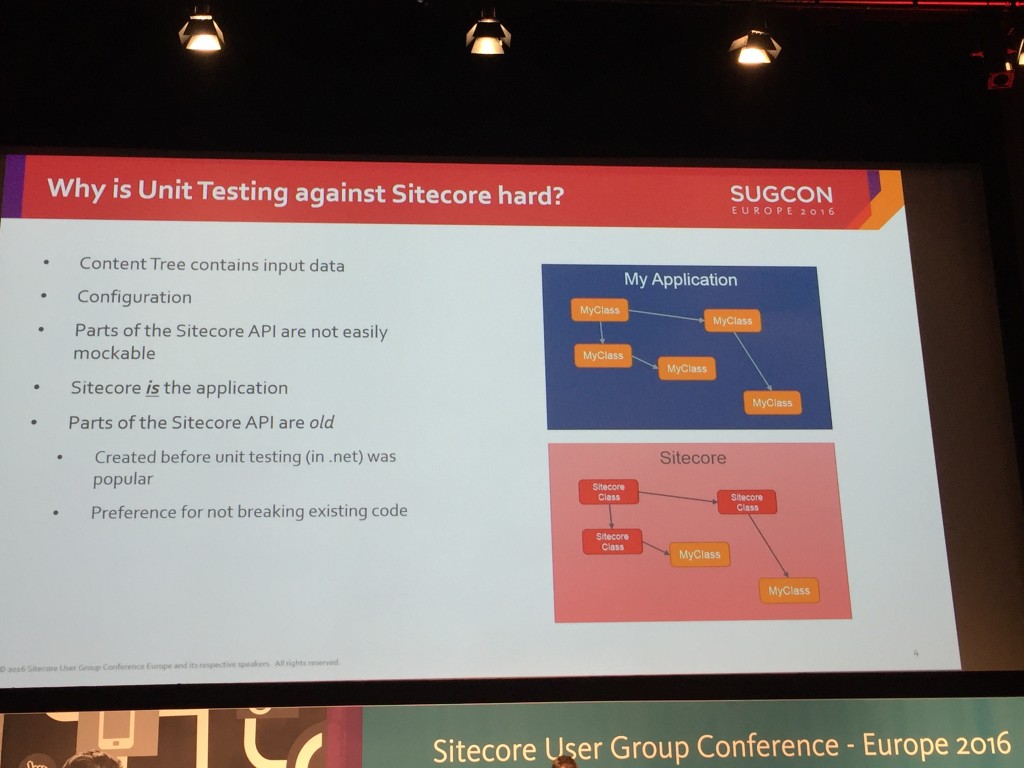
Testing in Sitecore can be notoriously difficult and for some Sitecore developers this means that unit and integration tests that involve the Sitecore context or items are sometimes skipped.  I was interested to see if Alastair had some other ways to implement testing and I wasn’t disappointed :-).

IMG_5844

Alastair Deneys ran us through 4 ways in which to Unit test with Sitecore. The first was an interesting one and was to essentially install Sitecore in your application and then run the tests from an asp.net web page test runner.

The 2nd and 3rd were to add a minimal or full Sitecore config files and the Sitecore dlls you need to your nunit test project and run It. This worked pretty well but as Alastair said, isn’t proper unit testing as it’s using real data.

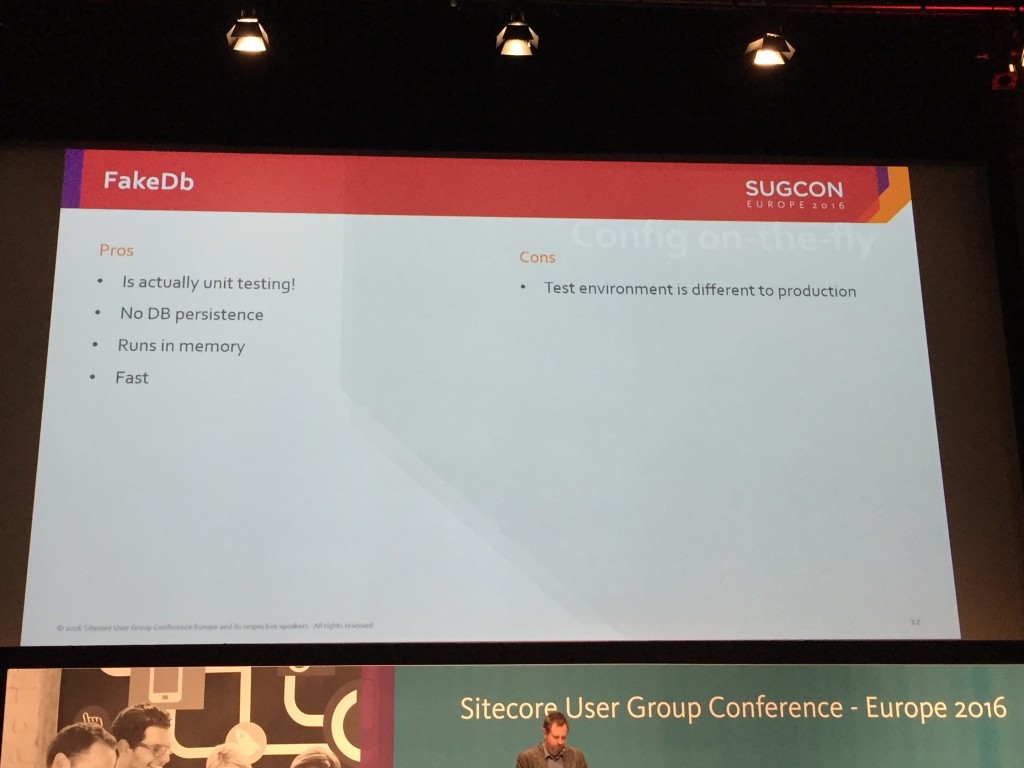
The 4th was to use FakeDb to mock the Sitecore items you need to run your tests. I’d heard about FakeDb before but not used it so it was nice to see an example of how this is done.

IMG_5855

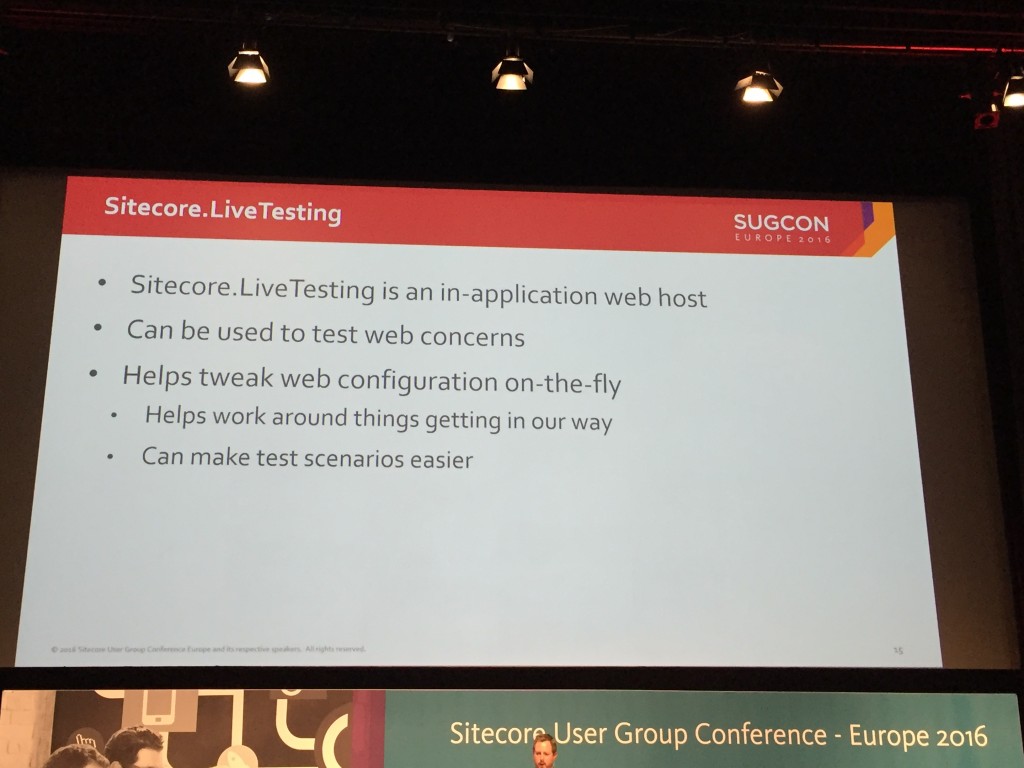
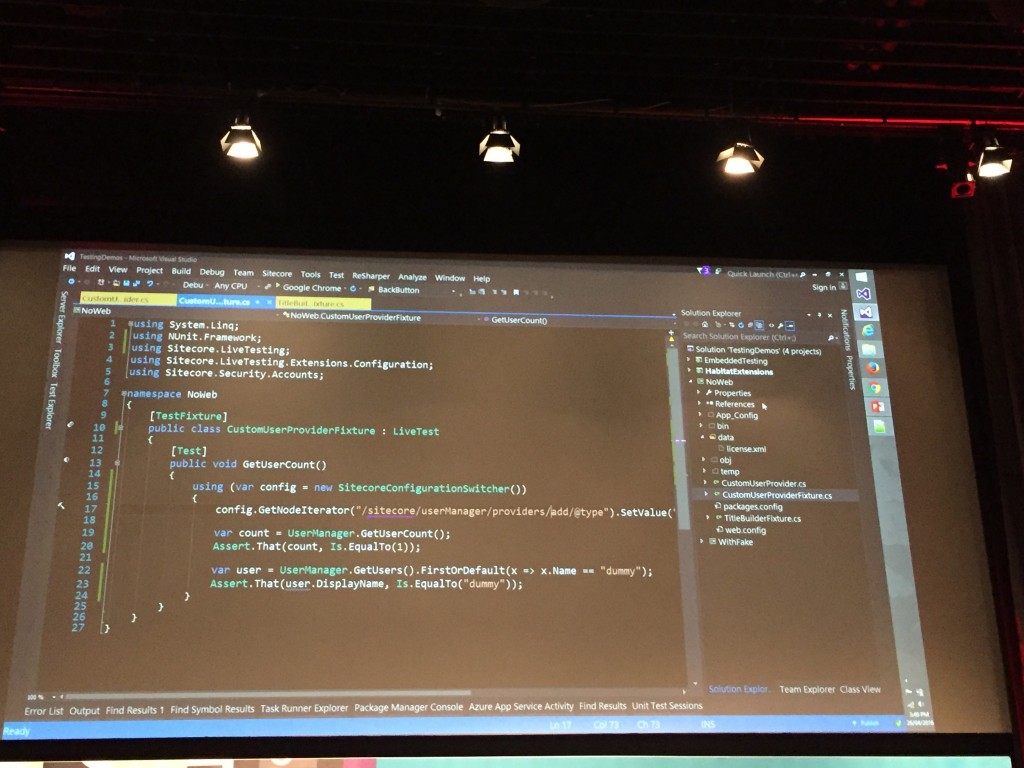
Alastair also showed us how Sitecore.LiveTesting can be used to spin up an instance of Sitecore in a container in the background to test against.

IMG_5856

IMG_5863

It was a bit slow but seemed really cool and definitely something I’m going to experiment with.

IMG_5868

The key message here was, whatever you do make sure you create tests and don’t get hung up on if they are real unit tests or actually integration tests.

Sadly it was now time to head to get our flight home so I missed out on the last talk of the day by Martina Welander on refactoring doc.sitecore.net, hopefully I can find it on Google Hangout.

SUGCON was a great experience and It has given me a whole lot of ideas and things to look into for current and future Sitecore projects. Thanks to the Sitecore Community and the sponsors for putting on the event.

My only regret is not having chance to chat to any of the MVPs who have been so helpful on Slack and on their blogs, but I’ll definitely be back next year so I’ll buy you a beer or two then instead.

Till next time.

IMG_5878